Sometimes, we need to stop all current assignments so that the records can be routed through a new workflow revision. A few articles on the web provide the instructions, but they look complex to me. The easiest approach I found is to create an automation script as in the following example, and then execute it via the OSLC API.
from psdi.server.MXServer import getMXServer as MXS

wfInstanceSet = MXS().getMboSet("WFINSTANCE", MXS().getSystemUserInfo())
wfInstanceSet.setWhere("ownertable = 'PO' AND active = 1")
wfInstanceSet.reset()

wfi = wfInstanceSet.moveFirst()

while wfi:
    wfi.stopWorkflow("Bulk closed by autoscript")

    wfi = wfInstanceSet.moveNext()

wfInstanceSet.save()
wfInstanceSet.close()
It is difficult to capture detailed error messages provided in the response body
In those cases, we can use the org.apache.http Java library, which is also included in Maximo out-of-the-box. Below are the instructions to create a basic HTTP end-point with this library:
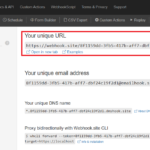
Step 1: Acquire a webhook.site mock url simply by visiting the site:
Step 2: Create an automation script (no launchpoint), use the source code below. Name the script as ZZENDPOINT2:
Step 3: Use the End Points application to create a new end point. The value is the name of the script above. (Note that the name is case-sensitive):
Step 4: As far as creating an endpoint. That’s about it. To test it, click on the Test button, enter some text in the Test Data input, then click on Test
If everything works correctly, Maximo should show a successful message, and in Webhook, you should receive the message sent by Maximo as shown below. (Note that, you’ll need to add Webhook’s certificate to Websphere’s truststore for Maximo to be able to send a message to this address).
Step 5: To test the ability to capture error details in the response’s body, we can Edit the mock response in Webhook as follows:
I created a simple Publish Channel and External System on the PO object, and set it to use this new Endpoint, then tested publishing a message by updating an existing PO, the error details are captured in Message Reprocessing app as follows:
When building integration in Maximo, using an inspection tool such as webhook.site to inspect the requests is extremely useful. It allows us to easily identify:
Whether Maximo published a message at all (to confirm Event Filter)
What is the data content it sends to external system (to confirm Data Mapping logic)
What are the values of some request headers (usually to confirm the authentication details are correct)
If you are an integration developer and haven’t used webhook.site, I encourage you to test it with Maximo. Spending 10 minutes now will save you countless hours of head scratching in the future.
However, in certain situations, this approach does not work. For example, a friend came to me recently for help with setting up an endpoint which uses Microsoft Entra’s OAUTH authentication. In this environment, the client has strict firewall and security settings. Means Maximo can only send requests to a few white-listed IP addresses. Using an online or locally installed inspection tool is not possible. We suspected Maximo did not send JD Edwards (the external system in this case) with a correct Authorization header but did not know how to confirm.
Solution
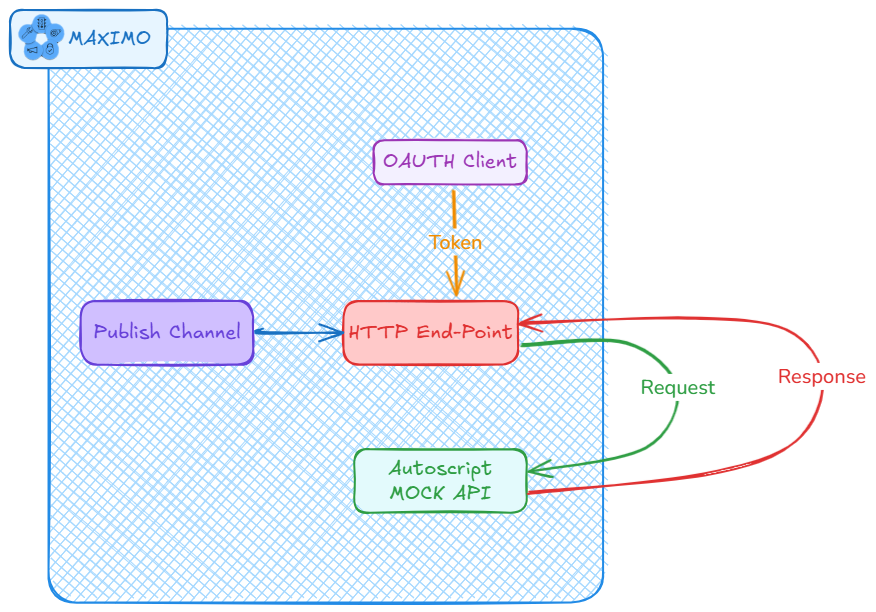
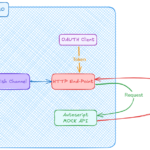
Automation Script can be used to build a fully functional web API. We can use it to capture the details of the request and write them to the system log or displaying it in the response. The request’s details are accessible in the autoscript via the following implicit variabbles:
request: exposes important methods such as request.getQueryParam(“parameter”) and request.getHeader(“header”) to retrieve values provided as a query parameter or header respectively. You can also access the UserInfo by calling request.getUserInfo().
requestBody: A string representation of the data submitted on request (for POST/PATCH/PUT)
httpMethod: whether this was a GET, POST, PUT
responseBody: a byte[] or String to return in the response. This is not required if you do not intend to return a response.
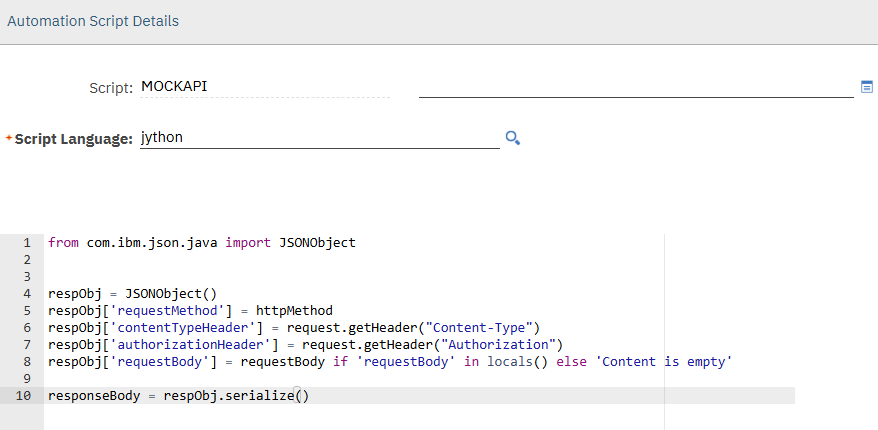
To provide an example, I setup Mock API by creating an automation script as follows:
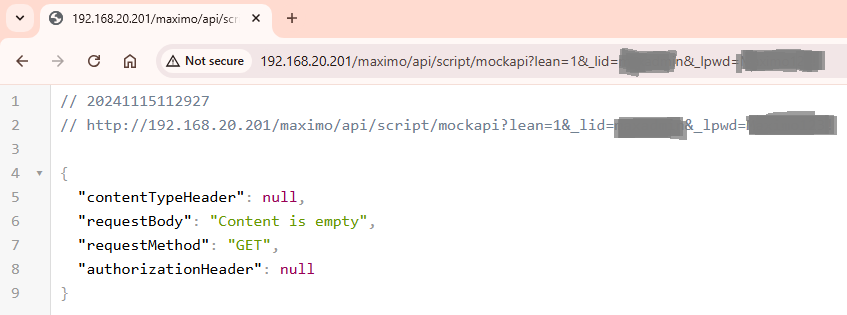
To confirm that it is working, I run the script by opening it in the browser and can see the details of browser’s request as follows:
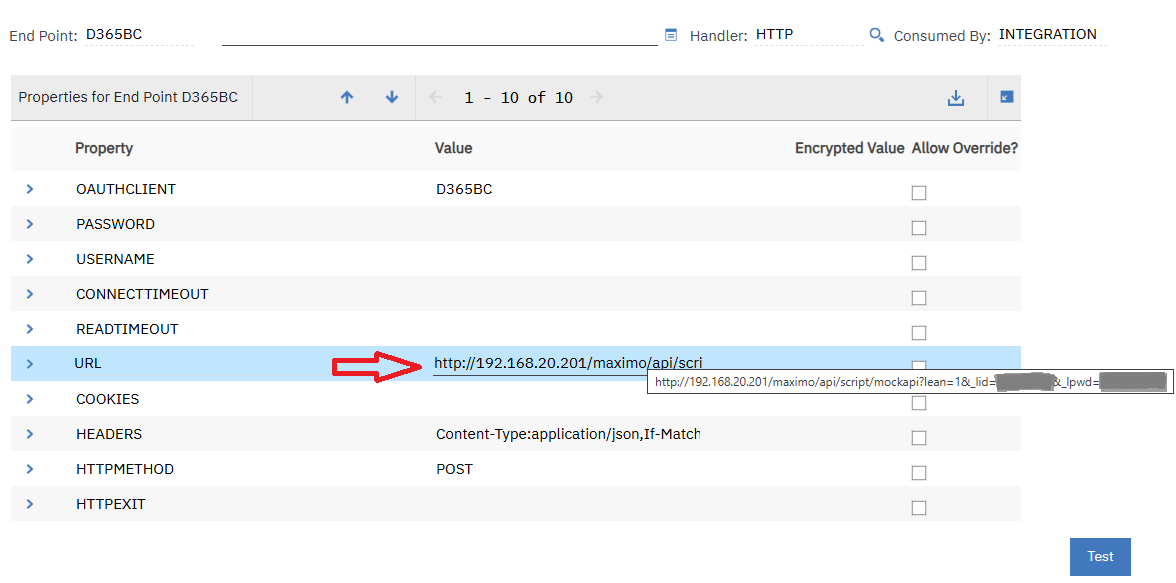
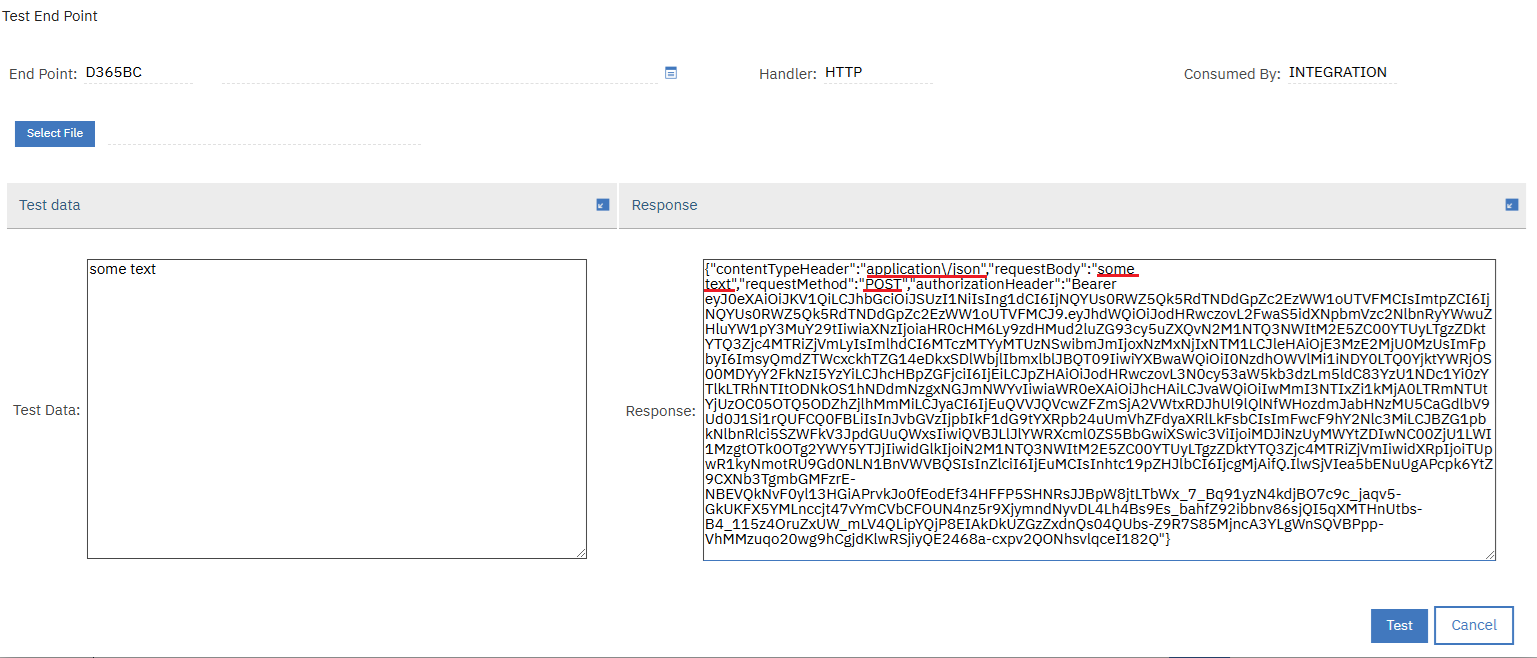
In this Maximo environment, I have an endpoint to Microsoft Dynamics 365 – Business Central. It uses Microsoft Entra OAUTH. If I want to inspect the requests to this endpoint, I need to change the URL to direct it to the MOCKAPI script as follows:
Note: Depending on the authentication settings in Maximo, we either have to pass the &_lid=xxx&_lpwd=yyy parameters in the URL, or set a MAXAUTH or APIKEY in the Headers field.
Now if I test the endpoint with some text data, it will give me a response with the details of the request as follows:
By using this method, in the investigation mentioned above, we were able to identify that Maximo sent JD Edwards the correct token in the Authorization header. However, because it required a few other parameters in the header which we forgot to put in, it still gave us a confusing “Unauthorised” error. After updating the header, the endpoint worked as expected.
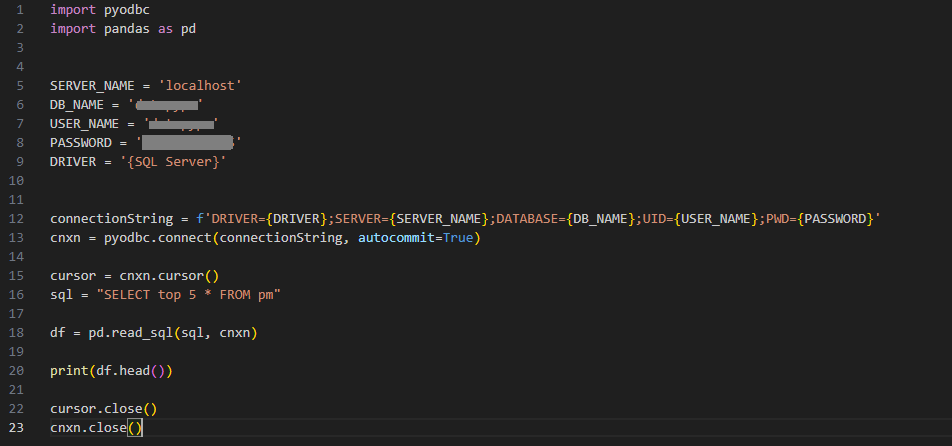
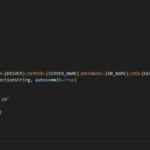
Just want to document a strange issue I had today. I have this small Python program that uses the pyodbc library to connect to an SQL Server database on my local machine. The code was working fine two weeks ago before I left it to work on a different project. Below is the simplified version of the code in which pyodbc is used to read data from SQL Server 2022:
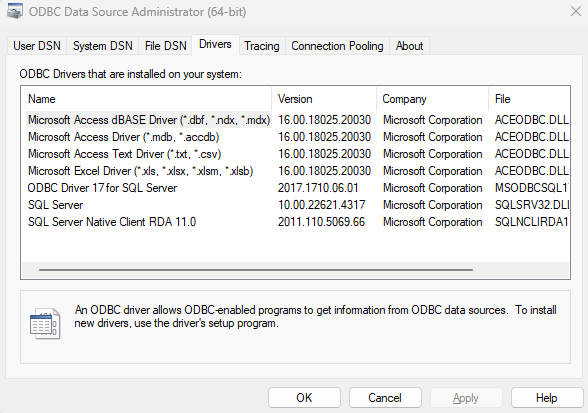
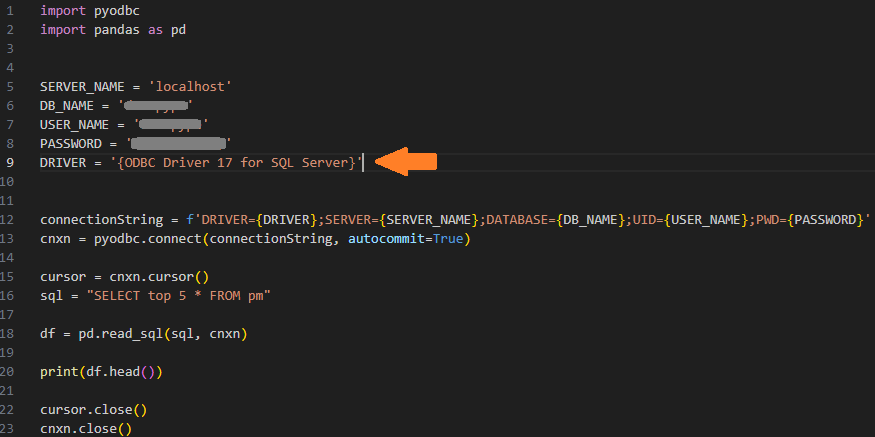
When I tried running it today, it did not work. I had the following error instead:
While it looks like a network issue, there has been no change to my laptop or home network. Looking up this error on the internet does not seem to give me any solution to the issue.
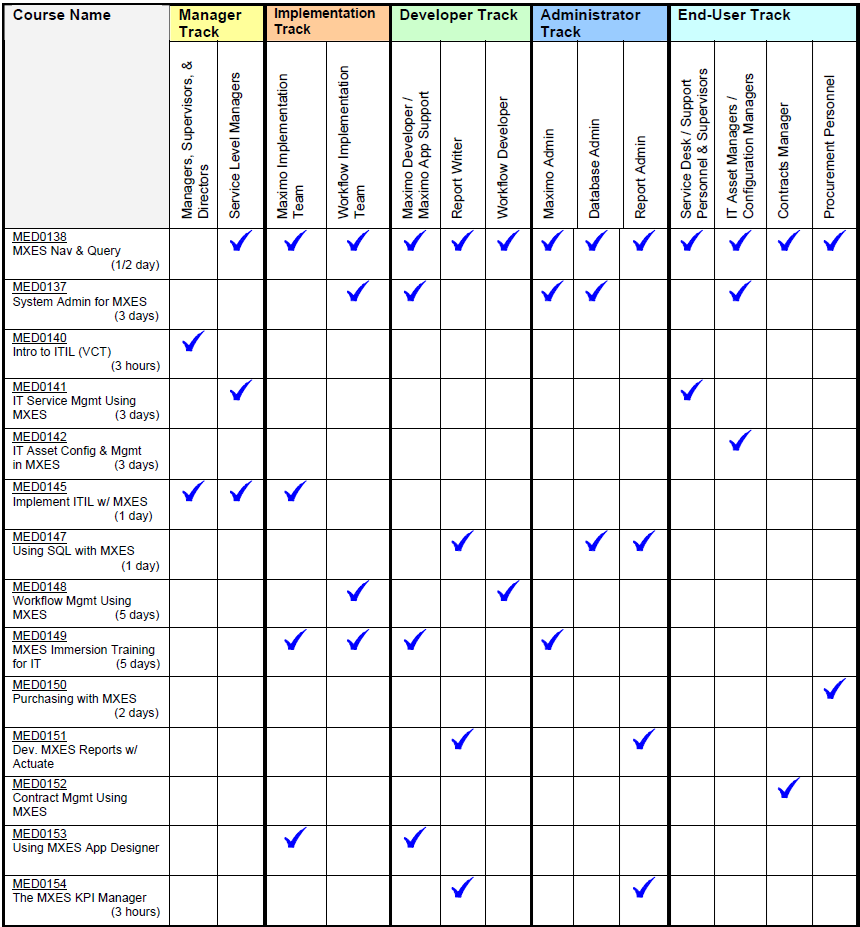
This is a list of old training books created by MRO before it was acquired by IBM. I used these to learn Maximo when I started with it. While these courses were designed for Maximo 7, the core processes remain the same in the newer versions. You can use this to learn Maximo if you can’t find a recent course elsewhere.
Immersion Training: this book should be the starting point for an absolute beginner to learn the basic Maximo applications and processes. It covers the following topics:
Setting up Organisation & Site structure
Creating Person and User records
Setting up Inventory items
Create Asset records
Setting up Job Plans, Preventive Maintenance, and generate PM Work Orders
Reactive Work Management process
Requisition and Reordering
System Administration Training: this book is for a beginner who wants to learn administration tasks and application configuration. It covers the following topics:
Users & Security Control
Report Administration
Database Configuration
Domains
Other configuration applications: Escalation, Bulletin Board, Escalations, and Communication Templates
Below are some other books that focus on certain specific topics:
Functional:
Inventory Management: covers Inventory management topics such as Item Master, Storeroom, Inventory Transactions, Reordering, and Item Kits
Procurement: covers the purchasing processes including setting up Companies, Contracts, Purchase Requisitions, Purchase Orders, Receipts, and Invoices.
Work Management: cover the work management processes including setting up Job Plans, Preventive Maintenance plans, generating Work Orders from PM, and schedule / dispatch / execute / complete Work Orders
Configuration:
Application Design: this book covers how to use the Application Designer to modify Maximo UI screens or create a new application
Workflow Management: how to use the Workflow Designer app to modify or create a new workflow in Maximo
Migration Manager: how to use Migration Manager to migrate configuration between Maximo environments
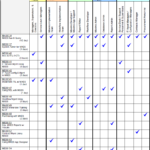
The matrix below shows the training tracks which provide some guidance on what kind of knowledge you need to acquire for each user role
Enterprise application integration needs to be fast and fault-tolerance. As a result, when it comes to integration with Maximo, we almost always opt for asynchronous, near real-time message delivery. This method of delivery has certain challenges which is not a big problem when using an external enterprise integration tool. There are dozens of these tools available on the market.
However, running an enterprise application integration system is expensive. Many smaller companies often opt for direct integration. Maximo Integration Framework offers an arsenal of tools to handle all kind of requirement. Yet, the framework is still lacking in two major areas:
Data mapping
Dynamic delivery
Previously, I have provided an example on how to use XSLT. In this article, I will discuss on how to address the dynamic delivery requirement.
Dynamic delivery with a custom automation script endpoint
When is dynamic delivery required?
In many cases, we need to build an integration interface with one or more of the following requirements:
Different URL for each Add/Update/Delete action: this is a common pattern for the REST API nowadays. For example, the ServiceNow API has 3 different URL formats to Add, Update, and Cancel a Service Order.
The target application needs an Internal ID for the Update request: this is also a common pattern. The Maximo OSLC REST API itself is an example.
The need for retrying and reprocessing failed deliveries: message delivery is expected to fail due to many external factors. Thus, this is a mandatory requirement for almost all integration interfaces.
In general, the logic to address the above requirement should be handled during delivery, not during publishing and transformation of the integration message.
Why using this approach?
When the external system requires an Internal ID for the Update action, one common strategy is to store the ID in the EXTERNALREFID field. For example, when a new PO is created, it is published to an external ERP system. Upon successful delivery, the receiving system responds with the Internal ID of the newly created record. We can store this value in the PO’s EXTERNALREFID field or a custom field. The next time when the PO needs to be published, if this field has a value, we know that the PO has already been created in ERP and thus, will send an Update request instead of a Create New request.
But this strategy often does not work well with asynchronous integration. For example, if the first request to create a new PO takes a while to process due to the external system being busy, a subsequent update to the PO will send another Create New PO request, resulting in duplicated POs in the target system.
However, if we handle the logic to determine whether to send a Create New or Update during delivery, this should not be an issue. In the case the first request failed, and the second request will be determined as a Create New. In the case both messages failed, and later they are reprocessed successfully, the first one that reaches ERP will be determined as a Create New, and the second one will be delivered as an Update.
Two key benefits of this approach are:
No need for manual intervention
Can use continuousoutbound queue instead of sequential queue
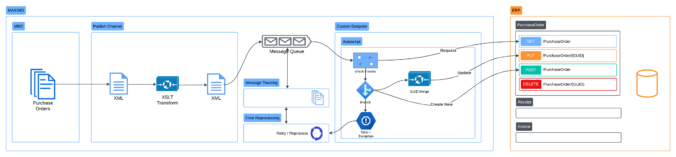
Real-world Implementation
Over the last 2-3 years, I have built a few interfaces using this approach. So far, they have been working well. The latest one was an interface between Maximo and Myob Greentree ERP. In this case, Maximo handles the procurement process and Greentree handles the payable process. The functionality of Greentree API is somewhat limited. It does not support Sync operation and requires Internal ID for both the PO and the POLINE records. To address this requirement, the interface is implemented with the following key points:
Delivery is handled by an automation script endpoint:
On delivery, the endpoint will query Greentree to identify the Internal ID and status of the PO and PO Lines. If the PO already exists, it will determine to Update or Add New PO lines depending on the status of each line.
The original payload is manipulated during delivery to match with the current status of the PO in Greentree. Which means if it fails, the delivery will retry and come-up with a new payload to match with the new status of the record in Greentree at that point of time.
An autoscript crontask is added to send error alerts to the user in Excel format. But it will only send email in the case there is a least one error. The email is delivered directly to the user most of the errors come from missing or incorrect GL Account.
Automation Script example
To implement the requirement above, we can create a custom endpoint with automation script. The endpoint can be associated with the publish channel and external system like other standard endpoints. That means the interface is fully compatible with other MIF functionalities including:
Message Queues
Message Tracking
Message Reprocessing
Below is an example piece of python code for the end point:
The basic example above does a similar job like a standard HTTP endpoint:
The published message is passed to the script in the implicit variable requestData
Any failure/exception at any line of the code will be equal to a failed delivery:
The message is put back to the error queue .
Error is captured and can be seen in the Message Reprocessing application.
However, by doing this, we have full control of what we want to happen during delivery such as:
Query external system to determine if a record already exists, and if yes, get the Internal ID
Raise an Exception to tell Maximo that the delivery has failed. This can be quite handy in given scenarios such as when an external system rejects a message but it still responses with a HTTP 200 code, and only provides an error message inside the XML response body.
Below is an example piece of code which does the following:
Query an external system to identify if a PO record exists
If the record exists, update the XML payload with Internal ID before delivering it to the system as an Update request instead of a Create.
I am a freelance Maximo consultant based in Melbourne. If you enjoy reading my blog, please connect with me on LinkedIn to get updates on new posts. If you or your company need any professional assistance, please leave me a message, I'll call you back.