Over the last 5 or 6 years, I haven’t had to write any new custom Java classes. Most requirements today can be done without Java coding. Despite that, some logic is hard to achieve using automation script. In this post, I’ll talk about using the NOSETVALUE access modifier to deal with one of such scenarios.
According to the MboConstants API document, the NOSETVALUE is “Similar to the READONLY, except that no exception is thrown and the setValue() calls are suppressed”. This means when a field has the NOSETVALUE flag, it is not editable, but it also doesn’t throw an error if other logic tries to update it.
Requirement
In many places, when a field is updated, the Maximo will update some other fields. We want to retain the standard logic except for a certain field we don’t want it to overwrite. Below are two examples I have come across:
With the HSE add-on, when a user updates the priority of a work order, the target dates are updated according to the prioritization matrix. The client does not want the target dates to be overwritten.
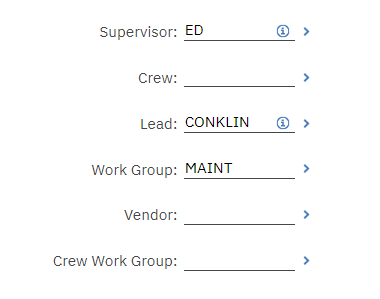
When assigning a workgroup to a work order, Maximo automatically populates the Lead field. However, the client wants this mandatory field to be left blank to force the user to specify the correct person.
Solution
For the requirement above, in Java, we can store the original value of the affected field in a variable, call the super.action() function to run the out-of-the-box Maximo logic, then set the field with the original value again.
However, with automation script, we do not have such control. To prevent Maximo from overwriting a field, we can switch on the NOSETVALUE flag on the affected field before the execution of the action method of the trigger field. After that, we need to switch it off to make the field editable again.
The execution order of attribute events is as follows:
Java – validate
Autoscript – validate
Java – action
Autoscript – action
The out-of-the-box logic to update any fields is executed in step #3. Thus, with automation script, we can switch on the NOSETVALUE flag at step #2, and then release it at step #4.
Implementation
To give an example, if we want to prevent Maximo from overwriting the Lead field when specifying the WORK GROUP (persongroup) field, we can create an automation script below:
Script Name: WO_PERSONGROUP
Launch Point 1:
Launch Point: WORKGROUP_VALIDATE
Object: WORKORDER
Attribute: PERSONGROUP
Events: Validate
Launch Point 2:
Launch Point: WORKGROUP_ACTION
Object: WORKORDER
Attribute: PERSONGROUP
Events: Action
Code:
Since the script is very simple, I combined two launch points into one script. This means, when the PERSONGROUP field is updated, it will be called twice. The first execution triggered by the Validate event will lock the LEAD field. After the out-of-the-box Java logic is executed, the second execution triggered by the Action event will release the lock to make the field editable again.
Automation Script is powerful for implementing direct integration between Maximo and an external application. One main challenge of direct integration is transforming the XML message produced by Maximo into the format expected by the external system. For a simple interface, we can write scripts to construct a JSON or an XML document from scratch. However, with a complex interface where the message contains a few dozen fields, it is not ideal to handle all of the data transformation logic within the script. In such cases, we can use the standard XSLT transformation capability in Maximo instead.
The advantage of this approach is two-fold:
It separates the data transformation logic from the integration flow logic.
By using the standard integration framework, it is fully compatible with other functionalities such as the integration queues, message tracking, and message reprocessing capabilities.
The capability to use XSLT has always been a standard feature in Maximo for a long time. However, it is not widely used. It is because XSLT by itself is a language, and it takes some time to learn. To address this gap, I will provide an example below, in this post. It serves as a starting point. Once you have it running, modifying the XSLT file to map other objects is straightforward.
Requirement: transform a standard Maximo’s PO XML message to another XML message but in the format expected by an external system.
Implement: to make it easier for you to test, I used a standard Maximo demo instance.
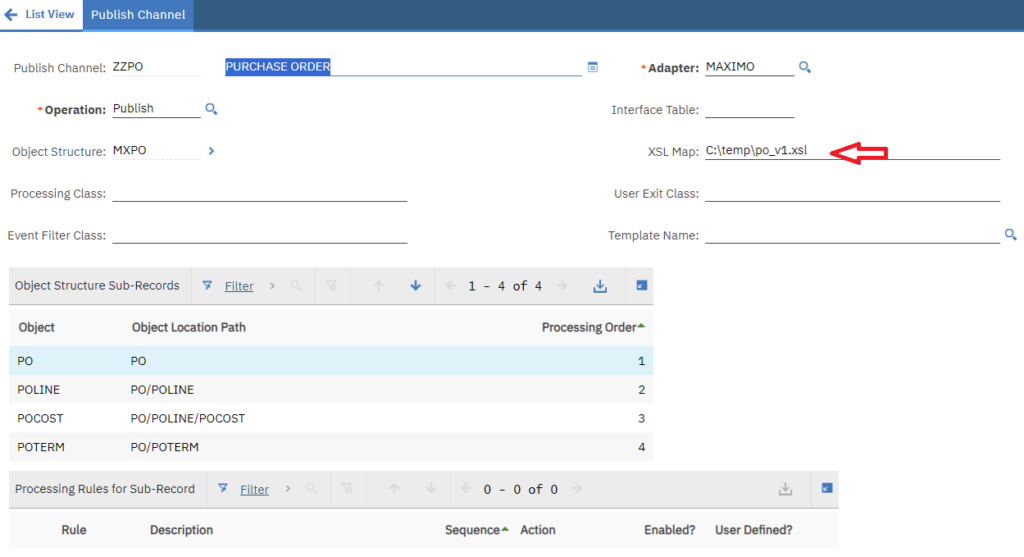
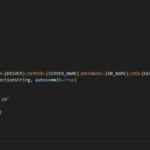
Step 1: Create a po_v1.xsl file with the XSLT code below. Put it in a local folder on the Maximo server, for example, C:\Temp\po_v1.xsl
Step 2: Duplicate the MXPOInterface publish channel to create a new one named ZZPO. In the XSL Map field, point to the path of the XSLT file created in the previous step. Enable Event Listener on the publish channel
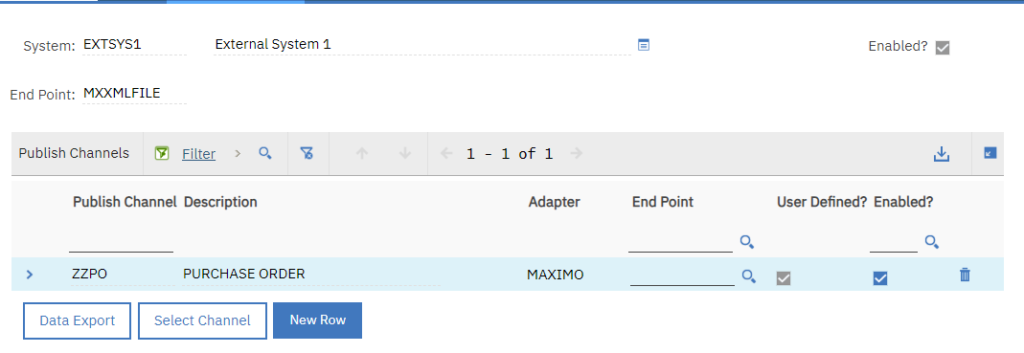
Step 3: Add the ZZPO publish channel to the external system EXTSYS1. Tick on the Enable? check box of this record.
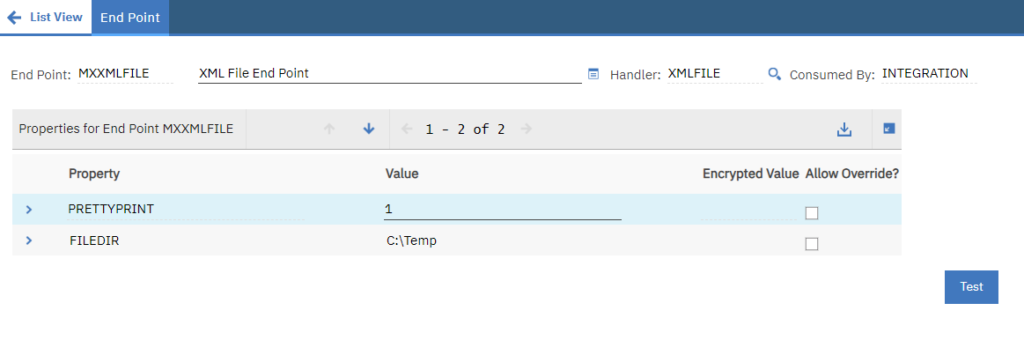
Step 4: For the MXXMLFILE End Point which is used by the EXTSYS1 external system, set the FILEDIR field to point to a local folder, e.g. C:\TEMP
Now, whenever a PO is updated, instead of producing a standard XML message, it produces a transformed XML message as shown below:
Standard Maximo PO Message:
Transformed output XML message:
Note: It appears to me the XSL code is cached in Maximo memory. To avoid having to restart Maximo whenever I made some changes to the XSLT file, I renamed the file to a new version. It forces Maximo to refresh the XSL code when the publish channel is invoked.
Highlighting work orders or service requests with color based on their priority and due date is a common requirement. While it is easy to implement this in the applications, it is harder to achieve with Start Center result sets as the functionality is quite limited.
I have seen this question pop up a few times in various forums but there hasn’t been a detailed instruction posted on the Internet. Hopefully, this post can provide enough details for the non-technical consultants to implement this for their clients.
I will demonstrate the steps to implement this with a simple requirement. A customer wants to display a list of Service Requests and highlight them in color as follows:
Priority 1 – Urgent: if the age of the SR is less than 30 minutes, display it as Green. If the age is less than 2 hours, display it as Orange. And if the age is higher than 2 hours, display it as Red.
Priority 2 – High: Green for less than 2 hours, Orange for less than 8 hours, and Red for more than 8 hours
Medium/Low: Green for less than 1 day, Orange for less than 3 days, and Red for more than 3 days
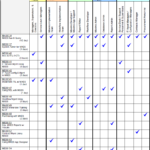
The functionality around color coding for Start Center Result Set is quite limited:
The expression is limited to a few simple operators such as Less Than, Equal, and Greater Than. And there is no option to use Conditional Expression.
The condition must be based on a field displayed on the result set
To workaround this limitation, we can use a non-persistent field, for which, we can use Formula or write an automation script to initialize a value based on a complex logic. The steps are as follows:
Step 1: Use the Database Configuration app, add a new field to the SR object, then Run Apply Configuration Changes
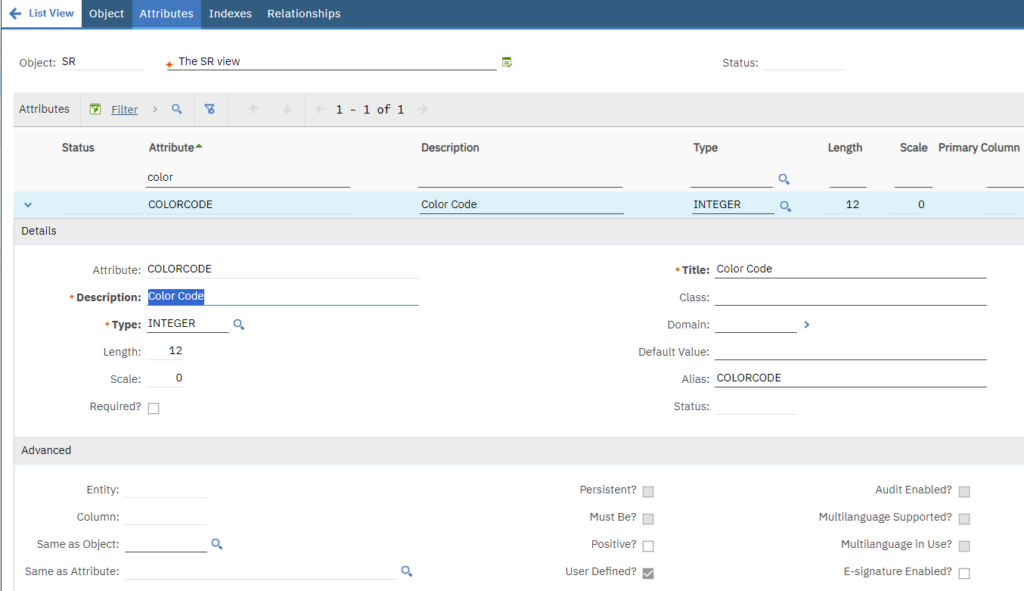
Attribute Name: COLORCODE
Data Type: Integer
Persistent?: Unchecked
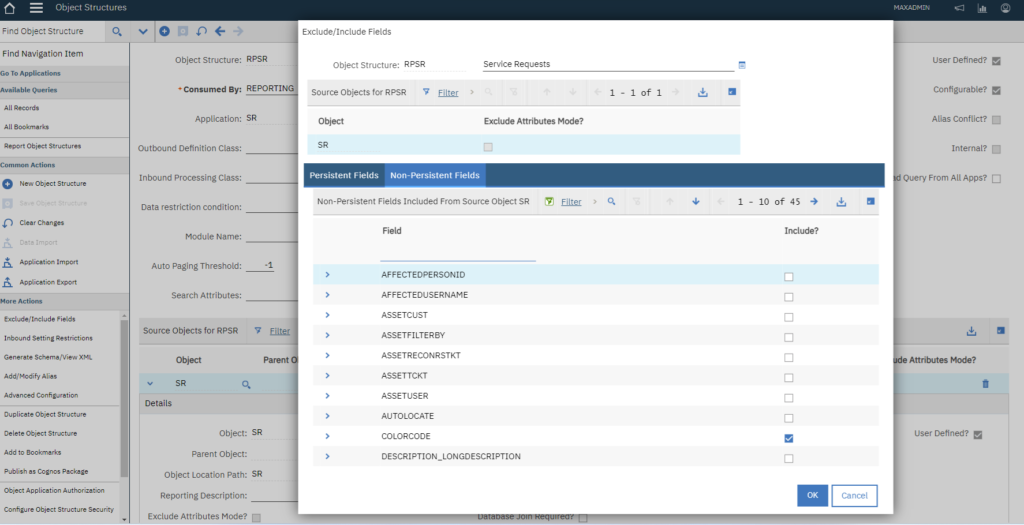
Step 2: Use the Object Structures app, create a new object structure:
Object Structure: RPSR
Consumed By: REPORTING
Source Objects: add the SR
Use Exclude/Include Fields action: include the COLORCODE non-persistent field.
Step 3: Use the Automation Scripts app, create a new Script with Attribute Launch Point:
Launch Point: COLORCODE
Object: SR
Attribute: COLORCODE
Events: Initialize Value
Script Name: SR_COLORCODE_INIT
Language: Python
Source:
Step 4: Edit the Start Center template, add a Result Set to the Start Center, then edit it:
Application: SR
Query: All Service Requests (or select any Saved Query you want to use)
In the Object List, ensure to select Object Structure created in the previous step
Add the fields you want to display. In this case, I added Service Request, Summary, Reported By, Reported Date, Reported Priority, Color Code. Note that the new non-persistent field Color Code must be added
In the Color Options tab, set up the 3 color options as depicted in the image below.
If everything is set up correctly, the Start Center Result Set should display values in the Color Code column, and the records should be highlighted in the right colors
Troubleshooting:
If the Color Code field does not display a value, need to check the automation script which is responsible for initializing the value for the field
When adding fields to the Result Set, if the Color Code field is not there, it is because the custom object structure is not selected. By default, the Result Set will always have a “Service Requests” item in the object list, even if there is no Object Structure of type REPORTING created. If you have multiple object structures for the SR object, you can give the object structure a specific description to easily identify it.
After deploying the Start Center to production, there could be various issues that prevent it from displaying properly, please refer to my previous post for more details on how to troubleshoot it.
A client recently asked me for a solution for importing fuel consumption data. Each day, their operators would refuel about two hundred cranes and vehicles. They enter the data in an Excel file hosted on SharePoint. The finance team has to manually key the data into Maximo from these files. The process takes a few hours each week. The client asked if we could build some integration or custom app that can automate the process.
After looking at various more complex options, we ended up using Maximo’s standard import function. The accountants have to copy and paste the data from Excel to a defined template and then import it into Maximo. The time it takes was reduced to a few minutes. Everyone is happy. The Maximo administrator is happy because this is a maintenance-free solution. The accountants are obviously happy as this helps with one of their most tedious tasks. Neither the finance team leader nor the Maximo administrator were aware of this standard capability. They started discussing applying it to applications like Purchase Orders and Invoices. From a few other recent conversations, I realised many Maximo users are not aware of some basic but useful features and tools. This post hopefully will help close some of this gap.
Import/Export function
We can upload/download almost anything using the standard Import and Export functions. They are not enabled by default in most applications as they require some configuration. As such, most Maximo users are not aware of this. In the cases where the Import/Export feature is being used, the users often don’t know how flexible this can be configured to address complex requirements. We can even customise the inbound/outbound processing rules to perform data transformation.
As an example, for the above scenario, I set up a template that has almost the exact columns as the current Excel data file the operators are using. This allows the accountants to copy/paste the data from the Excel file to the import template in just a few clicks.
For more details about this function, you can refer to the video below from Starboard Consulting:
Default Insert Fields
This is the feature I love the most in Maximo. Unfortunately, I found it is not used in most companies I had the chance to work with. Earlier in my career, when I did a lot of greenfield implementations, this was the first thing I talked about when discussing screen design. It is so useful that it helped minimise a lot of resistance from the procurement and logistics users when Maximo was introduced to them. When creating a Purchase Requisition or issuing material, the data fields are usually repetitive.
For example, in a material issue transaction, the lines usually have the same charge details like work order, asset, and GL account. By putting these details in the default insert fields, the user will only have to enter the item number and quantity for each line. You can refer to the short demo below to see how it works:
“Stupid” Smart Fill / Type-Ahead / Asynchronous
In Maximo, there are various features we can tweak to increase data entry speed. Some of them are:
Smart-Fill: for a look-up field, such as Item Number, if you type BEAR, and there is only one item that matches the first few characters, such as BEARING1001, it will fill the whole value for you. However, the issue is when you type an exact item number, if there is more than one option that partially matches the word, it will show a magnifying button, forcing the user to click and select. This means the user has to move his/her hand between the keyboard and the mouse. By turning “Smart Fill” off on a field, it accepts the exact value you entered without questioning. I once helped turn this off on the Bin Number field for the Inventory Issue/Transfer screens. It only took a minute to make the change, but it made the user “exceedingly happy”. That exact word she used when giving feedback to my boss. Below is a quick demo of the difference when turning “Smart Fill” off:
Type-Ahead: after typing a few characters, Maximo will show a list of available options for you to pick from. This needs to be configured to work.
Asynchronous Data Validation: after updating a field, the user can move and update the next field instantly without having to wait for the server to validate the data. However, the validation is almost instantaneous in most cases, and there is no benefit from this feature. On the other hand, after entering an invalid value, the user has to update another field to see the error message. This is actually can be counterproductive and annoying. The key takeaway here is that if you don’t like this behaviour, we can easily turn it off locally for certain fields, or for the whole system.
Bulk Apply Change
Many good applications provide the user with the capability to bulk-apply changes to multiple records. Unfortunately, Maximo doesn’t provide this as a standard feature. The good news is it’s easy to implement this bulk-apply function to the List screen. In the past, this required some Java customization. In newer versions, we can set it up with Automation Script. Below is an example of how it can be implemented to mass update work order scheduling details. This is probably the most common requirement for bulk updates in Maximo. I built this to demonstrate this point which took me less than 30 minutes by following this excellent tutorial.
MXLoader
MXLoader is a data upload/downloading tool written by Bruno Portaluri. It runs on top of Excel and is free to use. In case you don’t know what it is, below is a short introduction video. The only complaint I have about this tool is that it is too powerful. With MXLoader, we can update almost anything in Maximo. This can be a concern in terms of data security and integrity. Since it’s too easy and fast to mass update data, the damage is multiplied when the user makes a mistake. Other than that, for data entry, nothing beats the efficiency of feeding data directly from Excel to Maximo.
Conclusion
This post does not introduce anything new. My goal is to remind you that if you are a Maximo user who has to do a lot of data entry, speak to your Maximo support people. There are simple tricks they could do to improve your experience. If you think data entry in Maximo is a pain in the neck and they don’t have an answer, shout at them, bully them, or threaten to fire them. People often find creative solutions under pressure. Cutting down a few clicks doesn’t sound like much, but if you have to enter a few hundred lines of data, it can make a big difference. If you have any other data entry problem that can’t be addressed by the tricks mentioned above, please share in the comments. I will see what else can be done to address it.
Maximo has an Email Listener and an Email Interaction application. I have seen the Email Listener being used quite effectively by some clients despite having some annoying bugs that require fixes using custom Java code. I haven’t seen the Email Interaction app used in a real production environment. Recently, I attempted to use the two applications without success. I ended up writing a simple email listener using Automation Script instead. This post outlines the detailed steps here in case someone will need it in the future.
Requirement:
A major port uses workflow for their purchase requisition approval. The first-level approvers are first-line supervisors who often work in the field and do not have access to a computer most of the time. This causes some delays in the approval process. They asked if they could reply to an email from their mobile phones to approve the workflow assignment instead.
Analysis:
To address this requirement, my first solution was to include two hyperlinks at the end of the workflow assignment emails. In the client’s current workflow, when a new PR is submitted to a supervisor, he already gets an email notification from Maximo. We can add at the end of this email an Approve and a Reject link which will trigger the respective action. However, this approach requires the user to enter a username and password to authenticate for Maximo to work. While we can hard-code the API key in the hyperlink, or remove the authentication requirement, it is unacceptable for security reasons.
My next solution was using the Email Interaction and Email Listener application. I followed this instruction provided by IBM. The article is quite detailed, however, it misses a few key pieces of information for which, I had to decompile the code to figure out. Despite that, after spending 8 hours, I couldn’t get it to work for this simple scenario. There were two issues:
Email Interaction didn’t seem to populate the record ID correctly
Email Listener cron gave me a NullPointerException error without any other intelligence to troubleshoot.
It looked like I needed to debug and write some Java custom code to address those issues and it will likely take another day at least. I decided to write a simple email listener instead. Below is the solution that I came up with.
Solution:
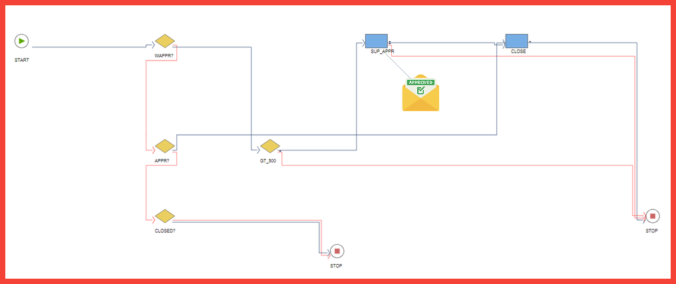
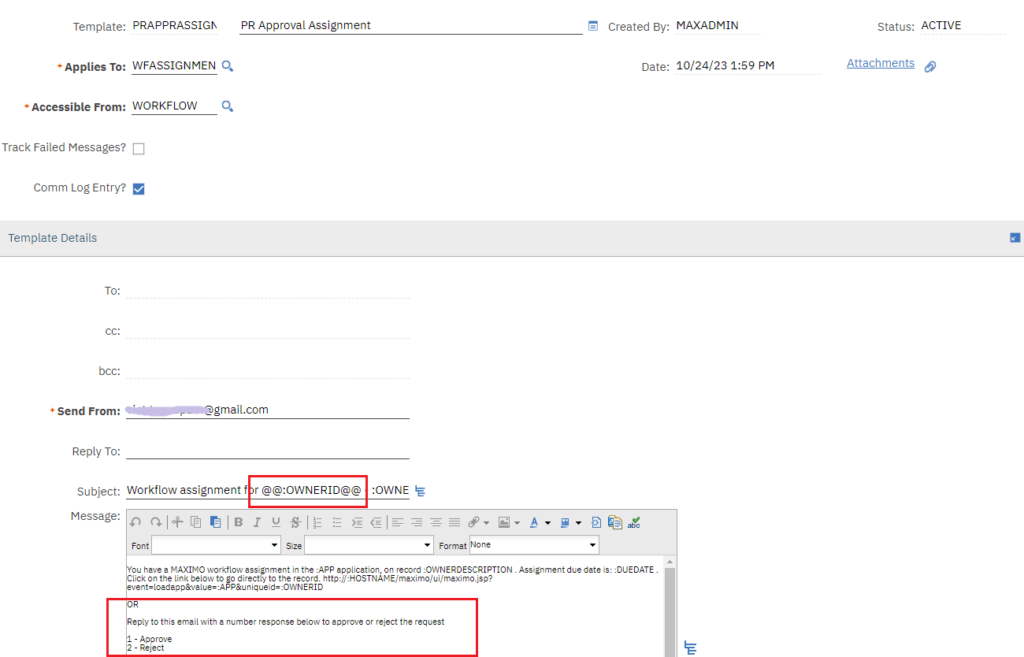
Note: For this example,I used the standard Maximo Demo instance. It already has a simple approval workflow named “PRSTATUS”
First, I duplicated the standard WFASSIGN communication template to create a new template and named it PRAPPRASSIGN. I added the @@:OWNERID@@ placeholder to the email subject and added some additional instructions at the end of the email.
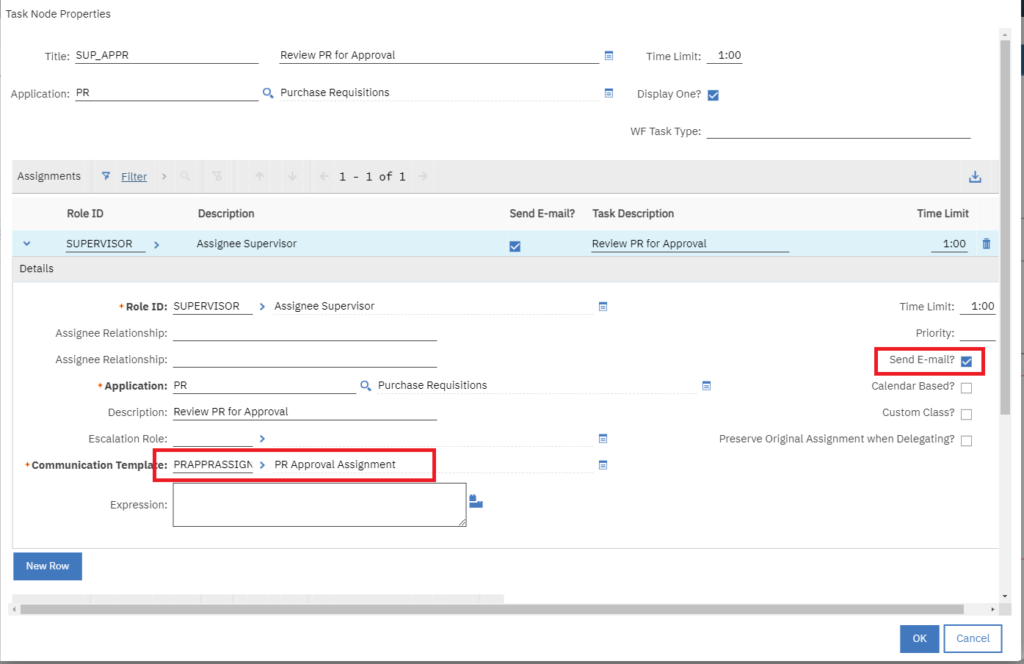
For the PRSTATUS workflow, I edited the SUP_APPR assignment node to enable sending emails when new assignments are created and set it to use the communication template created in the previous step.
As you can see, there is no crazy configuration here. The workflow will work exactly like before. The only change is the email sent out will also have a Record ID in the subject. When the user replies to the email, Maximo will use the ID to identify which PR record to approve.
The next step is to build a simple email listener. For testing, I created a new Gmail account and enabled App Password so it can be accessed from Maximo.
I created an Automation Script with the source code below and set up a cron task to execute it every 5 minutes. This simple script uses Java mail client library to access Gmail, and finds any unread emails that have an ID in the subject. If it can match the ID with a PR record that has an active WF assignment, it will approve or reject the request if the reply is 1 or 2 respectively. It also does a simple check to make sure the sender’s email matches the assignee’s email before routing the workflow.
Usage:
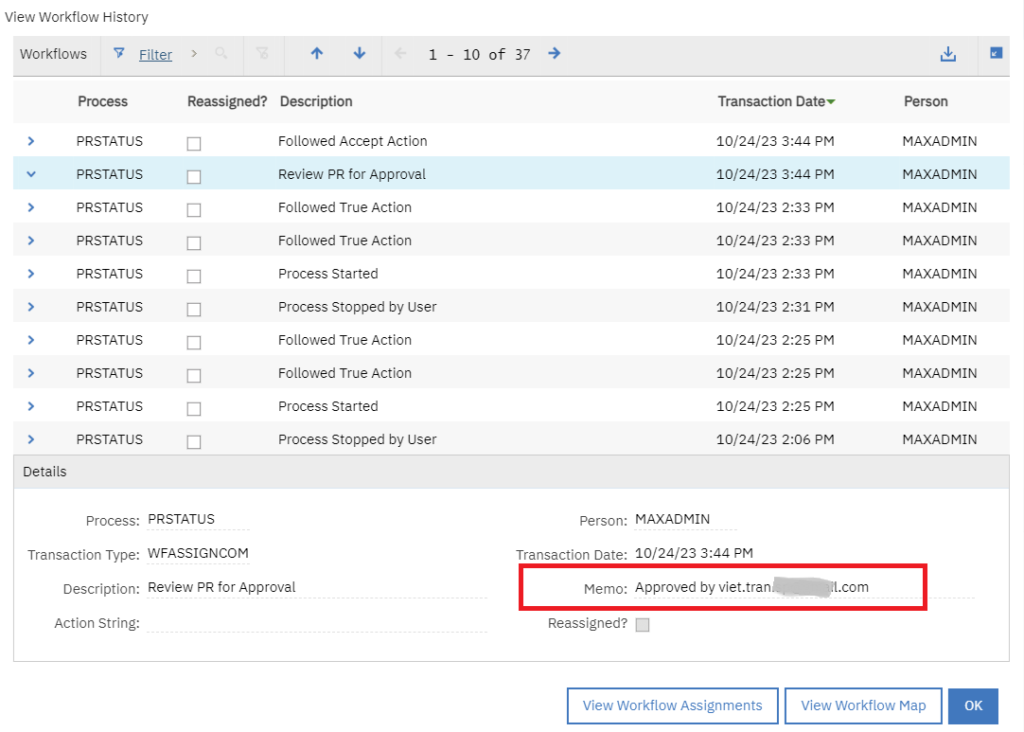
To test this, I set account Wilson to be Maxadmin’s supervisor and set Wilson’s email to be my own email. Then, with the Maxadmin account, I picked a PR in the WAPPR status and routed it through the workflow. The record was assigned to Wilson, and a notification was sent to my email inbox. To approve the assignment, I replied “1”. After a few minutes, Maximo Crontask will kick off the Automation Script which reads the reply and approves the workflow. As mentioned earlier, we can still use account Wilson to route and approve the workflow in Maximo. There is no change to the process.
To illustrate the approach, I will use an example of an interface between Maximo and an application on Azure via the Azure Event Hubs. The API requires a SAS token to be provided in the request’s header.
First, we will create an automation script end-point by following this tutorial by Alex at A3J Group:
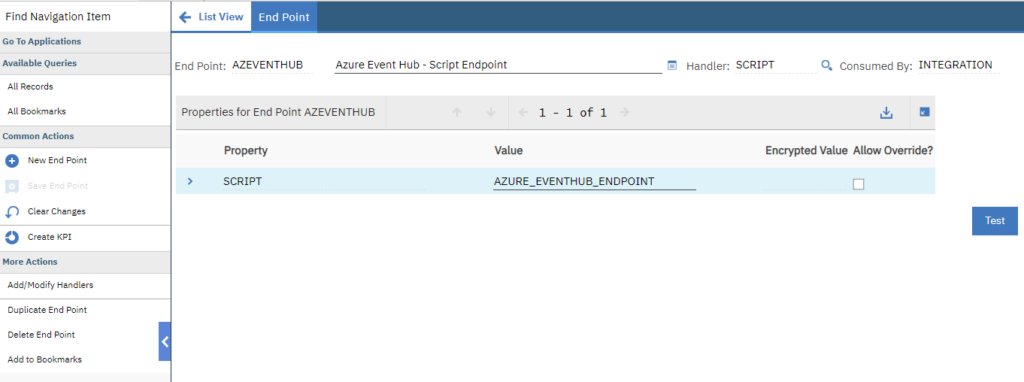
Create an end-point:
Name: AZEVENTHUB
Handler: SCRIPT
Script: AZURE_EVENTHUB_ENDPOINT
Note: As explained by Alex, the SCRIPT handler is available OOTB from 7.6.1.1. From versions between 7.6.0.8 and 7.6.1.1, we’ll have to manually create a handler that utilises the java class: com.ibm.tivoli.maximo.script.ScriptRouterHandler
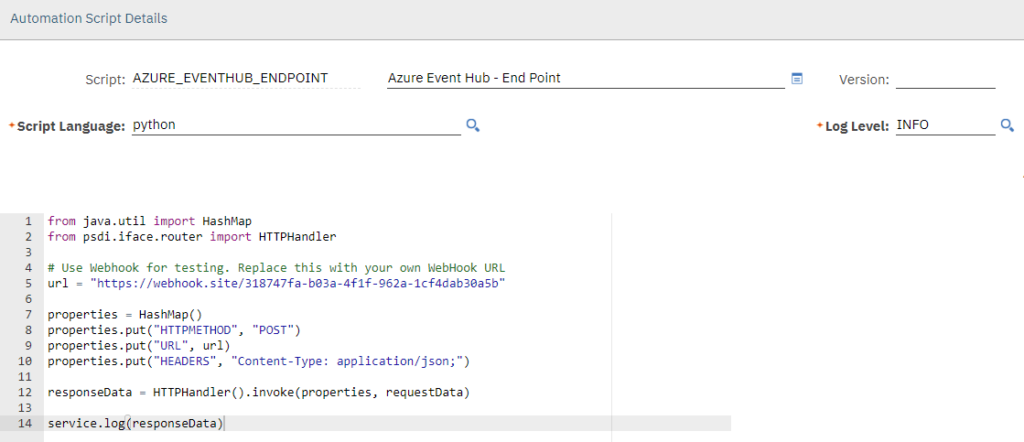
Create an automation script:
Name: AZURE_EVENTHUB_ENDPOINT
Language: python
Source Code:
This is a bare minimum example. When the publish channel sends data to this end-point. It will call the automation script, which sets a Content-Type header and sends the payload (implicit variable requestData) by invoking an HTTP Handler.
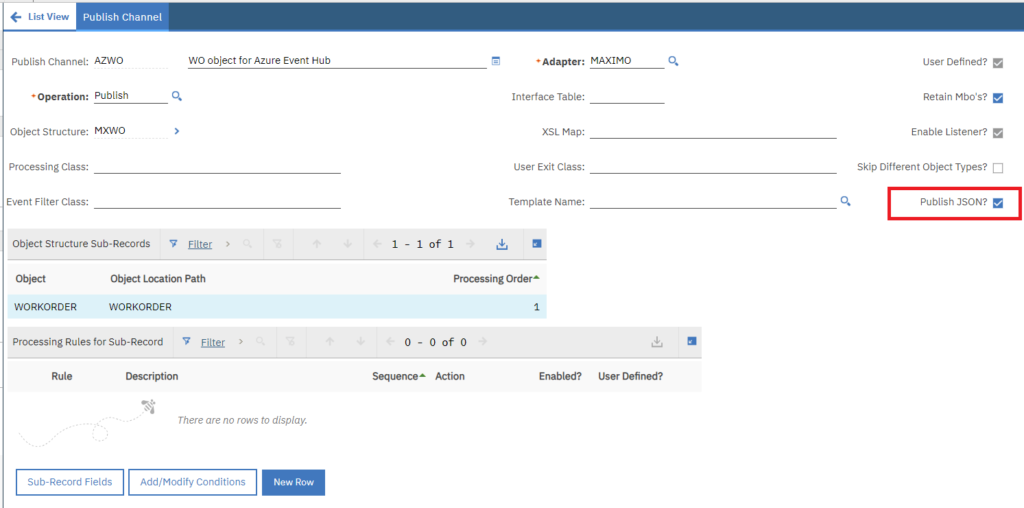
In this case, we’ll use Webhook.site to test my request. To do it, we’ll quickly set up a publish channel named AZWO from the standard MXWO object structure as follows:
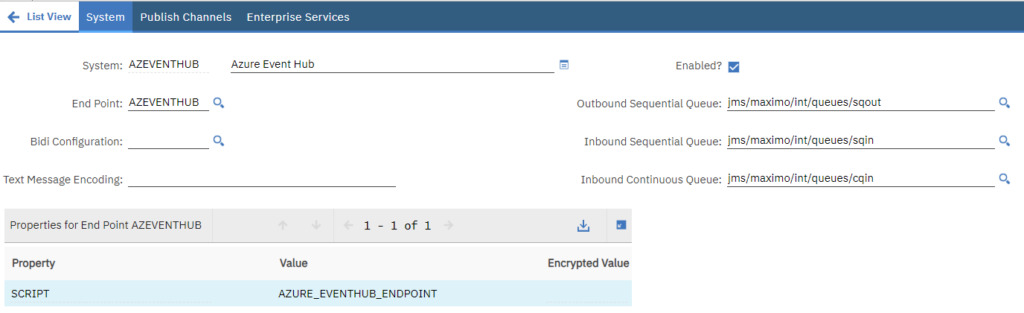
Then we’ll set up an external system named AZEVENTHUB as follows:
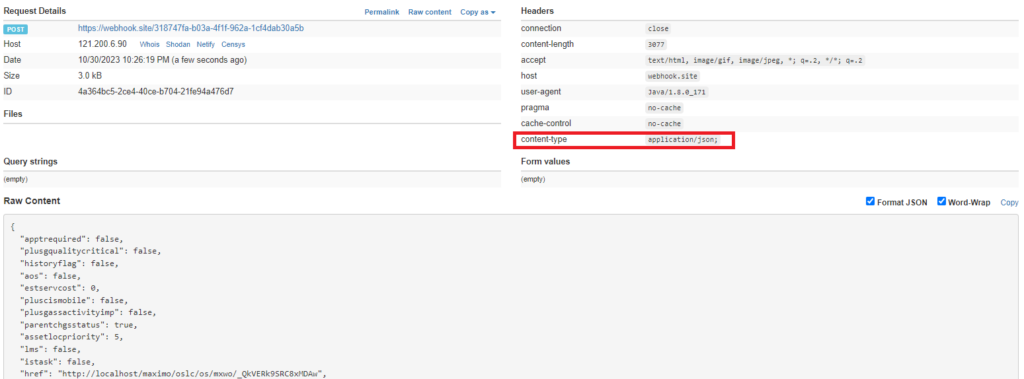
To confirm the end-point is working, we update a work order. As a result, we should see a message posted to Webhook as follows:
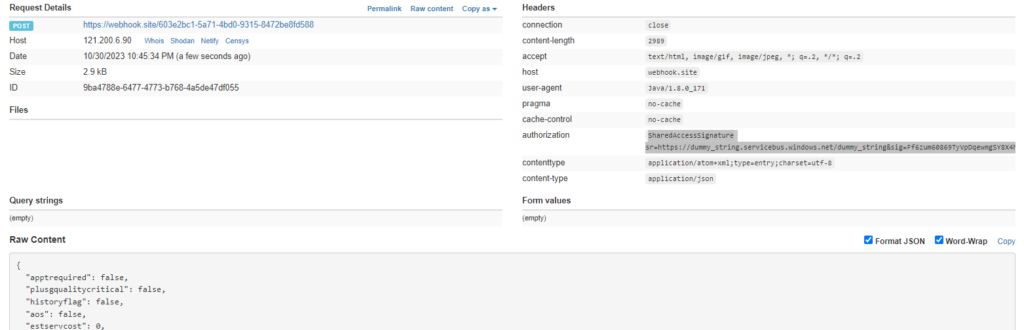
Now to get this end-point to work with Azure Event Hub, we’ll have to populate a “ContentType” and an “Authorization” header for the request following the examples by Microsoft on how to generate SAS token. To avoid having to import third-party libraries to Maximo, when there is no suitable OOTB python library available, I’ll use Java code instead. Below is the source code for the end-point:
To test it, we’ll make another update to a work order. On webhook, we should see the result as follows:
I am a freelance Maximo consultant based in Melbourne. If you enjoy reading my blog, please connect with me on LinkedIn to get updates on new posts. If you or your company need any professional assistance, please leave me a message, I'll call you back.