Category: JSP

Maximo custom control (Part IV) – Create a chart control


In the previous posts, we have practised how to create a JSP page, register it as a component, and register a control. We also discussed how to pass properties from the control to its components and use it with conditional UI.
 
In this post, I will provide an example to build a chart control to display meter data
of an asset.


A – First, let’s start by creating our basic control:

  • Create a “customchart.jsp” file with the following lines and place it inside the folder “maximo/ applications/ maximo/ maximouiweb/ webmodule/ webclient/ components”:
  • Register the JSP file as a component by creating a “customchart-component-registry.xml” file and place it inside folder  “maximo/ applications/ maximo/ properties/ registry-extensions”
  • Register a control using the component we just created by creating a “customchart-control-registry.xml” file in the same registry-extensions folder
  • Build EAR file, Deploy, and Start Maximo server. (Note: for a development environment, if you place these files directly to the EAR package in Websphere’s installedApps folder, you only need to restart Maximo server to register the new control and component.  After that, any change to JSP
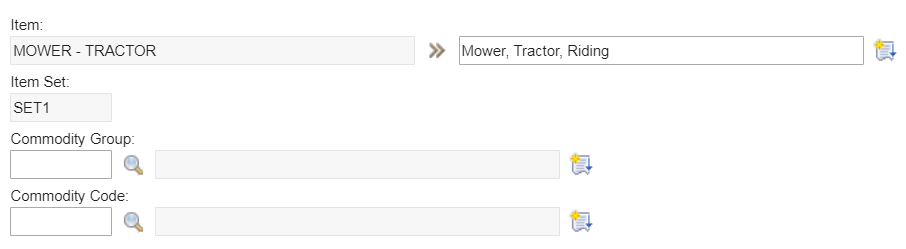
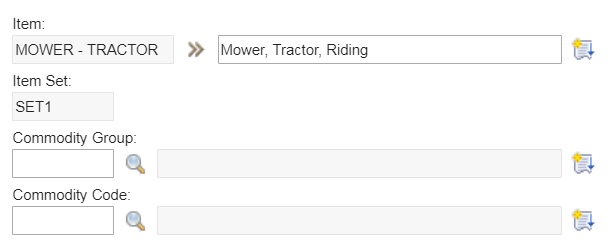
    file doesn’t need a restart)
  • Export Asset application and edit the application design XML file to add the new control above the Assetnum multipart textbox control:
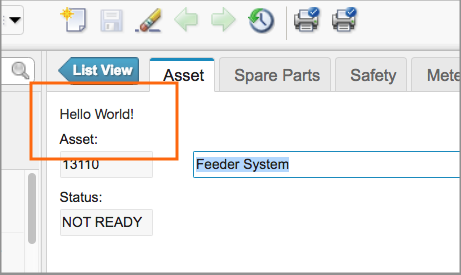
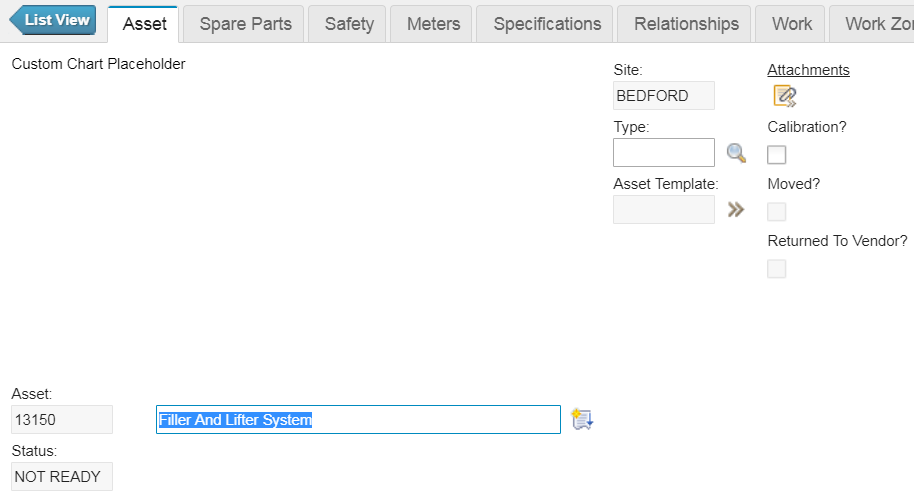
  • Open the Asset application and we should see our new control with the placeholder text as in the following image:

B – Replace
our placeholder text with a dummy line chart

  • Modify “customchart.jsp” to display a line chart with dummy data, and use the property to resize our control instead of using hard-coded value:
  • Examine the code, you will notice that we use a few variables such as “component”, “dojo” without declaring them. It is because there are commonly used variables and libraries which have been declared or imported in the “componentheader.jsp” file we included when defining our component. You can examine this file to find out about other variables that you can use. One such is the “s” variable, which is an MXSession instance, which I will use later to query data from the Maximo database.
  • Edit our Asset application XML file to specify the size of our custom control by adding the width and height property: <customchart id=”cust_chart_1″ dataattribute=”assetnum” width=”250″ height=”150″ />. 
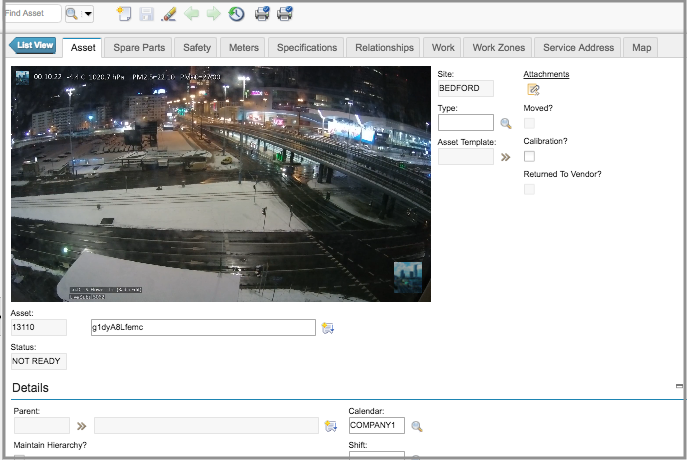
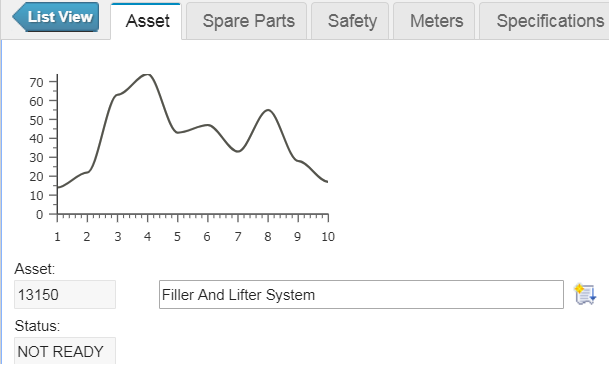
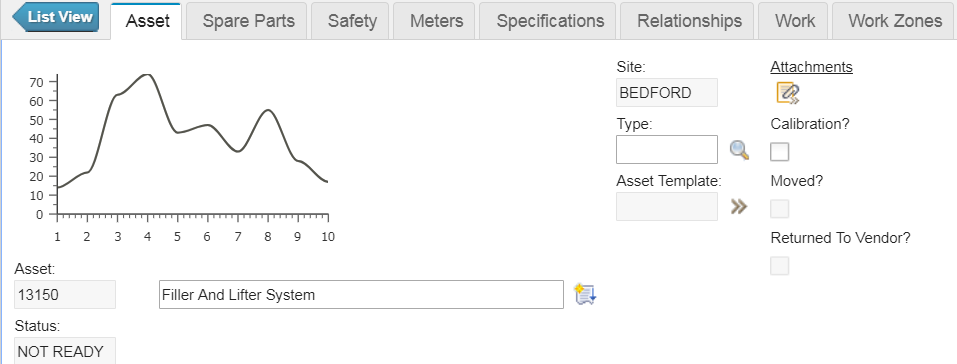
  • Open the Asset application, and it should show a chart with dummy data as follows:

C –Update “customchart.jsp” display actual meter data:

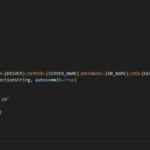
  • Using the MXSession instance variable “s” to retrieve meter data from the database: MboSetRemote readingsSet = s.getMboSet(“MEASUREMENT”);
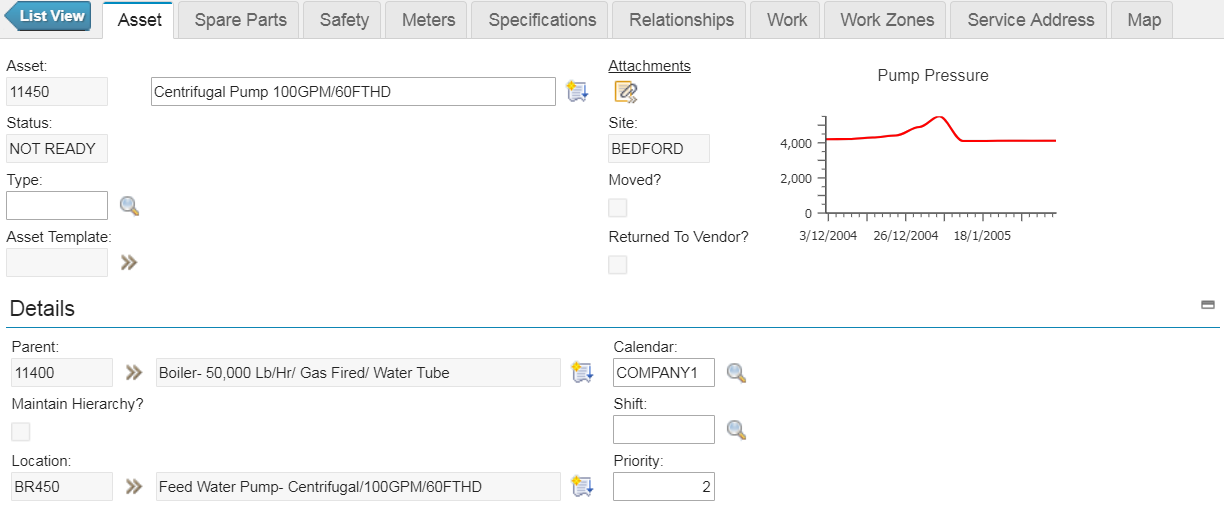
  • For the sake of simplicity, I hardcoded the query to display data of the “O-PRESSUR” meter from Asset “11450”. This is standard Maximo Mbo Java code. If you are already familiar with this, you will have no problem handling more complex requirements to display correct information here. (If you are not familiar with Maximo Mbo Java, you can learn the basics from Bruno’s blog)
  • After retrieving the MboSet, we get the meter data and put it into an array in JSON format to pass it to Javascript which is processed at the client side by the browser to feed into our DOJO chart.
  • Below is the full code of the customchart.jsp file:
  • Re-arrange the layout a bit using application designer, we should be able to show the pressure chart of the pump on the main asset screen:

So there it is. I hope this series provides you with basic information to start playing with Maximo custom control and enables you to make Maximo more useful to your organisation or clients.

Maximo custom control (Part III) – Conditional UI with custom properties

In the last exercise, we added new properties to a control, and by doing so, we have a better understanding that the properties of a control are defined inside the <property-list>…</property-list> XML element. We also know how properties are passed from the control level to its components.
 
If you have some experience with Application Designer, you must already know that we can dynamically modify the value of a property using Conditional UI. We can do the same with the custom properties that we recently added.
 
With the two properties: “part1size  and “part2size” added to the multipart
textbox in the previous exercise, let’s configure a simple Conditional UI to demonstrate this capability:
  • Create a new condition using Condional Expression Manager
    with following condition: length( :location ) > 10
  • Use Application Designer to edit the “Location” application
  • Select the “Location” multipart textbox under “Main” tab. Right-click on it to open the Properties dialog of the control
  • Go to “Advanced” tab, then add “READ” to the Signature Option box.
  • Click on “Configure Conditional Properties” button to open the Conditional UI configuration dialog.
  • In the “Configure Conditional Properties”, add “Everyone” security group, then specify the Condition we’ve just created in Conditional Express Manager. Under Property Values – Condition is true, enter two properties:
    • Property: part1size – Value: 15
    • Property: part2size – Value: 35
 
  • By doing this, we tell Maximo to resize the two components of the Multipart Textbox when the “location” field has a length of more than 10 characters.
  • Save the application configuration. Then open Location application, find a Location with “Location” field is shorter than 10 characters, open it, you will see the multipart textbox looks normal. But if we open a location with the “Location” field longer than 10 characters, we will see that the multipart textbox is resized to be a bit longer.


The whole purpose of this exercise is to demonstrate that we
can dynamically modify the appearance of Maximo applications by adding new
properties to a control, then modify the value of the properties based on
specific conditions.
 
In the next post, I’ll provide a more detailed example of how to pass property values from the component to JSP file, and then apply some business
rules to Maximo UI controls using JSP and Javascript.


Maximo custom control (Part II) – Control properties

In my last post, I created a super simple control with just a “Hello World” label. The goal of the exercise is for us to identify the core components of a control. In this post, I’ll continue to expand the exercise so we can better understand Maximo’s controls.
One common requirement is the need to modify the size of the multipart textbox control, usually to increase the size of the first textbox to fully display long ID of an item or asset.
Application Designer doesn’t provide us with an option to modify this.
If we export the application design XML file, and add: size=”40”, we will end up increasing the size of both parts to 40 as shown in the image below:
In our previous tutorial, we now know that this multipart textbox is just a control that has two “textbox” components. Therefore, we can definitely control the size of each component. To do that, let’s edit the “control-registry.xml”:


Find the multipart textbox control by searching
keyword: “
multiparttextbox”. In the <property-list>…</property-list>
element, add two more properties: 

   <property name=”part1size” />
   <property name=”part2size” />
In the <component-list>… </component-list> element, you will find two <textbox> components. For the first <textbox> component, pass the first size property: <textbox size=”@{part1size}” id=”tb” … /> . For the second <textbox> component, pass the second property: <textbox size=”@{part2size}” id=”tb2″ … />


Now open Application Designer, export the application we want to edit the size of a multipart textbox. Edit the application XML file to specify the size of each part to meet the requirement. For example, export Item application, and edit the multipart control of the ITEMNUM field to add two properties: <multiparttextbox dataattribute=”ITEMNUM” part1size=”16″ part2size=”34″ … />


Import the XML file back to Maximo, we will see our control having the size of each part modified accordingly:
In the next post, I’ll discuss how we can leverage this capability to address more complex requirements by dynamically updating properties in run time to change a control’s appearance.

Getting Started with Maximo’s Custom Control (Part I)

Application Designer is a powerful tool to customise Maxmo’s GUI. However, in certain situations, it couldn’t do what we want to meet the requirements of our clients. In that case, we can look at customising Web UI module.

In this series, I will provide step-by-step instructions on how to customise controls in Maximo. The aim is to help beginners get familiar with the framework by going from the most basic modification then building up from there. 

 
Part I –  Create a simple Label control: 
 
Let’s get started by displaying a ‘Hello World!’ label on the main screen of the Asset application. We can do that by creating our own custom control.
A sample of a standard Maximo control is a Textbox, a Label, or a Section, which you can drag/drop in Application Designer. In Maximo, a control can have one or multiple components. For example, the simple “textbox” control is actually a combination of 3 components: the ‘*’ sign which is displayed to indicate required field, the input textbox for entering data, and a lookup icon on the right side if the field is associated with a domain. Each component is simply a JSP file that will return HTML code to be merged into the main HTML page. However, in order to use the JSP file, we have to register it as a component in the “component registry”. And in order to include our custom control in Application Designer’s XML file, we have to define our custom control in the “control registry”.
 
Ok, that’s enough talking. Let’s build our first control:
 
1: Create a JSP file with a “Hello World” text:
  •  Go to folder: maximo/ applications/ maximo/ maximouiweb/ webmodule/ webclient/ components /
  • Create a new “mylabel.jsp” file with the following code:
 

2: Now let’s register this file as a component:

  • Go to folder: maximoapplicationsmaximoproperties
  • Edit the component-registry.xml file, and add the following piece of code just under the root <component-registry ….> tag
  • As you can see here, we simply declare a component called “mylabelcomponent”, and point it to our mylabel.jsp file 

3: Now let’s define our new control:

  • In the same maximoproperties folder, edit the control-registry.xml file, and add the following piece of code under the root <control-registry….> tag :

4: Deploy:

  • Build maximo.ear file
  • Deploy ear to Websphere
  • Start Maximo server. 
  • After Maximo started, open Application Designer, export the Asset application to edit XML file and add the following tag to the Main page, just above the Asset field. 
  • Import the XML file back to Maximo. Then open the Asset application, and open any asset to go to the Main tab, you should see your “Hello World” message on top of the tab:

5: Make it a bit more interesting with embedded Youtube Video:

  • Open any Youtube video, click on Share, and click on Embed, then copy embedded HTML code snippet it provides
  •  Open our mylabel.jsp file, replace the <div>Hello World!</div> code with the embedded HTML code snippet provided by youtube. Below is an example of the mylabel.jsp file content:

After making this modification, open Asset application again, and you will see the video is now embedded in your application:

6 – Make it dynamic:

  • To this point, you have done exactly what Richard Gebhardt taught us in his blog post. If you do read the JSP code he provided, you will notice he left us with some hints. For example, this line:  MboRemote mbo = control.getPage().getDataBean().getMbo();
  • Let’s capitalise on this and modify our JSP again to add a few lines:
  • Store a Youtube video’s ID into an Asset’s description field. Re-open the application, and open the asset record. It will now load the video ID you entered instead of a hard-coded link. 

(Youtube Video ID is the code string after the youtube.com/watch?v=. For example: https://www.youtube.com/watch?v=g1dyA8Lfemc )

At this stage, we can see a lot of real-world applications can be done with this capability to embed content from other websites into Maximo. For example, we can embed a real-time streaming surveillance video of certain locations or assets, and allow maintenance personnel to view directly when opening the location or asset record in Maximo.

In the next post, I will show you how to add more modifications to handle real-world requirements.

 *TIPS*: 

  • If you couldn’t start Maximo and receive something like InitializationError, it’s probably because your XML code in the control-registry or component-registry is not correct, review your code, and try again. Most likely that you forgot to close a tag, which makes it unable to parse the whole registry XML file. 
  • You can directly edit the files in the Websphere’s installedApps folder to avoid the build process every time you make a small change.
  • You can also unzip the “properties.jar” file to a “properties.jar” folder, and then remove the jar file. In this case, it doesn’t require you to stop Maximo to edit the registry XML files.
  • With the above tricks, your changes to the control’s and component’s properties, JSP, and CSS file will take effect instantly. But please note that you still have to restart Maximo if you define a new control or component.
  • Also note that with changes to CSS and Javascript files (which I will mention in follow-up posts), you will be better off by always disabling caching on the browser. Otherwise, you will not see the change as the browser still uses older files. On Chrome, you can open the Developer windows, move to Network Tab, and check on the “Disable Cache”. As long as you leave this Developer window open, Chrome will always download the latest CSS and Javascript files.