Page 17 of 18

Notification of new Inbox Assignment on mobile using Google Firebase

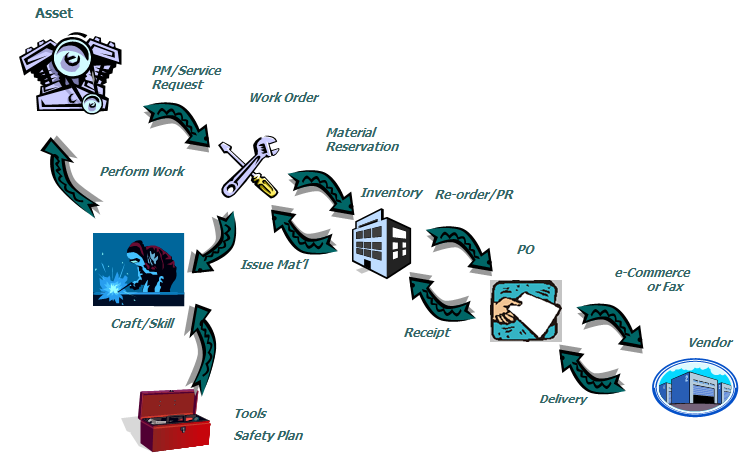
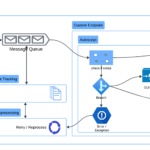
One of the great ways to reduce the time to review and route a workflow assignment is to setup email notification to inform the users of a new assignment. Some of my clients even want us to provide a more direct, immediate notification on mobile device. This can be done easily (but can be costly) by using a SMS gateway which is a service usually provided by a telecom provider. To use it, you subscribe to a SMS gateway and setup Maximo so that every time you like to inform a user on new assignment, Maximo will sent an email with a predefined format to the gateway. The SMS gateway will send a text message to the user’s mobile phone to inform him/her of the new inbox assignment.

With Push Notification, you can achieve the same result without having to pay a lot of money for SMS gateway service. Apple, Google, Amazon are some of the companies out there which provide a totally free or super cheap Push Notification service.
Thus, in this post, I investigate the possibility of using Google Firebase service to send notification to mobile devices when a person receives new workflow assignment from Maximo.

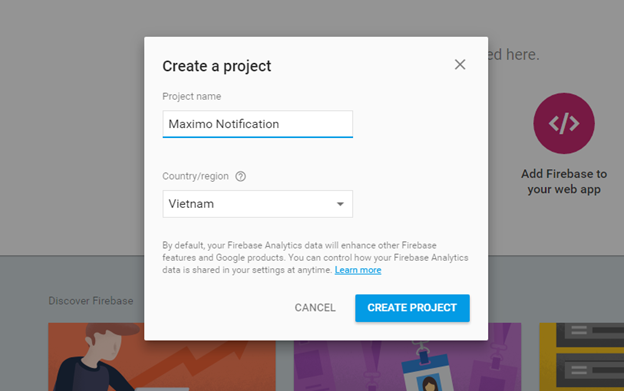
A – Create a Firebase project on Google Firebase website:

1. Go to https://firebase.google.com, log in using your Google ID, and create a new project. Enter a project name e.g. “Maximo Notification”.

2. After the project has been created, choose “Add Firebase to your Android app”

Enter a package name for the Android Java project that you going to build for receiving Push Notification on Android devices e.g. “io.tqv.maximonotification”. Click Add App

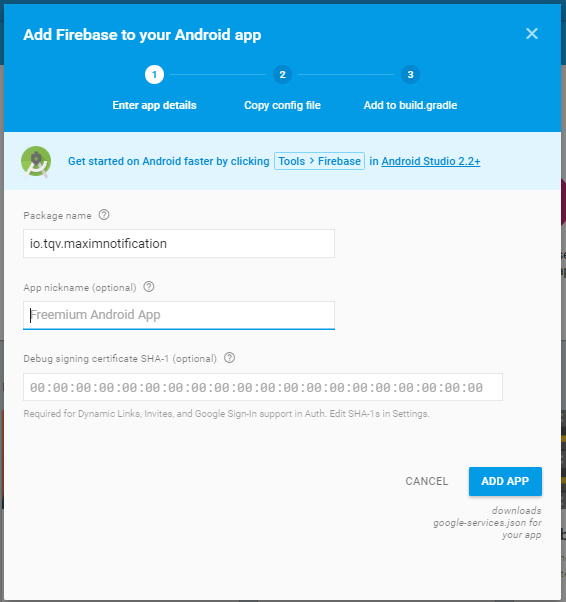
3. After clicked on Add App, the browser will automatically download the “google-services.json” file at step 2 “Copy Config File”- Click Continue. At Step 3: “Add to build.gradle”, quickly skim through the instructions and click Finish.


B – Build Android App to receive Push Notification from Firebase:
This app will allow the user to subscribe to a “topic” is will be Maximo login account of the user. Later on, we will add an Automation Script to make Maximo automatically send a request to Firebase to send a Push Notification to the “topic” which is the same as the Maximo username. Anyone who subscribed to this topic will receive the notification when a new assignment is created for the Maximo user. (Note: this method is the simplest solution to test the platform, in real production environment, you may want to build more restrict authentication method to ensure only authorized user can receive notification of his/her assignment)

Sample code of the Android project can be downloaded from this link: GitHub. The steps below are just high level guideline:

1. Open Android Studio, create a new project with the package name the same as you entered in the previous steps. Choose to create a project with an empty activity. Ensure that the package name you entered in Firebase is the same as the package name of your Android project.

2 – Copy the google-services.json file you downloaded in previous step to the project’s app folder.

3 – Add Firebase dependencies to Android project:

Add line: classpath ‘com.google.gms:google-services:3.0.0’ to project level build.gradle within the dependencies block
Add line: compile ‘com.google.firebase:firebase-messaging:9.6.1’ to app level build.gradle within the dependencies block
Add line: apply plugin: ‘com.google.gms.google-services’ to the bottom of the app level build.gradle

4 – Add a class “MyFirebaseMessagingService.java” which extends FirebaseMessagingService. This will implement the “onMessageReceived” method to handle the message received from Firebase and display Push Notification on the mobile device. You can download sample code of this class here. Make sure to register the service in AndroidManifest.xml by adding the following lines inside Application tag:

5 – To test if the implementation works, register to a hard-coded topic such as: “MAXADMIN” by adding the following line to the onCreate method of the MainActivity.java class:
FirebaseMessaging.getInstance().subscribeToTopic(“MAXADMIN”);

Run the application to register a new topic.

Go to Firebase console, on the left-side menu, click Notifications to open the Notifications page, click New Message to send a new message from Firebase console. Enter some message text, and choose “MAXADMIN” topic for target.

Please note that the first time when a new topic is subscribed, Firebase will automatically add it to the project’s database. However, it will take up to a few hours before a new topic is added and displayed in the “Topic” dropdown of the “New Message” pop-up window, then hit “Send Message”

If the configuration works well, the mobile device will receive and display the notification almost instantly. If it does not show, make a breakpoint at the first line of the onMessageReceived method of the MyFirebaseMessagingService class and send another message to see if the app does receive a message from Firebase or not. If it not, make sure the application have register for INTERNET permission in the AndroidManifest.xml.

6. In the sample code, I added the Preference screen to enable each device to receive notification from one Topic or User. I also added a bit more code to ensure that the service is started when mobile device reboots, and the code to handle the hyperlink data sent within the message so that when the user click on the Notification, it will automatically open the Maximo record in mobile device’s browser for the end-user to review and route workflow.

C – Configure Maximo to send POST request to Firebase:

Once you’ve built a mobile app to receive Push Notification from Firebase, the last step is to setup Maximo to automatically send a message to Firebase whenever a new assignment is created. The simplest way is to use Automation Script if you have Maximo 7.5 or later. For Maximo 7.1 or older, you have to write custom java code. In the sample jython code provided here, I use standard Java Library, thus, you can copy/paste the whole script file to Java and modify some syntax keywords to convert Jython to Java and it would work without much problem.

1. Open Maximo, open Automation Script application, and Select Action to create a new Object Launch Point. Enter a name for launchpoint, the Object should be “WFASSIGNMENT”, with condition “assigncode is not null” (Note: because Maximo use the WFASSIGNMENT table to store both workflow assignment and the configuration Workflow Notes in the Workflow Designer app, this condition ensure that no message is created when someone modify a workflow in the Workflow Designer). The event to trigger the automation script should be “add”. (This means, when a new workflow assignment is created, Maximo will execute this script). Click Next. 


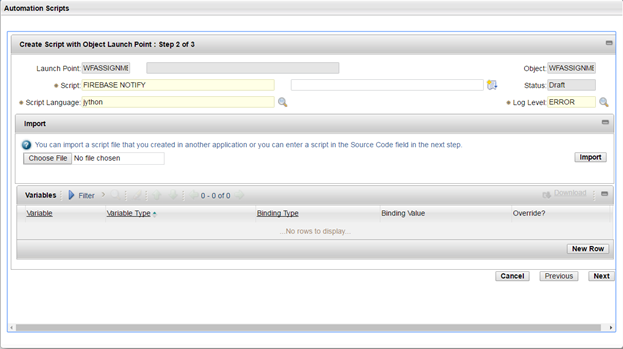
2. In the next page, enter a script name such as “Firebase_Notify”. For script language, choose jython, then click Next. 


3. In the next page, copy/paste the sample code into the Source Code text box. And click Create to finish.

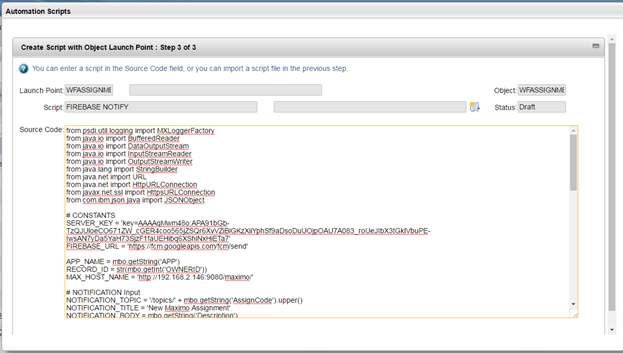
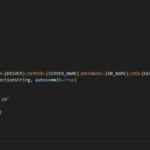
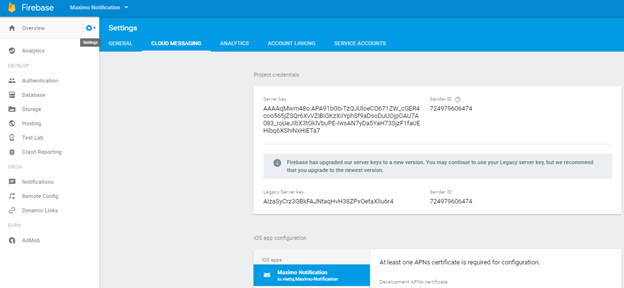
This code generates and sends a JSON message via HTTP POST method to Firebase server whenever a new assignment is created. The message also contains a hyperlink to allow the user to open the Maximo record directly when tapping on the Notification. You have to review the code and modify values of the SERVER_KEY and MAX_HOST_NAME constants:

MAX_HOST_NAME: is the IP address or Hostname to access your Maximo environment.
SERVER_KEY: is the server key of your Firebase project. You can get the key from Firebase Console, by open the Project’s Settings window; then go to the “Cloud Messaging” tab.

4. To test if the script works well, I created a workflow with only one task node assigned to ‘MAXADMIN’ on the Service Request application. I added the workflow to the Workflow Go button of the Service Request app so that every time I click on the Workflow Route, Maximo will create a new assignment, and trigger the Script to send Firebase a message. I also added a new custom field “errmsg” in the SR object to display the error message of the HTTP response from Firebase in case if it returns an error for easy debugging:


If the message is sent to Firebase successfully, it will send a notification to the mobile device, and when the user tap on the message, it will open the assignment in the device’s browser and allow the user to route workflow to the next step. If you have Maximo Everyplace, it will work very well with the small screen size of smart phone. However, I find that every without Everyplace, it is still possible to review and route workflow without any problem.


D – For iOS platform:
Firebase works with Apple Push Notification service; therefore, you don’t need to setup a separate Apple Push Notification service account. However, you will need a membership to Apple Developer Program (which cost $99/year) in order to download the SSL certificate to make the Firebase service works with iOS devices. The steps to setup are very similar to Android platform and it doesn’t take more than 10-20 minutes.

Useful small features in Maximo

As Technical Consultants or Maximo Administrators, we often
have high level of proficiency in using the software. Because of that, we often
overlook the many basic or simple features that can be extremely useful to the end-users.
In many cases, when I mentioned one those features to the end-users, whether they are beginners
or long time Maximo users, it is often received with much
excitement. So I think it may be a good idea to collect a list of those small features like that and share them here in this post:
Default Table Data:
in several standard applications such as Purchase Requisitions
or Purchase Orders, in the PR/PO Lines tab, at the bottom of the tab, below the Detail
section, there is a section called “Default Table Data”. This section allows a
user to enter default data values that will be automatically filled every time when he or she adds a
new line.
For example, when creating a new PR, the requester may create requests for a list of many different items, all of them will be received into the same storeroom,
charged against one same GL Account, and requested by the same person. By entering
these default values, every time the user hit “New Row”, these values are
populated automatically, and the user only has to enter the item number and the
requested quantity. For a large PR with a few dozen or hundreds of lines (it is not
unusual for PR/POs acquiring parts for large turn-around project to have few
thousand lines), this feature can be a huge time saver. For implementers and Maxadmins, the Receiving or Work Order’s Planned Material tab can be great
candidates to add this feature. The users will fall in
love with you after you added this “Default Table” feature to the apps. Sit down and ask them
what are the fields that they have to enter the same data again and again.
Spend 10 minutes to implement the feature and you will be the real hero.
 

Default Data section in Purchase Requisition app


Search record by
Itemnum (Advanced Search)
: here is one typical scenario: a user raised a PR
to purchase several items. These items later get copied to a PO and the PR
is closed. A few weeks later, the person wants to know the status of the items
he requested but unfortunately he forgot the number of the PR he raised, he
doesn’t know what is the PO number which the item got copied to. In this case,
the quickest way to find out is to open the Advanced Search, and search for the PR or PO records which contains the item he wants to find. This is the quickest way to find a main entity record which contains an Item Number. These records can be Work Order,
Inventory Usage, Contract, RFQ, PR, PO or Invoice. Obviously, as a Consultant
or Admin, you can add this feature to any application that contains a child
table to allow the end-users to search for the main record based on an
item/object contained in the Lines tab.
Find all PRs which contain a specific Item

Customized Advanced
Search
: given this scenario: due to regulation requirements, many of my
clients use a custom “Issue Date” field for Work Order. For reporting, this
field is used to determine the reporting period for different reports such as
“Completed work” or “Over-due work”. The “List” screen on every Maximo application
is very effective for filtering/finding record with a specific criteria such as
looking up for all Work Orders on an Asset with Work Type = CM for example. However, this screen does not allow the user
to search for all Work Order created within a period (i.e. Issue Date between
1/Dec and 31/Dec). Users who are more familiar with Maximo know that they can
use the standard Advanced Search feature to search for Work Orders which has Report
Date or Scheduled Start Date between a From Date and a To Date values. However,
customized fields, like the “Issue Date” in this case, are often neglected by
the implementers and thus are not added to the Advanced Search pop-up screen. In
many cases, when I conducted refresh training class, the users often greatly
appreciate after I point this out to them and add the missing fields to the
Advanced Search screen (which only takes me less than 5 minutes). A one- or
two-minute change to the software like this sometimes is a big time saver and makes life a lot simpler for the end-users. Ability to add small stuff like this and seeing these changes make a positive impact to the end-user’s workflow is also a great emotional reward to the consultant too.
Use Advanced Search’s Dates section to find all Work Orders in a period.

View Item Availability pop-up menu
View Item
Availability
: In any Maximo application which displays material-related
information, you can click on the “Detail Menu > View Item Availability”
menu to see all important information related to the item including the current
inventory balances, quantity reserved, and other detailed information such as
which are the alternate items, whether the item has been requested or being
purchased in a PO. This information is quite helpful when you make work plan or
intend to raise new purchase requisition. It’s great to know that you can use an
alternate item instead rather than raising a request and have to wait several months
for the whole procurement routine to be processed.
All item’s related information is shown in one pop-up

Classification/Attribute
Search
:  Maximo is one of the very
few CMMS software that allow cataloging and tracking assets or spare-parts’ classifications and technical specifications in a structured way. If your company
records such information, it becomes very handy when identifying inventory item
codes using the Classification/Attribute Search function. Next to any Item
Number field, you can click on the “Detail Menu > Classification” menu to
open the Classification Search pop-up where you can browse your inventory
catalogs to search for the item code that you want. Only a handful of companies
in this market records inventory item’s technical specification in
Maximo. As such, searching items using technical attributes is often not
possible. However, classifying items can be done pretty quick and many companies already have the data in Maximo. With the item already
classified, using the Classification Search to find item can be very easy and
efficient.
Browse and find items by Classification

Free Maximo Training Resources

Our company employees usually wear the T-shirt that has IBM Tivoli and Maximo logos on it. Because of that, for many times, I was approached by random guys on the street to talk about Maximo. In a few cases, they mentioned that they want me to provide materials to learn about Maximo or give them basic Maximo training. I have a few friends who work in IT and like to learn about Maximo too. So I think it would be helpful for some of you out there to know that you can learn and practice with the software completely free with the resources provided by IBM. In this post, I’ll provide some information and links to some of these sources:
Access to Maximo training environment:
You can access and play around with Maximo using the IBM’s preview environment using the following links or googling “Maximo Asset Management Preview Site”. Accessing this environment is completely free and open to the public.

          Maximo 7.5: http://www-01.ibm.com/support/docview.wss?uid=swg21499350 
The core functionality of the two versions are exactly the same, so any version would be ok for you to learn and play around.
(One side note: if you are serious on being a consultant or need to install your own Maximo system for advanced implementation training or for integration purposes, you can purchase the IBM Software Value Package ($999) to get access to the Software Access Catalog where you can download almost all software provided by IBM including all Maximo versions, industry solutions and add-ons. If you are a business partner and want to have access to different Maximo industry solutions and add-ons such as Oil & Gas, Scheduler, Anywhere etc., you can contact IBM to provide you access to their Skytap environments too.)
Free Online Training courses:
IBM recently created a website at www.iot-academy.info to provide free interactive online training courses. The Asset Management courses provided here cover all Maximo core modules and applications. This should be the first place to visit if you want to learn the basic functionality of the software. The courses available on this site provide both trainings on the functionality and business processes of the software and training for implementer and administrator.
 

Several courses available on iot-academy.info

Besides the two main sites above, there are many training resources made available by IBM, business partners and individuals that you can access too:


YouTube: search for those keywords “IBM” “Maximo” “Demo” you can find a tone of webinars, demonstration, and training video recordings uploaded by IBM and other business partners. Some go quite deep into the functionalities of various applications and modules. (If you prefer to learn the software in Vietnamese, check out my previous post: Maximo Immersion Training
For customization, you should go to Bruno Portaluri’s blog. His Java Customization tutorial series is definitely the best and most comprehensive source that you can find on the web. Simply by spending some time to go through his tutorials, you will master Maximo customization in no time.

All of the training resources provided in this post are free. However, the content of these sites are quite organized and will be enough to make you a competent power user, administrator or consultant, depending on what are you looking for. So don’t bother looking elsewhere and spend a lot of money on expensive classes unless you prefer to learn more advanced topics. 

Vietnam Maximo and CMMS users

It is surprising that almost everyone has heard about ERP,
but when Asset Management or CMMS software is mentioned, in most of the cases,
people don’t know what it is or think it is a function of accounting software.
It is unfortunate that we do not have any good report on the size of the software market, so it is hard to know about the current state of how enterprise software is being implemented in Vietnam market. From my perspective, the use of EAM/CMMS
is not much less than the use of ERP in this market. In many cases, the
companies who are using ERP actually only use its finance/accounting core
module; many of these companies are in manufacturing. In contrast, in the heavy
industries, many big operators are using EAM/CMMS extensively to manage
different aspects of their operations including operation & maintenance,
service, inventory, purchasing, and contract.
However, since I’m an EAM
implementer, my view could be heavily biased.
Here in this post, I’ll try to list out the companies I know that are using Maximo and other CMMS in this market.
I think this information might
prove to be interesting to people who are working in this domain.
Below are some companies or corporations who are using
Maximo:
  1. Nghi Son Refinery
  2. Dung Quat Refinery
  3. Cuu Long JOC
  4. Bien Dong POC
  5. Lam Son JOC
  6. PVEP-POC
  7. PV Drilling
  8. PV GAS (all subsidiaries)
  9. PV GAS D
  10. Rosneft
  11. JVPC
  12. KNOC
  13. Phu My Plastic
  14. Nam Con Son Pipeline
  15. PV Power (Ca Mau 1 & 2, Nhon Trach 1 & 2, Vung Ang
    Power Plants)
  16. EVN GENCO3 (4 power plants in Phu My)
  17. Ho Chi Minh Metro
  18. Saigon New Port (Tân Cảng)
  19. Cai Lan International Terminal
  20. Southern Airport Corporation (Tan Son Nhat Airport)
  21. Vietnam Brewery (Manufacturer of Tiger & Heineken Beer)


From what I know, AMOS is also widely used by offshore companies and
aviation industry, but I have little knowledge on this. Below are some companies that I
know who are using other CMMS software:
  1. Phu My 3 BOT – Engica
  2. PVFC Phu My – Ivara
  3. PVFC Ca Mau – Ivantis
  4. VietSovPetro –  AMOS,
    Datastream, and other software for their offshore platforms and service ships
  5. Vietnam Airlines – many maintenance service companies using AMOS and CMMS software to provide service to Vietnam Airlines’ fleet
  6. Intel Vietnam (SAP PM Module for maintenance)

I would love to know more about the other EAM/CMMS users out
there. If you know any company which is using CMMS, please provide some
information about it in the comments.

The core components of a complete CMMS system

I am lucky to work for a company that dominates the Vietnam market when it comes to CMMS implementation. Because of that, I have the opportunity to talk and work with nearly every company that is using Maximo in Vietnam (and some companies using other CMMS software too). Often the case, when I talk with a company, they usually ask me to assess whether their Maximo or CMMS system is complete. Obviously, different people will have very different opinions on what it means by a “complete” CMMS system. But, after many conversations with my client, I come to understand that what they really mean is to have a look at their system, identify the key areas that the system is missing, and advise them on what can be added to make the most out of their CMMS system.
The answer to the question almost always points to data. One of the reasons why implementing CMMS is often more difficult than implementing ERP software is that CMMS requires data to operate.To implement a typical ERP system, which includes standard processes such as finance, accounting, inventory, purchasing etc., your focus is on setting up the application process and functionality. In terms of data, your work is to set up the right metadata and settings such as Chart of Accounts, Master Item, People list,
Companies list etc. In contrast, when implementing a CMMS system, application setup is only half of the work, the other half is building data for the software to work. The data in this case must at least include asset information and preventive
maintenance data.

Building maintenance data requires knowledge and
experience in several different engineering disciplines such as Electrical,
Mechanical, Process, Instrumentation and Automation. However, since most of the CMMS implementers are IT companies, they often leave the job of building data to the client and focus on implementing software only. In other words, maintenance data is considered out of scope. In this case, in many projects, the client is responsible for providing whatever data that they have, and the implementer will simply help to upload the data into the system. This leads to a problem due to many clients do not understand what a CMMS system can do to help them with their O&M processes. Thus, they only provide the existing data that is readily available in Excel/Word formats which their O&M team is using for
their daily activities. The data typically only contains Asset Register, Work Procedures/Plans, Preventive Maintenance schedule. Many other critical pieces of information are often missing or left incomplete. These include asset – spare information, documentation, drawings, and a detailed work plan which includes labour, material, and tools. With this information available in the system, it will greatly help the O&M team to improve productivity and realize the full potential of the system.

To jump straight to the point, I will point out several areas that an operator should look at to ensure that their system is “complete”. This covers both software functionality and data, but when looking at this, you can easily identify the pieces of missing or incomplete data in your system and be able to do something about it.
  • Asset Register and Hierarchy (data): this is the foundation of Asset Management software, without this, it is not Asset Management software. If you are actually using the software at all, it is something else, like Inventory management software, or Job Card tracking system. But even in the case you are just using the software to manage Job Card or Work Orders, you won’t be able to track down the status, operating/maintenance cost, work history of each component of your plant.
  • Work Management (function): this is the core process of Asset Management software. You should be able to use it to track all preventive
    and corrective maintenance work activities of your plan, you should be able to raise work/service requests and monitor/follow-up on the request to ensure it gets done.
  • Failure Codes (data) and Failure Reporting (function): the biggest
    benefits of CMMS software is it allows you to carry out details analysis of
    your work, identify the “bad actors” in your plant, and do something about it
    to make these pieces of equipment “less bad” or become a superstar actors like Tom Hank or Leonardo DiCaprio. Without a good Failure Codes structure and comprehensive reporting, you won’t be able to identify the “good” or the “bad actors” and analyze the reasons that make them “bad”. This piece is in fact the cornerstone of a good reliability maintenance program.
  • Inventory Management (function): many of our clients don’t
    use Maximo to manage their inventory transactions as they already use other software to handle this task. However, even in that case, they should at least have the list of inventory item codes (Item Master) in the software and provide the ability for the O&M engineer to view current inventory balances. This will allow them to plan and request material for maintenance work.
  • Asset-Spare correlation (data): for each major piece of equipment, you should have the list of spare parts associated with it. This data must be “smart”, by that I mean each part should be linked using a unique Item
    Master code. Providing the data with just a description of the part and part
    number is not sufficient. When an engineer needs to fix a pump with a broken bearing, he should be able to find the record of the pump in the Asset module, see the list of spare parts of that pump, identify the item code of the bearing that needs to be replaced, and quickly identify whether that bearing is available in stock, or if it is being requested/purchased and when it will be
    delivered.
  • Asset O&M and related documents (data):  this data can be easily provided and uploaded to CMMS software and linked to specific assets. As such, there is no excuse for not having it available. The engineers should be able to quickly find O&M documents or drawings related to a piece of equipment by looking it up through the asset record in CMMS.
  • Job Plans and Preventive Maintenance Plans (data): without
    this data in CMMS, you do not have an effective preventive maintenance
    organization and I’m pretty sure that your plant is not in good shape.
    However, even if you have it, you should look closely to see if the Job Plans
    contain detailed planning information including Labor, Material, and Tools.
  • Labor plans (data): you need this data if you want to set a standard ‘budget’ or based line on what kind of people with the right craft/skill, and how many hours required to complete a job. With this establish, you will be able to identify if the productivity/cost of your maintenance team is above or below expectation
  • Material plans (data): this costs of lot of money and requires a lot of time to prepare/acquire from vendors. Thus, you want to have this information in your work plan to ensure the most effective and efficient work scheduling and execution.
  • Tools plans (data): you don’t want your crew to arrive at a remote work site, carried out all of the preparation/safety measures, shut down and open
    the machine just to find out you need a special tool to carry out a specific
    task. As such, a job plan should contain information on whether any special
    tools required for the job so that your engineers can plan ahead and be
    prepared.
The areas I point out above are only the core components that you should look at to assess and identify the missing pieces if your system is pretty new. This applies to many operators in Vietnam at the time of writing this article. Mature companies often have all of these pieces before or not long after commissioning CMMS; in this case, they will move on to expand the functionality to other areas such as safety, management of changes, RCM/RBI, mobility etc.This is just my own view based on the experience working with the companies in this market. You may have different perspectives on this. If that is the case, I would love to hear from you so that I can expand my knowledge on this topic.

The most effective way to learn Maximo core concepts

After several years training Maximo end-users and
consultants, I believe there is a right way to learn Maximo and also there is a
wrong way to do it. Contrary to what many may think, to me, the wrong way to
learn Maximo is through the job. This can take a lot of time, several full
cycle green field projects for a consultant, or many months or years for
end-users. By the time the person understands the software, it is often too
late. For a consultant, it could mean many bad implementations or advice had
been given to the customers; for an end-user, it could mean a lot of bad data had
been entered into the system over time.
So what is the right way to learn Maximo? I believe it is
through intensive, comprehensive training right at the beginning when a
consultant starts the job; or for an end-user, it is before he/she starts to use
the system.

But, you may argue, “how can I learn all of those modules and
applications, trying to remember all the menus, buttons, text fields and check boxes
and not spend a huge amount of time on it? Eventually, I have project (for
consultants) or a ton of other daily work (for end-users) to do. I simply
cannot spend several months to learn everything about this software”. Well, I
didn’t say you have to spend months to learn Maximo. It only takes a few days
if you know how to do it in the most effective way.

From my experience, the most effective way would be a guided
training through the key concepts and trying to relate those concepts with real
world examples. In the case of training new consultants for our company, I
would give the guy a real world problem to solve by drawing a motorbike on a
whiteboard. I’ll have the guy to enter information of the motorbike into Maximo
including: the asset – the bike, then the components and sub components such as
the engine, the wheels etc. Then I’ll have him to enter spare-parts information
such as tire, bearing, seal by creating Item codes for them and linking those item codes to the related asset (bike). Balances of the items also need to be
managed in the Inventory app too. The motorbike needs to have an odometer where
the end-user can enter the number of kilometers the bike runs each day. From
that, I’ll ask the guy to enter a preventive maintenance plan to inspect, clean
and change oil the motorbike for every 1000 km it runs or for every 3 months whichever
comes first.

When the guys can carry out all of those activities in Maximo, I’ll
review and ask questions to verify his understanding of the concepts and make
sure that he understands almost all advanced functions related to each concept too.
For example, when creating a new Item record, I’ll ask what is LOT? When should
somebody want to manage an item using this feature? What is KIT? Give an
example of how it is used.  When the “Add
as spare-part” check-box is checked, how does it work in Maximo?

This exercise will
extend to covers all core modules including Asset, Planning, Preventive
Maintenance, Work Management, Inventory, Purchasing and Contract. Although it
sounds a lot, I have seen many people, who have no prior experience with asset
management software, managed to pick up all of the knowledge and able to answer
almost 90% of my advanced questions only after 4-5 days of self-training. Very
few people require more than 10 days to fully understand all Maximo key
concepts This amount of time already includes the time to read books and watch through the training video recordings I provided in this earlier posts.

For the end-users, they usually have to learn on one or two modules,
and only require practical experience in the main processes; it only takes one
or two days of intensive training to get deep understanding of the concepts and
able to use the software effectively without much problem.

« Older posts Newer posts »