Page 12 of 18

Send SMS Notification from Maximo using Twilio

Email or SMS Notification?

Occassionally, someone would ask me if we can configure Maximo to send notifications via SMS. With Maximo, the answer to such questions is always Yes. However, with this one, it will cost some money, very cheap though.

Since it is not free, I would say for most Maximo notification scenarios, the user would be ok with email notification which is free. However, there are certain scenarios where SMS notifications can add value such as:

  • Notify a field worker when a new high priority Work Order is assigned to him/her
  • Notify an asset owner when the asset deviates from the normal operating parameter range or when downtime is reported
  • Notify Maximo admin when there are repeated login attempts from an uncommon IP address or when there is a major problem tracked by the Escalation app.

In the section below, I provide the detailed steps on how to set up a trial Twilio account and send notifications from Maximo

A. Setup a Twilio trial account

With your trial account, Twilio will give you a small initial balance to buy a phone number and use the service. I got $15, and it will cost me $6 to buy a phone number, and 5 cents to send a text message.

  1. Create a trial account on Twilio.com: you’ll have to use your real mobile phone number to verify the account.
  2. Login using your trial account, go to Console, then create a new Project. Select “Products”, then choose “Programmable SMS”. Give your project a name, for example: “Maximo”. Then skip the rest of the steps to create the project
  3. On the left menu, click on the icon with the title “Programmable SMS”. In this menu, open the “SMS” submenu, open the “Messaging Services” page, then click on “Create new Messaging Service
  4. Give the messaging service a name, such as “MaximoNotification”. For use case, choose “Notifications, Outbound Only”. Then click on Create
  5. After the messaging service is created, open it. On the left menu, click on Number to open it, then click on “Buy a Number” to purchase a telephone number. On the pop-up, select your country code, then click on “Search”. It will give you a list of numbers to choose from
  6. Choose a number with SMS capability, and click on Buy. Depends on the country you live in, you may have to enter some details for your new number. I’m in Australia, so I have to enter my address.
  7. After purchasing a number, you are ready to send SMS messages from your Twilio account.
    Please note: with Trial account, it can only send SMS messages to a Verified Number. Your mobile number which you entered when registering is automatically added to this list. So you will be able to send SMS to that number. But if you like to send SMS to a different number, you’ll have to add it to the ‘Verified Caller ID’ list first.
  8. Go to “Console Dashboard”, open the “Settings” sub-menu, then open “General” page to take note of your Account SID, and Authentication Token. You will need it to send an SMS from Maximo.

B. Configure Maximo to send REST requests to Twilio

There are different ways to set this up depending on your requirement. In this example, I’ll create an ‘Action’ automation script, and send a REST request using Apache HTTPClient library. Action auto script can be used with Workflows or Escalation. In this example, I’ll send out an SMS when the workflow is initiated on the Service Request application.

The setup steps are as follows:

  1. Go to Automation Script application, create an ‘Action launch point’ automation script. Give the launch point a name, for example: “SENDSMS”. Set the action name as “SENDSMS” too. Set “SR” as the main object. Select “Jython” for script language. For the script, copy/paste the example code below to the “Source Code”
  2. With the code above, replace {YOUR_ACCOUNT_SID}, {YOUR_AUTH_TOKEN}, {YOUR_PURCHASED_PHONE_NUMBER} with actual details of your Twilio account. For testing purposes, replace {RECIPIENT_PHONE_NUMBER} with your phone number. Later on, once it works, you can replace it with a variable retrieved from your record using mbo.getString()
  3. Create a new workflow “SEND_SMS” for the SR object, connect the Start and Stop node with one line. And set the line to use ‘SENDSMS’ action. After that, Enable and Activate the Workflow. And remember to Add Workflow to SR application using the Select Action menu if you haven’t done so.
  4. Open an SR record, then click on the route button to initiate the “SEND_SMS” workflow
  5. After clicking on the Route workflow button, you should be able to receive an SMS message on your phone:

Source Code:

In a later post, I’ll talk about integrating Twilio with Maximo to create new Service Requests via SMS. For now, good luck with spamming your end-users with endless work requests 🙂

IBM App Connect – Integrate Maximo with Google Sheet, SalesForce, and ServiceNow

While having a break between projects, I have some free time to play around with IBM’s new toy: App Connect. After several years of working with Enterprise applications, I’ve got to a point where I can tell if a system is great or not after playing around with it for a short time.  Some examples of great systems or platforms I have experience with is Maximo (of course), React Native (for mobile development), and SAP. Some examples of *not so great* systems I played with include Oracle EBS, Infor SunSystems, and Maximo Anywhere mobile platform.
With App Connect, I can tell this is an excellent tool after going through a few beginner tutorials. I can immediately come up with some useful use case using it to enhance Maximo by integrating it with other cloud applications. Below are two examples:
1 – Using shared Google Sheets to collect project data such as Asset register, Spare-part BOM from vendors:
An operator can create different Google Sheets and then share them with EPC contractor or sub-contractor, asking them to copy/paste data from their internal design database, and the data will be sent over to Maximo automatically. This continuous data provision process will ensure a more complete and accurate asset database after the system is handed over to the operator.

2 – Linking Maximo with a Service Provider’s CRM or ticketing system to automate Service Request workflow: 

Obviously, companies have been integrating Maximo with other systems in similar scenarios for ages, but with App Connect, the implementation is so much simpler and effortless. The above scenarios took me less than 10 minutes to configure everything without writing a single line of code. For an enterprise-grade integration solution, which needs to be robust, secure, and has high performance, it will take a lot more effort than that, but surely, it will not take weeks or months using traditional methods which involve coding. This is great news for companies that need to react fast to changing processes.
I haven’t looked into details on the cost of this solution, but IBM’s cost model charging is based on the volume of messages exchanged via App Connect. It will be relatively cheap and easy to get started. The cost will only increase as you scale up your operation. For small operators which only need to send out a few hundred tickets a month, I guess they can even get away with the free Lite plans. So this is definitely worth considering.

Hope you enjoy it.

Maximo Crash Course on Youtube – Starting point for a complete beginner

After posting a bunch of Maximo training videos in Vietnamese on Youtube, I got some requests for similar contents in English. On the web, there are plenty of Maximo resources in English; so I didn’t think it is necessary to create new duplicated content. But someone recently pointed out to me that as a beginner, he doesn’t know where to start. So here it is, a bunch of *super short* videos to get you started with Maximo. After going through these, I’m sure you will have a better idea on which direction you want to learn more about the software.

 Basic concepts in Maximo asset management: These tutorials are done on the IBM public Maximo preview site, so you don’t need to set up anything to do some exercises


 Basic Maximo configuration tutorials: 


Setting up development environment and writing customized java code for Maximo:

For configuration and customization, you’ll need MAXADMIN access to a Maximo environment to do the exercises. This shouldn’t be a problem if you are working for a company that already has Maximo. But if you are a student or freelance developer, at this point I don’t know of an easy and relatively cheap way to get this. The cheapest option is to buy an IBM Value Package for $999 which will give you access to *all* IBM software and support services. But I guess that’s too expensive for an individual just to learn about a system.
I guess you can ask somebody you know who have a development environment VM to give you a copy. Although this may not be completely legitimate. I believe IBM should allow free download to a trial version or demo VM like Microsoft or Oracle. It only helps them to expand the popularity of the product. Anyway, that’s enough for complaining. 
I hope these stuffs help you get started.

Deploy Maximo 7.6.1 on Websphere 8.5

Out of curiosity, I installed Maximo 7.6.1 on a VM to explore the new features. Then I found that I kind of like it, so I wanted to deploy it on my host OS to get rid of the VM. The trouble is I have Websphere 8.5.5.3 which comes with Maximo 7.6.0.0. I can run maxinst.bat to create demo data with Oracle 11g without a hiccup, but the deployment of the EAR file to Websphere didn’t go well.

It turned out Maximo 7.6.1 requires Java 1.8 and Websphere 9. It’s not possible to upgrade Websphere from version 8 to 9. We will have to install a new Websphere environment and migrate all of the settings which sounds like a lot of work. I decided to tweak it a little bit to make Maximo 7.6.1 runs on Websphere 8.5 using the following process:

1 – Update Installation Manager: Open IM, then open File > Preference, on the left menu, choose Update, check the Search for Installation Manager updates. Then click Ok. Then back to the main Installation Manager screen, click on “Install”, a wizard will pop up to download and update Installation Manager to the latest version (I got 1.8.9 by the time of writing this)

2 – Update Webshere: Open IM after it is updated, click on Update, choose Websphere Application Server 8.5, then follow the wizard. It will download and update Websphere with the latest fix packs. (I got 8.5.5.13)

3 – Install JDK 1.8: Open IM again, choose Install, then select ‘IBM SDK Java version 8’ to install it to the existing Websphere. After that, I got both Java 1.7 and Java 1.8 in my Websphere folder:

4 – Switch SDK version in Websphere: I used the [WAS_home]/bin/managesdk.cmd tool to change Websphere to use SDK 1.8 following the instruction here. To verify that MXServer uses the correct SDK version, I started MXServer and look at the SystemOut.log file to see the startup log:

5 – Upgrade deploytool: After the above step, I tried to deploy maximo.ear file and it failed. Turned out that the deployment tool of Websphere 8.5 doesn’t work with this new Maximo version. So I cheated by replacing the ‘deploytool’ folder of my Websphere 8.5 environment with the ‘deploytool’ folder I copied from the Websphere 9 environment I got when installing a fresh Maximo 7.6.1 instance in my VM. After that, the deployment process ran without any issues (and it is super fast compared to the previous version, yay!)

6 – Add new JMS queues: after maximo.ear is deployed, I tried to start MXServer but it failed, turned out there are new queues added to Maximo 7.6.1 which are not there with my existing Websphere environment, so I have to manually add those new queues and activation specifications to Websphere.

In summary for this step, I had to add new queues and activation specifications to Websphere. I basically mimic the settings from the Websphere environment I got in my VM. In the end, I added two queues: NOTF and NOTFERR, and two activation specifications: notfact, and notfacterr. Since I use Websphere MQ, I have to added two bus destinations in Websphere MQ as well. If you use the standard WAS default messaging provider, you simply add the two destinations to the ‘intjmsbus‘. I struggled with this step a little bit as the name of these artefacts are case-sensitive but I didn’t pay attention the first time I created those.

After this step, MXServer starts up without any issue and it works like a charm.

Basic steps integrating Maximo Spatial and ArcGIS

Due to many changes in different versions, the documentation provided by IBM for Maximo Spatial integration is scattered and inconsistent. This video is a quick demo on how to carry out the most basic configuration to enable integration between Maximo Spatial version 7.6 and ArcGIS.

In the video, what we have is a sample non-secured ArcGIS online server, made publicly available by ESRI. However, enterprise GIS map services are often provided via an SSL layer and can use token-based authentication. Thus, below are some of the common problems that you can have when configuring Map Manager with a secured map services:

  • If HTTPS is used, the SSL Certificate must be added to WebSphere trust store for Maximo to be able to send requests to the GIS server. If you don’t add the Certificate, when trying to add Map Service in Map Manager, it will give you a ‘BMXAA4199E – The remote object of the server cannot be accessed. A network error has occurred…’. You can follow the steps in this link to add the certificate. After that remember to restart the WebSphere for the change to take effect
  • If Map Server uses Token-based authentication, it doesn’t work with HTTP. Thus, you must use HTTPS, otherwise, it will give you a confusing error: ‘BMXAS0467E – Token is required to access this Map Service. Enable token security for this Map Manager’. Some old IBM sources mention that you have to add the ‘tokenEnabled’ and some other properties to System Properties. With Maximo Spatial 7.6.0.1 or newer, it is not required as you can tick the check box and enter username and password directly in the Map Manager app.
  • If you have a strange java.lang.ArrayIndexOutOfBoundsException when trying to add Map Service with HTTPS, it is because WebSphere is using TLSv1 and doesn’t support 2048DH key. Follow the steps in this link to change SSL protocol to TLSv1.2 or v2.
  • If your GIS provider uses self-signed certificate instead of a certificate issued by a Certificate Authority, users may get a blank screen when opening the Map tab. It is because the browser doesn’t trust the source (GIS service) and blocks it from loading. To work around this issue, try to open the GIS Map service directly on the browser, it will ask if you like to add the untrusted certificate to your exception list. After that, the map will be able to load in Maximo. The best solution is to use an SSL certificate provided by a Certificate Authority. In this case, Maximo users don’t have to worry about adding exceptions to the browsers. You can also enable the “Use Proxy” flag in Map Manager to address this issue.

If you have any other problems with the map control and integration, the first step would be to see the SystemOut.log file and the logs displayed in the ‘Developer Console’ of the browser. Most of the time it will give you some extra information to identify the cause of the problem.

I hope this helps.

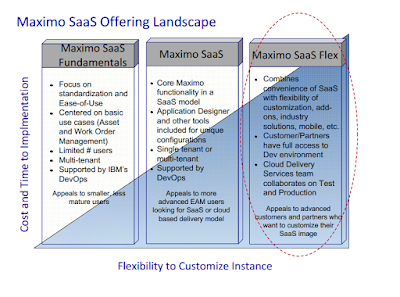
Unboxing Maximo SaaS Flex

I had never been a big fan of Maximo SaaS due to my background comes from a market where labour cost is cheap while license cost is outrageous. As such, we consultants prefer to spend some time building customized apps rather than spending lots of money buying more licenses or add-ons. (To give you a bit of perspective, in Australia, one Maximo license is worth about 15 days cost of an average engineer. In Vietnam, it is equivalent to about 1 year. Which means if you give an engineer a Maximo account; after a year, if it helps to save him or her 15 days, it worth the cost. But in Vietnam, it must save the engineer 1 year of labour to break even).

Anyway, back to the main point, I was not a big fan of Maximo SaaS mainly due to many restrictions on what you can do with it in term of configuration and customization. I’m surprised to find that there aren’t many sources on the web discuss about this. When looking at vendor presentations, we know what a new product offering can do. But it is much harder to find out the limitations a product can have. Most of the time, we learn about it the hard way and it seems people don’t openly talk about it. 
In this post, I’ll share some experience I got with the latest Maximo SaaS Flex product. Hopefully, the information helps you to make the right purchase decision or make the right preparation for your SaaS project.
Product package: 3 environments were provided: Production, Test, and Development. PROD and TEST run on Linux and DB2 with latest Websphere and Maximo feature/fix pack. DEV has the same configuration except it runs on a Windows VM
Performance: I find performance is pretty good for TEST and PROD environment. You can click on a link and expect a response in less than a second most of the time. DEV is a bit slower, but I usually don’t notice if I’m not paying attention. Remote access to DEV server is very slow, but it is workable.

Access: initially, you are given web access to Maximo using a sub-domain: https://[your-max-env].maximo.com with Maxadmin account details. Static IP addresses for three environments are also provided. If you ask for more access (by raising a ‘case’ using IBM support portal), you can get full admin access to DEV environment including remote desktop, DB2, Websphere, file folders. For TEST and PROD, you can get read-only access to DB2, and read-only sFTP access to a few important folders like Websphere’s Log, IntGlobalDir etc. Remote access to servers, access to Websphere admin console, or write access to DB2 are not given.

Other Restrictions: DEV server is not connected to the internet by default for security reason. And if you need to integrate Maximo with another cloud-based service, you need to raise a ‘case’ asking IBM support to open a VPN tunnel/Firewall exception to allow connection to a specific IP address/port (or range). Exception on domain name and port 80 (it seems) are not supported.

Dependency on IBM support: with the above restriction, you can’t do certain admin/config tasks on TEST/PROD environment. To carry out these tasks, you have to raise a case with IBM:
  • Restarting of Server OS, Websphere, MXServer, or DB2.
  • Changing WebSphere configuration – e.g. adding an SSL certificate to trust store so Maximo can send request to a secured cloud-based API.
  • Build/deployment of customized codes to TEST/PROD
  • Updating data in DB2
  • Transferring a large file to servers
  • Back-up/Restore database and refresh DEV/TEST environment from PROD

IBM Support: support on this product goes to IBM CDS team and I find them knowledgeable, thorough and supportive. For example, when I request to get access to DEV environment, I got a 30-page document prepared specifically for me, with detailed steps to set up everything like VPN, remote, WebSphere, DB2, BIRT development IDE, sFTP, and the details are accurate to the level that I got access to everything I need without having to ask any further question. CDS team is also ready to help you carry out many admin tasks like the ones listed above.
However, if you have experience working with IBM support, you know what to expect. If your ticket goes to a guy in a different time zone, for none emergency issue, it takes a day to get an email reply. Sometimes a ticket can take many replies over many days to solve if the problem is vague or if you don’t provide enough information for them to act.
So you can see that although it is a ‘Flex’ offering, there are still many limitations and you may find it difficult to work with, especially if you always work with on-premise system and have full access to both DB and App servers like me.  To overcome these limitations, following are some of my tips:

  • Get access to IBM support early: for cloud environment, you rely on IBM CDS team to handle many basic admin tasks, as such having access to IBM support for your specific client is crucial. You or someone in your team should be able to raise and check the status of tickets directly. This should be done as soon as you first get the welcome pack.
  • Be specific with your support request: for example, if you like to get some access to TEST server, list out the things you need like ‘Read access to DB2’, and ‘Access to MXServer’s Log folder’ and ‘DocLinks folder’. Don’t ask for general access to the server’s file systems as it can be refused. Or like an instance when I got stuck in Admin Mode; when raising a request, I also mention they can restart the server at any time. Otherwise, they will come back asking for what time is suitable for a restart.
  • Database access on TEST/PROD: get a read-only database account so you can query the data you need. For data upload/update, use MXLoader (See my other post)
  • Mass upload attachments: to upload Doclinks, refer to this excellent BPDZenith’s blog post; To upload images, see my other post here if you have Maximo 7.6 and here if you have 7.5 or older
  • Transfer large files from/to DEV: because remote connection to DEV is very slow, while actual HTTP access to Maximo is quite fast, compress the large files or folders to a zip file, rename it to pdf then upload it as an attachment. Then you can copy the file from DEV’s Doclinks folder, rename it back to zip to decompress. You can do the reverse to download large files by first attaching a dummy pdf file, then in the DEV server, replace it with the ‘fake pdf’ large file. In Maximo, download the attachment to your local drive rename it back to .zip to decompress. Using this method, upload/download speed is at least 20-30 times faster than copying over remote desktop session.
Maximo SaaS offering certainly has some restrictions. However, with Flex offering, the client can implement any add-ons or customization they like. And with some clever tricks, 3rd party implementers can help their clients roll-out an asset management system in a much shorter time and free them from worrying about many technical aspects of operating the system to spend more time on business problems. 
« Older posts Newer posts »