Category: Mobile

Interacting with Maximo via SMS with Twilio

Voice call and SMS are being used as a user interaction interface in many systems and services provided by large organizations. However, in the past, this integration is quite complex and expensive, and I never had a chance to play around with it. Recently, I posted an article on how we can easily configure Maximo to send SMS notifications. This is made easy and free (for developers) by using Twilio.

Sending inbound commands to a system from Twilio is more complex as it requires setting up a Web Server and writing code to parse HTTP POST requests, then forward the message to an onpremise Maximo system. With App Connect, it becomes easy (and free for developers) to set up an API gateway on the cloud and route messages to a system hosted in-house. I decided to give it a crack by imagining two easy use cases as follows:

  • Field workers send a text message to Maximo to create a new Work Request, or to report a Defect. This could be useful to quickly register an action item without having a smart device or 3G connection. Below is a quick demo of this scenario:
  • A user approves a workflow request by sending a SMS command. This could be useful for supervisors or managers who are always travelling or in meetings and don’t check email often. In many cases, the managers are often given a heads-up call, approving workflow is just a formality to keep record. With such scenarios, just reading the title of the request in a text message will be enough for the approver to say Yes or No, this approach could speed up the approval process. Below is a quick demo for this use case:

There are many other use cases we can implement SMS, MMS, or Voice command to add value. I can quickly think of a few such as

  • Field workers sending an acknowledgement of new work order assignment and confirmation of  scheduled start time entered by planners
  • Driver sending in telemetry data (fuel level, mileage etc.) or technician sending in asset meter data
  • Workers updating actual labour hours to work orders.
  • And whatever simple yet important data you can think of here

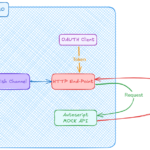
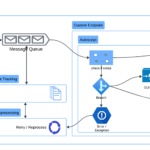
For the technical consultants who are interested in App Connect, the image below is how I integrated Twilio with Maximo via App Connect:

This may look a bit complex, but in fact, it is quite simple. The whole process to set up AppConnect, hook up with Twilio and Maximo takes less than 15 minutes. For Maximo on the cloud, I guess we can configure Maximo to hook up with Twilio directly. But I don’t have access to a cloud Maximo environment which I can mess with. So perhaps, that can be saved for a future article.

Send SMS Notification from Maximo using Twilio

Email or SMS Notification?

Occassionally, someone would ask me if we can configure Maximo to send notifications via SMS. With Maximo, the answer to such questions is always Yes. However, with this one, it will cost some money, very cheap though.

Since it is not free, I would say for most Maximo notification scenarios, the user would be ok with email notification which is free. However, there are certain scenarios where SMS notifications can add value such as:

  • Notify a field worker when a new high priority Work Order is assigned to him/her
  • Notify an asset owner when the asset deviates from the normal operating parameter range or when downtime is reported
  • Notify Maximo admin when there are repeated login attempts from an uncommon IP address or when there is a major problem tracked by the Escalation app.

In the section below, I provide the detailed steps on how to set up a trial Twilio account and send notifications from Maximo

A. Setup a Twilio trial account

With your trial account, Twilio will give you a small initial balance to buy a phone number and use the service. I got $15, and it will cost me $6 to buy a phone number, and 5 cents to send a text message.

  1. Create a trial account on Twilio.com: you’ll have to use your real mobile phone number to verify the account.
  2. Login using your trial account, go to Console, then create a new Project. Select “Products”, then choose “Programmable SMS”. Give your project a name, for example: “Maximo”. Then skip the rest of the steps to create the project
  3. On the left menu, click on the icon with the title “Programmable SMS”. In this menu, open the “SMS” submenu, open the “Messaging Services” page, then click on “Create new Messaging Service
  4. Give the messaging service a name, such as “MaximoNotification”. For use case, choose “Notifications, Outbound Only”. Then click on Create
  5. After the messaging service is created, open it. On the left menu, click on Number to open it, then click on “Buy a Number” to purchase a telephone number. On the pop-up, select your country code, then click on “Search”. It will give you a list of numbers to choose from
  6. Choose a number with SMS capability, and click on Buy. Depends on the country you live in, you may have to enter some details for your new number. I’m in Australia, so I have to enter my address.
  7. After purchasing a number, you are ready to send SMS messages from your Twilio account.
    Please note: with Trial account, it can only send SMS messages to a Verified Number. Your mobile number which you entered when registering is automatically added to this list. So you will be able to send SMS to that number. But if you like to send SMS to a different number, you’ll have to add it to the ‘Verified Caller ID’ list first.
  8. Go to “Console Dashboard”, open the “Settings” sub-menu, then open “General” page to take note of your Account SID, and Authentication Token. You will need it to send an SMS from Maximo.

B. Configure Maximo to send REST requests to Twilio

There are different ways to set this up depending on your requirement. In this example, I’ll create an ‘Action’ automation script, and send a REST request using Apache HTTPClient library. Action auto script can be used with Workflows or Escalation. In this example, I’ll send out an SMS when the workflow is initiated on the Service Request application.

The setup steps are as follows:

  1. Go to Automation Script application, create an ‘Action launch point’ automation script. Give the launch point a name, for example: “SENDSMS”. Set the action name as “SENDSMS” too. Set “SR” as the main object. Select “Jython” for script language. For the script, copy/paste the example code below to the “Source Code”
  2. With the code above, replace {YOUR_ACCOUNT_SID}, {YOUR_AUTH_TOKEN}, {YOUR_PURCHASED_PHONE_NUMBER} with actual details of your Twilio account. For testing purposes, replace {RECIPIENT_PHONE_NUMBER} with your phone number. Later on, once it works, you can replace it with a variable retrieved from your record using mbo.getString()
  3. Create a new workflow “SEND_SMS” for the SR object, connect the Start and Stop node with one line. And set the line to use ‘SENDSMS’ action. After that, Enable and Activate the Workflow. And remember to Add Workflow to SR application using the Select Action menu if you haven’t done so.
  4. Open an SR record, then click on the route button to initiate the “SEND_SMS” workflow
  5. After clicking on the Route workflow button, you should be able to receive an SMS message on your phone:

Source Code:

In a later post, I’ll talk about integrating Twilio with Maximo to create new Service Requests via SMS. For now, good luck with spamming your end-users with endless work requests 🙂

Barcode/RFID Scanning for Maximo Everyplace

I’m in love with Maximo Everyplace. It is so simple and easy to use. And guess what, it is totally free now with Maximo 7.6.

Recently I worked with a client and while the team still discussing various options for mobility solutions, I quickly duplicated and produced an Everyplace mobile app on Test environment and demonstrate a smooth workflow with barcode scanning on my iPhone, all done within 15 minutes. I understand there are certain reasons for choosing a more complex online/offline, even native app solutions. However, since everyplace is so easy and cheap to implement, so why not have it as a backup solution just in case the more complex one doesn’t work. If you have experienced the use of such offline, installed app solution, you will know what I’m talking about. Things like app crashes or hang are quite common. Those things are usually quite difficult to support as the programmers, who for 99% of the time are present not onsite and do not have access to log files to see what happened to investigate and provide timely bug fix. In this case, for the end-users it is extremely frustrating as they cannot proceed with their work.

One of the most common requirements with mobile app is ability to scan barcode to quickly search for asset, location, inventory item code, or work order number. Since Everyplace runs on browser, it doesn’t have a way to work directly with smart phone or tablet’s camera to read barcode. One solution is to use barcode scanner custom keyboard. This has been mentioned earlier in other blog posts such as by Bruno Portaluri (link) on how to use Barcode scanner keyboard app or IBM Android app for Everyplace. These are all Android solution.

With iOS, for many years, the only option is to use external barcode scanners because Apple restricted its custom keyboard API from accessing the camera. However, I recently found out about this app: ScanditWedge which does exactly the same thing, but now on iOS. The license for the use of their app is quite expensive though. But at least, now we know something like this is possible on iOS. I tried their trial license which allows the use of the keyboard on 20 devices for 2 weeks and it works like charm on my iPhone. So, this is definitely something you can consider.

For RFID, with built-in NFC reader on many Android devices and NFC scanner keyboard, it is possible to work with Everyplace. I have built native app and utilize the internal NFC reader of the ECOM Tab-EX (designed based on the Samsung Tab Active) and the ECOM Smart-Ex 01, and 02. All of those have been implemented and proven to work well under industrial settings. However, currently I do not have access to such device to test the newer NFC scanner keyboard apps. But I believe they would work the same with barcode scanner keyboard (You may need a separate field to store RFID tag’s ID string for this purpose).

On iOS, it’s been a long story. Apple introduced NFC support since iPhone 6, but the hardware acts as a passive RFID tag, used for ApplePay only. They restricted API access to 3rd party developers. Only in the latest iPhone 7, iPhone 8, and iPhone X, the hardware can actually act as a scanner, and with recent release of iOS 11, Apple have opened API access to 3rd party developer to read stored information in RFID tag (not tag ID). The demo video below by Serialio clearly demonstrated this capability.

I’ve personally tested this capability on iPhone 6 Plus and iPhone 7 plus using GoToTags and can confirm it works with iPhone 7. So this is another great news because we now know that it is technically possible to use iPhone to scan RFID and identify Asset/Check Point/Labor etc. (although not very convenient to setup).