Category: Maximo (Page 6 of 12)

Manipulating Chain of Java Extensions for the upgrade/installation process


I recently had to upgrade a pretty complex system. The original environment includes Maximo and ICD, and two large customization packages, one extended by the other (let’s call them package XXX extended by package YYY). The target system is the latest Maximo + ICD 7.6.1, plus 4 add-ons which include Oil & Gas and Utilities.

Customization was written by 3 different third parties over a long period of time and the source code was lost. This posed some challenges related to preserving customization and I had to spend a bit of time to figure it out. Below are some of the gotchas I learnt after the project:
 
Problem 1: Ensure customization is preserved after the upgrade

After reviewing the SMP folder, I found about 300 extended Java class files, but the product.xml files only cover about 20-30% of them; worse, some data are not even up-to-date. After the initial attempt to correct these files, I decided to simply ignore them, and build new product.xml files from scratch. Below are some of the key steps I had to do:
 
  • List out all extended java class files found in the SMP folder (using the command: dir /s /b  >list.txt) and put them in an Excel sheet
  • Use SQL to search from the DB any usage of custom Java code, put this list into another Excel sheet
  • Match the two sheets above to identify any missing files
  • Use a decompiler to view the code of each file to determine what is the original class it extends, and the type of the class (which I put into: Action, Bean, Cron, Event, Field, Object, Util)
  • For each of the class types, use Excel to generate an XML element as the follow examples:
  • After generating those elements, I put them together into newly created XML files.

Problem 2: Manipulating chain of extension without having Java source code:

The updated process took 6 hours, and after it finished and I can start Maximo. However, I freaked out when I looked into the MboSet class used by various objects. For example, in the WorkOrder object, the class used is psdi.pluss.app.workorder.PlusSWOSet. Initially, I thought the custom classes were wiped out after the upgrade. But after some investigation, I realized that due
to the upgrade and installation of new add-ons, Maximo has updated the classes (through the mean of binary code injection) to modify the chain of extension like this:

Before:  YYYWOSet XXXWOSet TloamWOSet PlusPWOSet WOSet


After:  PlusSWOSet > PlusGWOSet > YYYWOSet > XXXWOSet > TloamWOSet > PlusPWOSet > WOSet


After spending some time reading various IBM tech notes, I learnt that, in the past, we need to create a file with the exact name as: “a_customer.xml” to maintain metadata about customization. In the newer version (not exactly sure from what version, probably 7.5), we actually SHOULDN’T name it “a_customer.xml”. Because the file name makes it top of the list (in alphabetical order), and thus, becomes the first product to extend the core Maximo classes. For example, if you only have Core Maximo, Oil & Gas Add-on, and your custom package, if you name it a_customer.xml, the O&G package name is plusg, thus the extension chain would become: PlusGWOSet > CUSTOMWOSet > WOSet


If I like my custom class to be the last one that extends everything else, I actually should name it z_customer.xml, or anything that comes last in term of alphabetical
order. So I named the product XML files for the two custom packages z1_XXX
and z2_YYY.

For some unknown reasons, using just file name doesn’t give me the desirable outcome (probably due to  some undocumented logic), I had to use the <depends>
tag inside the two product XML files. From my experiment, by having the <depends> tag, the updatedb process will now ignore the file name rule, which means it doesn’t matter if you name it a_customer or z_customer anymore. The classes in your package will be extended after all packages listed in the <depends>
tag

To illustrate this point, below is the <depends> tag of my original z2_YYY.xml file:

It means the YYY package will extend the XXX package, then extend a bunch of packages (which included in the ICD product).

I updated the <depends> tag of the z2_YYY.xml file as follows:

Notice now I inserted three other packages before z1_XXX. After I updated the files, I ran updatedb process again (Even if there’s no update, updatedb will still update the java class files. With newer Maximo versions, you can run updatedblitepreprocessor.bat to do the same). With this, the updated process displays the product installation order as below:

Checking the class files, I got the extension in the desired order:

YYYWOSet > XXXWOSet > TloamWOSet > PlusSWOSet > PlusGWOSet > PlusPWOSet > WOSet

One more note, during the process, I found some of the files that get extended in an endless loop, for example:


YYYWOSet > PlusSWOSet > PlusGWOSet > TloamWOSet
> PlusPWOSet > XXX > TloamWOSet

This caused Maximo to fail when opening the app and crashed Eclipse when I tried to decompile the file. It turned out the reason is I used the wrong XML tag for the class type i.e. I should have used <Mbo….>  and <MboSet…> for object class rather
than <Class…> tag.

Another note is, due to some bugs or unknown logic, I had to play around a little with the product listed in the <depends> tag to get to the desired order as it doesn’t seem to work exactly as documented.

Hope this helps.

Blank parameter page when trying to run report from Eclipse/BIRT Designer

The issue with Eclipse/BIRT designer showing a blank parameter page when we try to run a report has been around for a while. This problem is due to newer versions of IE installed on Windows. When I was using an older Windows version, I can simply uninstall IE to restore it to an original, older version. Recently, I had to switch to Windows 10 which comes with IE11 and uninstalling IE is not possible. The problem is described here in this IBM technote

After trying the various solutions found on the web, the following seems to work for me:
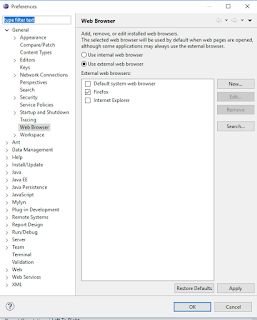
– In Eclipse, click on Windows > Preference. 
– Then under the General > Web Browser page, check the “Use External Web Browser” selection, and choose “Firefox” as the External Web browser
– In the same Preference dialog, go to the “Report Design” > “Preview”, then in this page, tick on the checkbox “Always use external browsers”
– After that, click on Apply and OK.

“This portlet has not been setup” error in Maximo Start Center

Introduction

When creating Start Center Template, I often run into the issue of users not being able to see data in result sets with the error ‘This portlet has not been setup‘. I often waste a bit of time to troubleshoot the issue and then forget about it. Repeatedly, I would run into the same issue. This post provides a check list to troubleshoot this problem in the case I hit with this issue in the future. Hopefully it will help some of you Maximo technies out there.

The dreaded “This portlet has not been setup” error

When and Why does it happen?

This issue often occurs to the normal users after deploying a new Start Center to Production. During development, it usually works fine. For a resultset to display on a user’s Start Center several things happen in the background:

  • The user’s Start Center / Resultset need to be generated from the Start Center template.
  • The user must have the permissions to access the data displayed by the Result set

Because of that, several different access permissions must be given to the user for he/she to be able to see the data

Troubleshooting Checklist

To allow the user to access the data, and generate start center from the template, the user must be given the following access:

  • Read‘ access to the main application. For example Work Order Tracking if the result set is for listing work order.
  • Run Report‘ and ‘Create Report‘ signature option in the main application. If the main app is a custom app, you’ll need to create the same Signature Option in App Design first.
  • Access to ‘All Site‘ or at least one Site.
  • Access to the ‘Layout and Configuration‘ application
  • Access to the Report Object structure used by the result set (which is given in the ‘Report Administration’ app > Select Action > Set Report Object Structure Security
  • The Saved Query used by the portlet must be marked “Public

Process Inbound Twilio SMS message in Maximo

In my previous post, I provided some demos on how we can process inbound text messages to create SR and route Workflow. There are a few people on LinkedIn asked me how to do it. I also like to explore the option of integrating Maximo with Twilio directly without the need for AppConnect. With Maximo 7.6, we can create a simple API using automation script. To prove the concept, the video demonstrates how we can create a simple API with automation script and direct Twilio HTTP requests to Maximo:


Below is the source code for the script in the video:

In this case, for the sake of simplicity, I only include the bare minimum components to make it works. You will probably want to write some scripts to automatically populate the “Reported By” person based on source phone number and populate other details like location/asset number based on the content of the incoming message. Also, it would be nice to respond with a text message for confirmation and provide the users with the new SR number.

With this method, we’ll need Maximo to be accessible from the Internet, it’s is not a problem for a cloud-based system. But if you have an onpremise system, you’ll need to configure port-forwarding to make Maximo accessible from the Internet. For development, since my ADSL router does not support port-forwarding, I used a tool called ‘ngrok’ to forward access of my local Maximo to the web via ngrok.io

The Scripted API is a new feature in Maximo 7.6. Thus this approach won’t work if you have an older Maximo version. It that case, probably using App Connect is an easier option. With App Connect, I used it for two functions:

  • Act as an API gateway to route Twilio request to a local server
  • Quickly transform HTTP request to REST/JSON request which Maximo can easily consume

App Connect is just a fancy name for a newer version of IBM Integration Bus (which IBM now call it App Connect Enterprise) and a bunch of new cloud-enabling features. So you’ll need some basic understanding of IIB in order to set it up. For connecting App Connect (the cloud component) and local Integration server, I followed the tutorial here: link

Interacting with Maximo via SMS with Twilio

Voice call and SMS are being used as a user interaction interface in many systems and services provided by large organizations. However, in the past, this integration is quite complex and expensive, and I never had a chance to play around with it. Recently, I posted an article on how we can easily configure Maximo to send SMS notifications. This is made easy and free (for developers) by using Twilio.

Sending inbound commands to a system from Twilio is more complex as it requires setting up a Web Server and writing code to parse HTTP POST requests, then forward the message to an onpremise Maximo system. With App Connect, it becomes easy (and free for developers) to set up an API gateway on the cloud and route messages to a system hosted in-house. I decided to give it a crack by imagining two easy use cases as follows:

  • Field workers send a text message to Maximo to create a new Work Request, or to report a Defect. This could be useful to quickly register an action item without having a smart device or 3G connection. Below is a quick demo of this scenario:
  • A user approves a workflow request by sending a SMS command. This could be useful for supervisors or managers who are always travelling or in meetings and don’t check email often. In many cases, the managers are often given a heads-up call, approving workflow is just a formality to keep record. With such scenarios, just reading the title of the request in a text message will be enough for the approver to say Yes or No, this approach could speed up the approval process. Below is a quick demo for this use case:

There are many other use cases we can implement SMS, MMS, or Voice command to add value. I can quickly think of a few such as

  • Field workers sending an acknowledgement of new work order assignment and confirmation of  scheduled start time entered by planners
  • Driver sending in telemetry data (fuel level, mileage etc.) or technician sending in asset meter data
  • Workers updating actual labour hours to work orders.
  • And whatever simple yet important data you can think of here

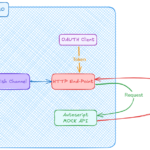
For the technical consultants who are interested in App Connect, the image below is how I integrated Twilio with Maximo via App Connect:

This may look a bit complex, but in fact, it is quite simple. The whole process to set up AppConnect, hook up with Twilio and Maximo takes less than 15 minutes. For Maximo on the cloud, I guess we can configure Maximo to hook up with Twilio directly. But I don’t have access to a cloud Maximo environment which I can mess with. So perhaps, that can be saved for a future article.

Send SMS Notification from Maximo using Twilio

Email or SMS Notification?

Occassionally, someone would ask me if we can configure Maximo to send notifications via SMS. With Maximo, the answer to such questions is always Yes. However, with this one, it will cost some money, very cheap though.

Since it is not free, I would say for most Maximo notification scenarios, the user would be ok with email notification which is free. However, there are certain scenarios where SMS notifications can add value such as:

  • Notify a field worker when a new high priority Work Order is assigned to him/her
  • Notify an asset owner when the asset deviates from the normal operating parameter range or when downtime is reported
  • Notify Maximo admin when there are repeated login attempts from an uncommon IP address or when there is a major problem tracked by the Escalation app.

In the section below, I provide the detailed steps on how to set up a trial Twilio account and send notifications from Maximo

A. Setup a Twilio trial account

With your trial account, Twilio will give you a small initial balance to buy a phone number and use the service. I got $15, and it will cost me $6 to buy a phone number, and 5 cents to send a text message.

  1. Create a trial account on Twilio.com: you’ll have to use your real mobile phone number to verify the account.
  2. Login using your trial account, go to Console, then create a new Project. Select “Products”, then choose “Programmable SMS”. Give your project a name, for example: “Maximo”. Then skip the rest of the steps to create the project
  3. On the left menu, click on the icon with the title “Programmable SMS”. In this menu, open the “SMS” submenu, open the “Messaging Services” page, then click on “Create new Messaging Service
  4. Give the messaging service a name, such as “MaximoNotification”. For use case, choose “Notifications, Outbound Only”. Then click on Create
  5. After the messaging service is created, open it. On the left menu, click on Number to open it, then click on “Buy a Number” to purchase a telephone number. On the pop-up, select your country code, then click on “Search”. It will give you a list of numbers to choose from
  6. Choose a number with SMS capability, and click on Buy. Depends on the country you live in, you may have to enter some details for your new number. I’m in Australia, so I have to enter my address.
  7. After purchasing a number, you are ready to send SMS messages from your Twilio account.
    Please note: with Trial account, it can only send SMS messages to a Verified Number. Your mobile number which you entered when registering is automatically added to this list. So you will be able to send SMS to that number. But if you like to send SMS to a different number, you’ll have to add it to the ‘Verified Caller ID’ list first.
  8. Go to “Console Dashboard”, open the “Settings” sub-menu, then open “General” page to take note of your Account SID, and Authentication Token. You will need it to send an SMS from Maximo.

B. Configure Maximo to send REST requests to Twilio

There are different ways to set this up depending on your requirement. In this example, I’ll create an ‘Action’ automation script, and send a REST request using Apache HTTPClient library. Action auto script can be used with Workflows or Escalation. In this example, I’ll send out an SMS when the workflow is initiated on the Service Request application.

The setup steps are as follows:

  1. Go to Automation Script application, create an ‘Action launch point’ automation script. Give the launch point a name, for example: “SENDSMS”. Set the action name as “SENDSMS” too. Set “SR” as the main object. Select “Jython” for script language. For the script, copy/paste the example code below to the “Source Code”
  2. With the code above, replace {YOUR_ACCOUNT_SID}, {YOUR_AUTH_TOKEN}, {YOUR_PURCHASED_PHONE_NUMBER} with actual details of your Twilio account. For testing purposes, replace {RECIPIENT_PHONE_NUMBER} with your phone number. Later on, once it works, you can replace it with a variable retrieved from your record using mbo.getString()
  3. Create a new workflow “SEND_SMS” for the SR object, connect the Start and Stop node with one line. And set the line to use ‘SENDSMS’ action. After that, Enable and Activate the Workflow. And remember to Add Workflow to SR application using the Select Action menu if you haven’t done so.
  4. Open an SR record, then click on the route button to initiate the “SEND_SMS” workflow
  5. After clicking on the Route workflow button, you should be able to receive an SMS message on your phone:

Source Code:

In a later post, I’ll talk about integrating Twilio with Maximo to create new Service Requests via SMS. For now, good luck with spamming your end-users with endless work requests 🙂

« Older posts Newer posts »