Category: Integration (Page 4 of 5)

IBM App Connect – Integrate Maximo with Google Sheet, SalesForce, and ServiceNow

While having a break between projects, I have some free time to play around with IBM’s new toy: App Connect. After several years of working with Enterprise applications, I’ve got to a point where I can tell if a system is great or not after playing around with it for a short time.  Some examples of great systems or platforms I have experience with is Maximo (of course), React Native (for mobile development), and SAP. Some examples of *not so great* systems I played with include Oracle EBS, Infor SunSystems, and Maximo Anywhere mobile platform.
With App Connect, I can tell this is an excellent tool after going through a few beginner tutorials. I can immediately come up with some useful use case using it to enhance Maximo by integrating it with other cloud applications. Below are two examples:
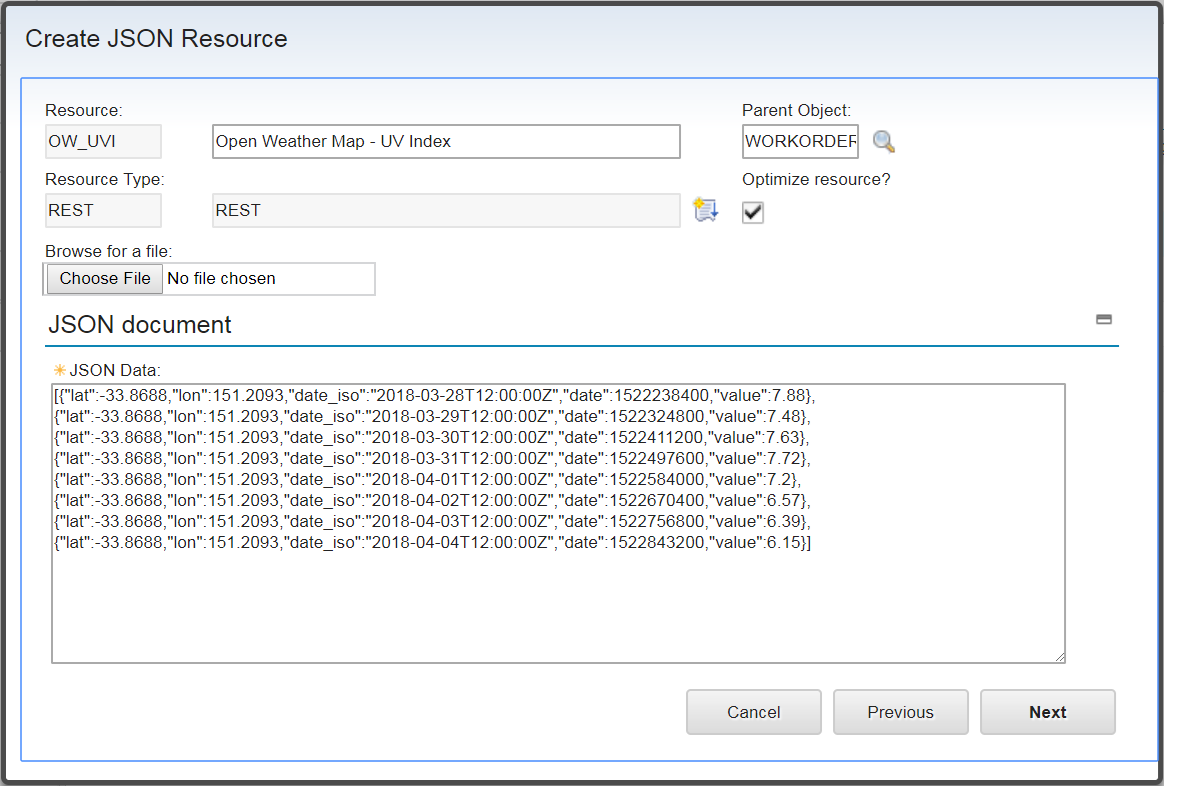
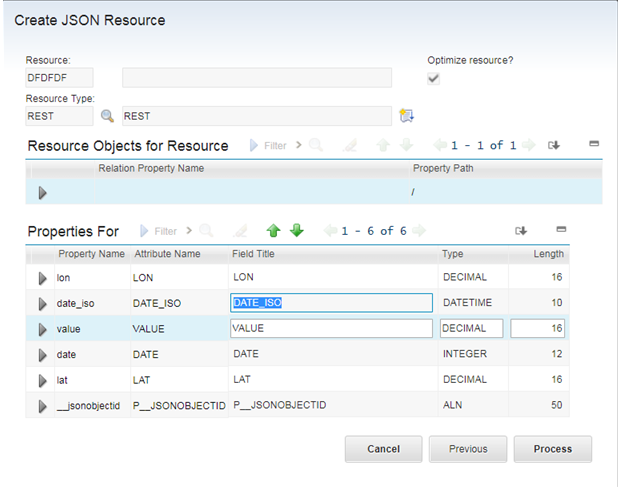
1 – Using shared Google Sheets to collect project data such as Asset register, Spare-part BOM from vendors:
An operator can create different Google Sheets and then share them with EPC contractor or sub-contractor, asking them to copy/paste data from their internal design database, and the data will be sent over to Maximo automatically. This continuous data provision process will ensure a more complete and accurate asset database after the system is handed over to the operator.

2 – Linking Maximo with a Service Provider’s CRM or ticketing system to automate Service Request workflow: 

Obviously, companies have been integrating Maximo with other systems in similar scenarios for ages, but with App Connect, the implementation is so much simpler and effortless. The above scenarios took me less than 10 minutes to configure everything without writing a single line of code. For an enterprise-grade integration solution, which needs to be robust, secure, and has high performance, it will take a lot more effort than that, but surely, it will not take weeks or months using traditional methods which involve coding. This is great news for companies that need to react fast to changing processes.
I haven’t looked into details on the cost of this solution, but IBM’s cost model charging is based on the volume of messages exchanged via App Connect. It will be relatively cheap and easy to get started. The cost will only increase as you scale up your operation. For small operators which only need to send out a few hundred tickets a month, I guess they can even get away with the free Lite plans. So this is definitely worth considering.

Hope you enjoy it.

Basic steps integrating Maximo Spatial and ArcGIS

Due to many changes in different versions, the documentation provided by IBM for Maximo Spatial integration is scattered and inconsistent. This video is a quick demo on how to carry out the most basic configuration to enable integration between Maximo Spatial version 7.6 and ArcGIS.

In the video, what we have is a sample non-secured ArcGIS online server, made publicly available by ESRI. However, enterprise GIS map services are often provided via an SSL layer and can use token-based authentication. Thus, below are some of the common problems that you can have when configuring Map Manager with a secured map services:

  • If HTTPS is used, the SSL Certificate must be added to WebSphere trust store for Maximo to be able to send requests to the GIS server. If you don’t add the Certificate, when trying to add Map Service in Map Manager, it will give you a ‘BMXAA4199E – The remote object of the server cannot be accessed. A network error has occurred…’. You can follow the steps in this link to add the certificate. After that remember to restart the WebSphere for the change to take effect
  • If Map Server uses Token-based authentication, it doesn’t work with HTTP. Thus, you must use HTTPS, otherwise, it will give you a confusing error: ‘BMXAS0467E – Token is required to access this Map Service. Enable token security for this Map Manager’. Some old IBM sources mention that you have to add the ‘tokenEnabled’ and some other properties to System Properties. With Maximo Spatial 7.6.0.1 or newer, it is not required as you can tick the check box and enter username and password directly in the Map Manager app.
  • If you have a strange java.lang.ArrayIndexOutOfBoundsException when trying to add Map Service with HTTPS, it is because WebSphere is using TLSv1 and doesn’t support 2048DH key. Follow the steps in this link to change SSL protocol to TLSv1.2 or v2.
  • If your GIS provider uses self-signed certificate instead of a certificate issued by a Certificate Authority, users may get a blank screen when opening the Map tab. It is because the browser doesn’t trust the source (GIS service) and blocks it from loading. To work around this issue, try to open the GIS Map service directly on the browser, it will ask if you like to add the untrusted certificate to your exception list. After that, the map will be able to load in Maximo. The best solution is to use an SSL certificate provided by a Certificate Authority. In this case, Maximo users don’t have to worry about adding exceptions to the browsers. You can also enable the “Use Proxy” flag in Map Manager to address this issue.

If you have any other problems with the map control and integration, the first step would be to see the SystemOut.log file and the logs displayed in the ‘Developer Console’ of the browser. Most of the time it will give you some extra information to identify the cause of the problem.

I hope this helps.

How to bulk upload images via the Integration Framework?

In the previous post, I provided an example of how we can customise Object Structure to enable import/export of binary data via MIF. It is achieved with Java customisation. From Maximo version 7.6, the automation scripting framework has been greatly extended to support integration. With this update, we can enable import/export of binary data with a simple automation script. Below is an example of how we can configure Maximo 7.6 to bulk upload images to Item Master application:

Step 1: Add a new Object Structure

  • In the Object Structures application, Open and duplicate the MXITEM object structure to create a new one. Name it MXLITEM
  • Under “Source Objects for MXITEM”, delete all child objects, and add a new child object IMGLIB as shown below

Step 2: Add an Integration Automation Script

  • In the Automation Script application, choose Action > Create > Script for Integration
  • In the pop-up, enter the following  details:
    • Select “Object Structure”, choose “MXLITEM” for Object Structure
    • Select “Inbound Processing
    • Language: Python
    • Copy/paste the piece of code below to the  Source Code area.

Step 3: Upload images to Item Master

Download the Excel VBA tool in this GitHub repo. Use it bulk upload images to Item Master:

  • Upload the Settings page with the URL and the username/password to connect to Maximo
  • Put all the image files in the same folder as the Excel file
  • Update the Data sheet with the list of Item Number and the name of the image file.
  • Click on “Upload Images”

Notes & Updates

Note 1: be careful with photos taken from newer cameras, the files usually have high resolution and thus can be quite big. I’ve seen an eager team of engineers upload images for all assets and inventory items in a power plant, and overnight, the database grew from 1GB to 20 GB. Thus make sure you resize the images before uploading.

One quick and simple method in Windows is to select multiple files, then right-click, and choose Send To > Mail Recipient. Windows will give you a pop-up to resize the files, choose the smallest size (640×480). Windows will resize the files, then attach them to Outlook, in Outlook, select all the files, and copy/paste them to a different folder. These files will be much smaller than the original, full-resolution files.

Update Aug/2023: I have posted a new article on how to automatically rescale the image to a smaller size

Federated MBO / JSON Resource – Filling the gap between Maximo and IoT

What is a Federated MBO?

Recently I got some time to explore the new Federated MBO feature. I like it a lot because it is simple to configure and quite powerful. Of course, prior to Maximo 7.6, the same functionality can be done with Java programming, but with this new feature, it is so easy to incorporate data from external systems into Maximo business logic and make a seamless experience to the end-users.

Basically, Federated MBO allows you to link an API from an external system and make it looks like a standard object in Maximo and treat it like other standard Maximo objects such as displaying data on GUI or setting up workflow conditions or writing automation script against it. The key difference here is that data is not stored inside Maximo database but queried from the API on-the-fly when the object is accessed.

Use Cases

I can immediately think of several applications that are enabled by this feature:

  • Integrate with Data Historian/SCADA: to display real-time operation conditions of assets. It is always beneficial for the asset managers to know the current conditions of the assets when planning works. Traditionally, operation conditions of critical assets can be imported/synchronized into asset meters for conditional monitoring PM or analytical reports. But it is not real time data. Generally, we don’t import every meter reading collected into Maximo. It will fill-up the database and consume valuable system resource. With this capability, we will only query data of a specific asset or location directly from an external system and don’t store it in the DB. However, we still can interact with the data as part of Maximo functionality which is a distinct advantage over other methods such as embedding the web page of an external system inside Maximo or directing user to a different web application
  • Integrate with security access systems: to display in real-time the current whereabouts of a worker. This could help with work planning and coordination activities.
  • Integrate with external service: to verify ID, Certificates etc. for the labour self-registration process.
  • Integrate with weather service to assist work planning process. For example, Maximo will warn the planner when planning to work if extreme heat, high UV, or heavy rain is forecasted. This allows them to plan the work on a different date or prepare proper PPE equipment to the workers. The same can be done if we deploy sensors to report temperature, noise level, humidity etc. on certain work locations.

Implementation

To demonstrate how the Federated MBO feature works, below is an exercise I did with OpenWeatherMap API. This API provides free access to 5-day weather forecast, UV Index forecast, and Air Pollution. In this example, I will link the UV Index forecast API and make it available as an MBO. When the user set a Scheduled Start Date, if UV Index is forecasted to be higher than 7, Maximo will display a warning message to remind the planner.

Step 1: Register OpenWeatherMap API account, and retrieve data on browser

  • Go to OpenWeatherMap.org to register a free account.
  • Sign-in with your new account, go to Account home page, open the “API keys” tab and copy your API key to use it to access the API.
  • Paste the following link into a new browser tab, replace the XXX with your API key, you should be able to retrieve JSON data of the UV Index forecast for the next 8 days as shown in the image below 
http://api.openweathermap.org/data/2.5/uvi/forecast?lat=-33.8688&lon=151.2093&cnt=7&appid=XXX
Test the OpenWeatherMap URL in browser
  • If you couldn’t retrieve the data, go to the site’s API document to read the instructions. It might have been updated. The OpenWeatherMap’s API syntax is very simple.

Step 2: Create a JSON Resource in Maximo

  • In Maximo, go to the Integration \ JSON Resource application. Under the More Actions menu, click Create JSON resource to start the wizard
  • Create a new Resource
    • Resource: OW_UVI
    • Resource Usage: OBJECT
    • Resource Type: REST
    • URL: <copy/paste the URL in the previous step above>
  • Note: for simplicity, we hardcode the latitude/longitude of the location in the URL. Once it works, you can dynamically populate the values from the main object by putting the field name inside a bracket such as:
    lat={LOCATIONS.LATITUDE}&lon={LOCATIONS.LONGITUDE}
  • Click Next 
  • Copy/Paste the sample JSON data we retrieved in previous step from OpenWeatherMap into the JSON Data text area. This allows Maximo to parse the data structure returned from the API for the next step
  • For Parent Object, enter “WORKORDER”. This will create a relationship on the “WORKORDER” object to point to the new JSON object “OW_UVI” we are creating
  • Click Next to proceed to the next screen. This screen summarizes how Maximo parsed and construct new MBO structure from the sample data provided.
  • Leave the default value, click Process to finish.

Step 3: Test the new JSON Resource

  • In the Database Configuration application, open the new OW_UVI object it just created for us. It also added a relationship OW_UVI in the WORKORDER object to link to this new mbo.
  • To check if our JSON resource can query data from the API correctly, use Application Designer, add a Table to anywhere, such as the “Map” tab. Open properties of the table, put OW_UVI as the relationship of the table. Add two columns and assign the DATE_ISO and VALUE field to the two columns. 
  • Open the Work Order Tracking app, open any work order, the table will display some UV forecast data:

Step 4: Create a warning using Automation Script

  • Open the Database Configuration app, choose Action > Messages to open the Message dialog. Create a new Warning Message:
    • Message Group: WOTRACK
    • Message Key: HighUVI
    • Value: High UV Index is forecasted for the scheduled date. Ensure proper sun protection PPE has been planned.
  • Note: the Message Group and Message Key fields are case-sensitive. Thus, in automation script, we should use the exact case in order for the message to be displayed
  • Open Automation Script app, Create an Attribute Launch Point:
    • Launch Point: SCHEDSTART
    • Object: WORKORDER
    • Attribute: SCHEDSTART
    • Event: Validate 
  • Click Next to the next screen, give the script a name such as Check_UVI choose Python as language
  • Click Next. Copy/Paste the following source into the Source code text area, then click Create to finish creating the script
  • In this script, I compare and identify if the Scheduled Start Date is in the next 8 days, and if the UV Index is higher than 7. If this condition is met, Maximo will display the warning we created above.

Extras

With Maximo 7.6, we can setup to assign Service Address to Location with coordinate of the location. When a Work Order is created against a location, it will inherit the coordinate of the location. We can use it to fill into the parameter of the API request, and retrieve the actual forecast of the Work Order’s location.  If you’ve read my previous post on creating custom chart control, we can also modify the app to display UV Index forecast in a chart for visualization. A planner after receiving the warning can then open the “Map” tab to see the location of the work, and see the UV Index forecast on a chart to determine what day is better to carry out the work.

I hope you have fun with this new Maximo feature. If you can think of any creative application using this feature to make Maximo better, please suggest by leaving me a comment. I would love to try it out

Blanket Contract and Procurement in Maximo

A friend of mine who has experience with SAP asked whether Maximo can handle a “Blanket PO” process similar to SAP. I sent him my answer based on the scenario and requirement he provided and think it is probably worth posting here as some other people may find it interesting:

In the Purchase Contracts application, we can create a new Purchase Contract of type “Blanket”  and give it a Maximum Amount say $1.5M. Some companies call it “Budget” because this is the limit a user can use to release Purchase Orders (PO). This is called “Release PO” in Maximo, but I saw many of my clients in the energy sector refer to it as “Call-Out” or “Work order”. Blanket Contract is also sometimes referred to using different terms such as Frame Contract, Framework Contract, or Price Contract. I mention this because the “Work Order” PO can easily be confused with normal maintenance Work Order, and “Price contract” in this case can easily be confused with the “Price Contract” type in Maximo which works a bit differently.

To create a Release PO, on the Contract app, we use the “Select Action >> Create Release PO”, and then select the contract items we want to procure. We can choose not to select any existing contract item, generate an empty PO, and add service/material items to the PO lines later. The total amount of the PO will still be counted against this Contract.

GL Account is specified in PO, not in Contract because the contract is an agreement between the operating company and a 3rd party vendor; it is generally to define terms and conditions and set a fixed price for certain goods or services. When the good or service is actually ordered (by issuing a Release PO), we will have a better idea of where and how it is used (on what project/work order or on what location/asset/cost centre?).

In the Purchase Order application, we can distribute the cost of each line item to charge against different cost centres or GL accounts for more detailed financial reporting. To do this, we can select a line and click on the “Distribute Cost” button and specify the cost and GL account that we want to charge against. This information will also be copied to the Invoice when creating an Invoice record so that accountants can determine what expenses will be recorded against what accounts.

The rest of the steps are similar to the standard procurement process: we can receive material/service using the Receiving application, and we can create an Invoice against the receipts. (In the Receiving application, even with the latest version, Maximo still treats each line item received as a separate transaction, I prefer IBM to introduce an app that groups all items received each time into one Receipt header record which can be used to enter details like the receiver, inspector, and actual receipt date).

If Maximo is integrated with the Finance system, generally, items in an approved PO are posted as a “commitment” transaction, items received into inventory are posted as “accrual”, and items/services purchased against an Asset/Location, Work order, or simply a GL, which are referred to as “Direct Issue” item in Maximo, are posted as “expense”, and Invoice is posted as “payable”, “tax”, and “expense” transactions.

In the Contract application, we can open a Blanket Contract, and click on “Select Action >> View Release Cost” to see with the original “budget”, how many Release POs have been issued, the total committed amount, the total received, and the remaining of the “budgeted” amount we have left to spend on future release.

RFID/Barcode and Integrated Mobile Solutions for Maximo

      I had to look at RFID/Barcode options for Maximo mobility solution recently. Although these technologies have been around for decades and have become a commodity, when integrating with other systems like Maximo Anywhere or Everyplace, there are certain problems that we have to deal with. In this post, I’ll discuss a few concerns related to this topic, hopefully it helps Maximo consultants to save some time when considering the solution. These are just a brain dump of different things related to the topic that I have in mind. Thus, you can read them at any order or only look that the part that you are most interested in.

  • Barcode vs QR code: When it comes to barcode reading, many people think that they can simply use the built-in camera of the phone or tablet to read barcode, as seen in many product comparing apps. However, in industrial setting, one should consider various extreme conditions that field workers have to work in. For example, in construction or in oil & gas, working at night is common. In such case, the camera doesn’t do well in reading barcode. In some of our tests, under pretty good ambient light, reading barcode takes up to 3-5 seconds while QR code reads almost instantly. In poorer conditions though, the camera simply couldn’t focus and can’t read anything. Thus, if the requirement is to work in environment where lighting condition is always ideal, Barcode or QR codes doesn’t matter, I’m a bit lean toward QR code as it read faster and enable higher workflow efficiency. Otherwise, we should consider other options such as RFID or using laser barcode reader.
  • Barcode vs RFID: When it comes to barcode (QR code is included in this category) versus RFID, they have very different attributes that one should really think carefully before deciding on which one suits their requirements the most. Many of the better features of RFID do not apply in certain asset management application. For example, RFID tags don’t need line of sight to be read or RFID can be read in bulk simultaneously. However, in asset identification, these are usually not required. However, one feature of RFID that is a clear advantage when compare to Barcode is that RFID tags can be a lot more durable under extreme conditions such as in processing plants where conditions usually involve high temperature, high moisture, and can be tampered with chemical/oil, even the some of best weather-resistant barcode label brands can wear out/fade out pretty quick (in few months). In this case, RFID tag is a clear winner. On the other hand, if working under extreme conditions is not a requirement, I would generally suggest using barcode as it is much cheaper and simpler to use. For example, we can encode Asset Number or Inventory Item Number directly to print out barcode labels, and on Maximo apps, we will just scan and lookup barcode using the standard “assetnum” and “itemnum” fields. If RFID is to be used, we generally need a separate custom field to store the tag’s ID string. Then we have to customize the app to lookup asset/item using this field instead of the standard asset/item number. We also need an extra step of reading and updating the tag’s ID string into the record in Maximo before it can be used.
  • Built-in camera/NFC reader vs specialized reader: Here I’m discussing about the pros and cons of using built-in camera or NFC reader (NFC is one form of RFID) versus using a specialized, external Barcode/RFID device. Built-in reader is obviously simple and more compact, thus it is suitable for occasional use. However, if your application requires frequent reading of barcode/RFID, you should go for a specialized laser barcode reader or RFID reader. These tools are designed specifically for the job, as such, it is a lot more efficient and easier to use. As mentioned above, using the camera to read barcode under poor ambient light can be problematic, but if a laser reader is utilized, poor ambient light is not a problem as the device has its own laser light source, and thus can read under any lighting condition. When it comes to industrial use, invest in specialized tool can be a bit more costly but almost always give a much better return in term of improved productivity and user acceptance. One thing to consider with external reader is that, field workers usually has to wear/carry many accessories such as PPE equipment, walkie-talkie, safety-belt, and other work-related tools. The idea of having to carry an extra phone/tablet and an external reader doesn’t sound convenient. As such, one should consider higher level of resistance from field workers if external reader is introduced. Another drawback if you consider external bluetooth scanner is that the pairing-up process between bluetooth devices and smart phones sometimes aren’t straightforward, these kind of glitches can sometimes create additional reasons for the workers who resisted to change to pushback and refuse to use the solution. As such, if possible, choose devices with built-in or connected laser barcode/RFID reader over wireless devices
  • iOS vs Android: Almost everyone prefers using an iPhone or iPad over Android devices. However, iPhone and iPad is designed for consumer market. When it comes to industrial use, iOS devices have many shortcomings such as they are not designed to work under extreme conditions such as under rain, hash sunlight, or sensible to touches when worker wearing thick gloves. Apple is also more restrictive in term of providing API for 3rd party developers, as such, there are less options provided by 3rd party vendor when it comes to industrial application. In the Energy and Mining industries, the use of intrinsically-safe/non-explosive (EX) electronic equipment is mandatory. This make Android platform the only option as currently, there is no iOS device on the market that can meet this safety requirement. Over the last few years, many companies introduce various computing devices such as smart phones, tablet, and even laptop meeting this standard. Some of those companies includes ECOM, Honeywell, Motorola etc. Therefore, if you design a solution for use in Hazardous areas that requires intrinsically-safe equipment, forget about iOS.
  • Online only vs Offline support: Here I’m only talking about Maximo Everyplace versus Maximo Anywhere. From Maximo version 7.6, Everyplace become a built-in feature. As such, it doesn’t cost anything to use. The process to produce a simplified app by duplicating an existing Maximo application then modify it to fit into small mobile  screen and to do a specific task generally takes only a few hours to a few days maximum. The users who are already familiar with Maximo will virtually don’t need any training at all. As such, if working environment has available wireless LAN or 3G/4G internet connection (which is pervasive and very cheap now), you should go for this solution, it’s a no-brainer. However, in certain conditions, stable connection is not always available, such as inside deep tunnel for infrastructure company or inside confined-space/basement of a large building. In this case, we need to use Anywhere to support offline/online working mode. However, let’s be realistic here. Do your field workers really need to use Maximo app when going in a confined space? In a client who I had chance to work with recently, they said they need offline solution because Everyplace won’t work inside underground tunnels. I went around to check and found out that in most areas inside underground tunnels, 4G network is fast and stable. Some areas may have poor signal. But with standard work order process, we generally only need access to the app to check-in when starting the work, and to check-out after the work is done. In this case, identify and designate several safe areas where network connection is available to check-in and check-out would do the job. With the widespread of 3G/4G repeaters installed by network companies,
    you might not realize that 3G/4G network is now available in many areas
    where it was not possible before like inside tunnels, underground train
    stations, or parking basements of big buildings.

          For other applications such as asset audit/inspection, where users need to use the app to scan the equipment or check-point, if network connection is unstable, offline solution will be required. 

    Maximo Anywhere is a great offline solution because it provides very smooth experience when transition between online/offline working mode. However, it comes with a price. It is very expensive in term of license fee. It is also a complex platform that requires MobileFirst development skills to configure/customize. Keep in mind that this is still a relatively new solution and not widely proven in the industry, especially when it comes to integration with other 3rd party hardware/software. However, IBM team have been moving really fast with the development of this solution. In the past few year, the solution has seen considerable improvement and level of adoption by the asset management community. So kudos for IBM R&D team for this progress.
    Considering the significant cost of Anywhere product, we should carefully survey the work environment and take these aspects into account when considering the two solutions.

  • IBM Mobility vs 3rd Party Solutions: When it comes to mobility solutions for Maximo, most people immediately think of IBM’s mobility solutions which includes Maximo Mobile Suites (gone), Maximo Everyplace, and Maximo Anywhere. However, to make objective evaluation, one must go further than that to evaluate 3rd party mobility solutions such as EzMaxMobile, Datasplice, Syclo Work Manager (now SAP), and many other lesser known custom-built systems. (eLogBook mobile is one of such solutions which I and my team built when working for Avenue Business Solutions). The advantage of IBM mobile solutions is that they are open platform. Therefore, any Maximo consultant with the right skill can customize the apps without IBM’s restriction as long as the users have the right license (which can be very expensive). The problem with IBM solutions is that they don’t always work in practice (e.g. the notorious Maximo Mobile Suites), too complex (Anywhere/MobileFirst solutions), having limited support from IBM (tickets generally take months to resolve or not resolved at all), or having limited material available for developers to customize/integrate. Gartner over the last several years have been putting IBM mobility solution under the “Cautions” section. Only in the recent 2017 report they say something a bit more positive about it which reflects recent development in IBM Mobile First strategy and the Anywhere solution . Third-party vendors on the other hand usually have consultants available to come in and guide clients to design process and implement their product properly and with much lower cost. They are usually smaller companies with dedicated people working in mobility space, as such they can provide a much better integrated solution with proven integration modules, software, hardware options and best practice recommendation for processes. Mobile apps provided by 3rd party companies can be less customizable than IBM’s product, and client usually have to rely directly to the vendor to provide 3rd level support, but they are usually very well designed to achieve high efficiency and smooth user experience. Overall, implementing these solutions are usually much more cost effective, provide better ROI, and client usually see much higher success rate.
« Older posts Newer posts »