Category: Import

The fun and pain of Kronos Integration

Introduction

One of our clients undertook a massive IT transformation program which involved switching to a new financial management system, upgrading and rebuilding a plethora of interfaces among several systems, both internal and external to the business. Kronos (now UKG) was chosen to replace an old timesheet software and there was the need to integrate it with other systems such as Maximo and TechnologyOne.

WebMethods was used as the integration tool for this IT ecosystem. This is my first experience working with Kronos. The project took almost two years to finish. As always, when dealing with something new, I had quite a bit of fun and pain during this project. As it is approaching the final stage now, I think I should write down what I have learned. Hopefully, it will be useful for people out there who are doing a similar task.

The REST API

Kronos provides a fairly good reference source for its REST API. Theoretically, it offers the advantage of supporting real-time integration and enables seamless workflow. However, we don’t have such a requirement in this project. On the other hand, this has two major limitations.

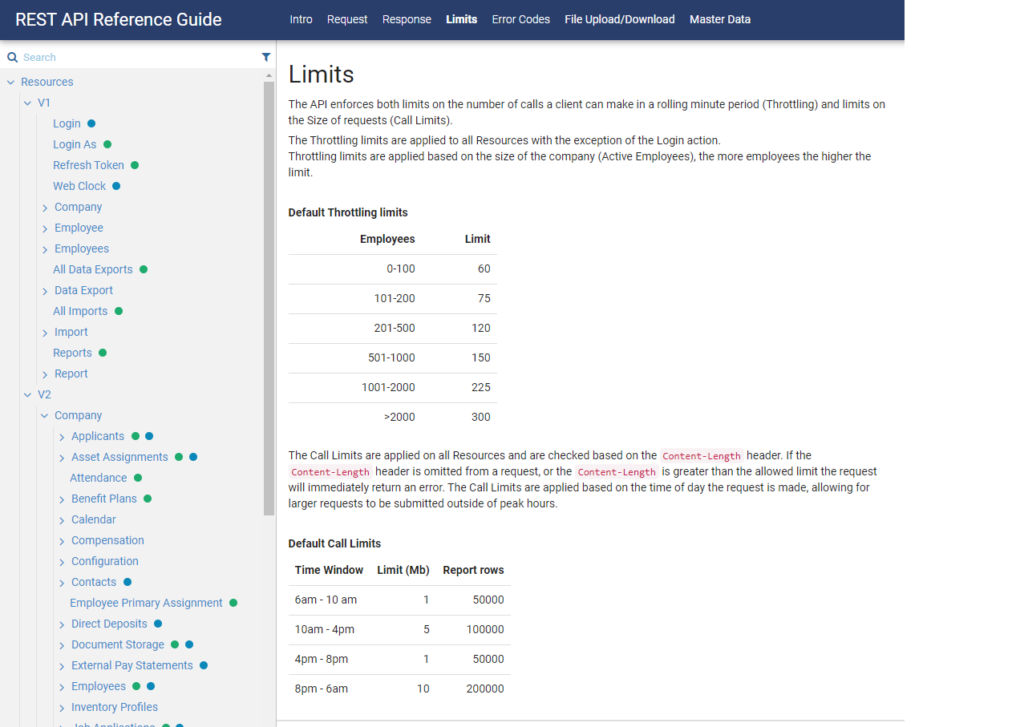
  • API throttling limit: it restricts the number of calls you can make based on the license purchased.
  • Designed for Internal Use: it is obvious to me that the API was built for internal use of the application. It is not built for external integration.

No one told us about this when we first started. As a result, we hit several major obstacles along the way:

First, most API calls will need to be method specific. For example, Cost Center requests need to be either Create New, Update, or Move. There is no Sync or Merge operation. The Update and Move requests will accept Kronos’ Internal ID only. When sending an Update or Move request, we need to send another request first to retrieve the Internal ID of a record.

Cost Center has a simple structure with a few data fields. However, to get it to work, we had to build some complex logic to query Kronos to check whether the record exists (and the parent) to send in the appropriate Create New, Update or Move request.

This is not a major problem until the API Limit is added to the equation. If Kronos receives more than certain number of requests over a given period, it will stop processing other requests. In other words, the whole integration system is out-of-service. We had to build a caching mechanism to pre-load and refresh the data at a suitable time so that the number of requests sent to Kronos is kept at minimal. This adds a lot of complexity to an otherwise simple interface.

Kronos API Throttling Limit

With a more complex data structure, such as the Employee master data, if we use the REST API, it is impossible to build an interface that is robust enough for a large scale, high-volume system. We had to build complex business logic in WebMethods to handle all sort scenarios and exceptions that could occur. The process to create a new employee record can result in more than a dozen different requests to check existing data and lookup for Internal ID of different profiles such as Security, Schedule, Timesheet, Holiday, and Pay Calculation Profiles, then send in the Create New/Update requests in the correct order, ensure proper handling of exception and roll back if one request fails due to various reasons.

The Report API

Kronos provides a REST API to execute reports. Besides from the out-of-the-box capability, it is possible to build custom API for reporting too. This is useful to alleviate some of the problems with the API throttling limit.

For example, we have an interface to send organisation hierarchy (departments and job positions) to Kronos as Cost Centers. The source system, TechnologyOne in this case, would periodically export its whole data set to a CSV file. We only need to query Kronos to determine if the record exists to either send a Create or an Update request. If the record has a new change, we need to send an Update and/or a Move requests. In this case, we used the Report API to retrieve the full set of Cost Center in one single call rather than having to make thousands of individual cost centre detail requests.

The Import API

The Import API turned out to the best way to send data to Kronos. We learnt it the hard way. It has some minor limitations such as:

  • Some APIs use description to identify a record instead of an ID
  • Documentation sometimes is not accurate.

However, the Import API provides some powerful capability for sending external data to Kronos:

  • Support bulk upload operation
  • Auto matching with existing records – does not require querying for Internal ID
  • Support “merge” operation – automatically decide whether to create new or update depending on whether a record already exists or not

Since this is an asynchronous operation, and the time it takes to process inbound data depends on the volume. We need to build a custom response handler to continuosly checking with Kronos after a deliver to retrieve the status of an import job to handle Success or Failure result. This custom response handling takes some extra effort to build, but it is reuseable for all import endpoints.

As an example, with the Employee interface above, at some point, it became too complex and a maintenance nightmare for us. We had to rebuild it from scratch using the Import API and we were glad that we did. It greatly simplified the interface, and the business is now very confident of its robustness.

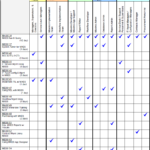
List of Import APIs which can be seen after logged in to Kronos

Conclusion

If I need to build a new integration interface with Kronos now, for retrieving data from Kronos and sending it to another system, I will start with using Reports (via the Report API) to identify new updates, then use the REST API to retrieve details of individual records if it is required. For sending data to Kronos, I would look at the Import API first. I will only go for the REST API if the Import API cannot do what I want and only if the request is simple and low volume.   

How to generate DBC Script for Maximo? (2023)

This post includes some of my notes on using DBC for the deployment of Maximo’s configuration. In case you wonder why using DBC, the short answer is if you’re happy with whatever method you’re using to deploy configuration, whether it is manual or using Migration Manager, ignore this post. But if you’re looking for a way to streamline the development process for a large team by collaborating and source controlling using GIT, or if you want to fully automate the deployment process, DBC is the way to go.

IBM has been using DBC script for a long time, but only recently, they published a
reference guide so 3rd party consultants like us can use it. DBC Script can be used to automate most of the common configuration for Maximo. It has standard commands to create/modify common low-level objects like tables, indexes, domains etc. For many other configurations that don’t have a specific DBC command, we still can handle the deployment using the <freeform> or <insert> statement to put anything into Maximo DB. Below are some specific notes on certain types of changes:

DB Configuration and System Objects:

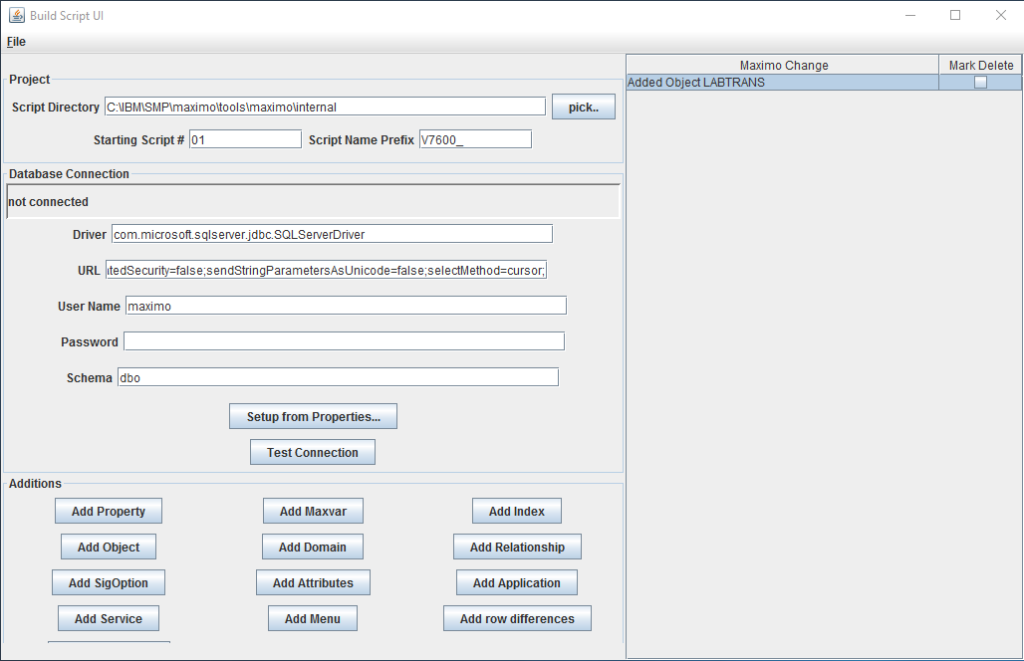
Operations to add/modify many low-level objects like tables, views, maxvars… are available as DBC commands. However, manually writing all of the scripts can be laborious. We can instead make the changes from Maximo’s front end, then generate a DBC script for the changes by using the ScriptBuilder.bat tool (found under tools/maximo/internal). Simply add the objects you want to generate script, then choose File > Generate Script. The script file will be created in the same folder:

Application Design

The standard method to export/import XML files using App Designer is simple enough and suitable for version control. However, if we want to fully automate the deployment process (for CI/CD) we can export the changes to DBC script using the mxdiff.bat tool (found under tools/maximo/screen-upgrade). For example, if we add a new column to the List tab of the Work Order Tracking app, we can export the XML files of the before and after versions of the app. Copy the two files into the screen-upgrade folder and execute this command: 

mxdiff.bat -bWOTRACKOLD.XML -mWOTRACKNEW.XML -t001.mxs

It will produce the script as shown in the image below. (Do note that the extension for changes in app layout design should be .mxs instead of .dbc)

Automation Script

For simple manual deployment, I still prefer to use the Import/Export function as it is very convenient. Note that the permission to see the Import/Export buttons is not granted to maxadmin by default. Thus, you have to give it to the maxadmin security group first.

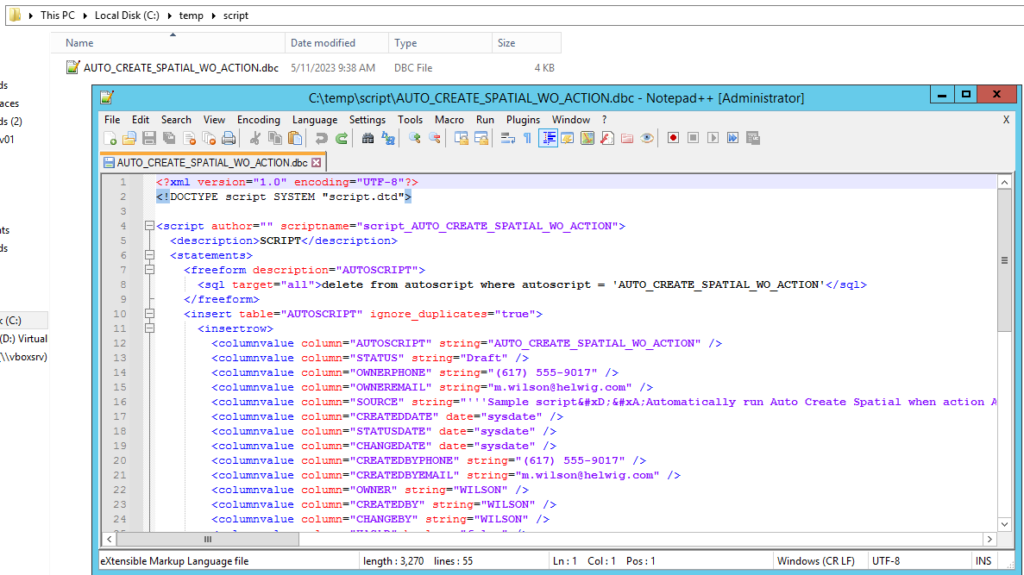
However, if we need to generate DBC for automated deployment, we can use the following approach. First, create an automation script called GENDBC with the source code below:

Now, whenever we need to generate a DBC file for an automation script, execute the GENDBC tool above by calling it from a browser:

https://[MAXIMO_HOST]/maximo/oslc/script/gendbc?source=SCRIPT&name=[YOUR_SCRIPT_NAME]

The output DBC file will be created in the /script folder, under your Integration Global Directory (specified in the mxe.int.globaldir system property)

Note: I recently found out this approach doesn’t work with Oracle database. It gave me the error below. In the project I worked with, we used a tool created by someone else and I can’t share it here. If you’re using Oracle, you can try the tool created by Jason @ Sharptree.

Invalid column type: getString/getNString not implemented for class oracle.jdbc.driver.T4CBlobAccessor

Integration Artifacts

To generate DBC script for integration artifacts such as Object Structure, JSONMAP, Publish Channel etc., we can also use the GENDBC tool mentioned above. For example:

  • To extract Object Structure, run the script with the following parameters:
https://[MAXIMO_HOST]/maximo/oslc/script/gendbc?source=MEA&name=[OBJECT_STRUCTURE_NAME]
  • To extract Publish Channel:
https://[MAXIMO_HOST]/maximo/oslc/script/gendbc?source=MEA&pubChannel=[PUBLISH_CHANNEL_NAME]
  • To extract Enterprise Service:
https://[MAXIMO_HOST]/maximo/oslc/script/gendbc?source=MEA&entService=[ENT_SERVICE_NAME]
  • To extract JSON Mapping:
https://[MAXIMO_HOST]/maximo/oslc/script/gendbc?source=JSONMAP&name=[JSONMAP_NAME]

The output files for Object Structure, Publish Channel, and Enterprise Service will be in the [GlobalDir]/mea folder. And the output for JSONMAP will be in the [GlobalDir]/jsonmap folder

Other configurations

For many other configurations such as escalation, messages, workflow etc., there is no standard DBC command to create or modify those objects. However, all such configurations are stored inside Maximo’s database and if we can export and then import the correct data to the target environment, it would work well (some objects will require a Maximo restart to refresh the cache). The easiest method is to use the geninsertdbc.bat tool. To use it, we simply have to give it a table name and a where clause, it will generate the data found as DBC insert statements.

For example, to export all rows of the table MAXINTOBJECT for the object structure ZZWO we can run the command below:

geninsertdbc.bat -tMAXINTOBJECT -w"INTOBJECTNAME='ZZWO'" -fOUTPUT

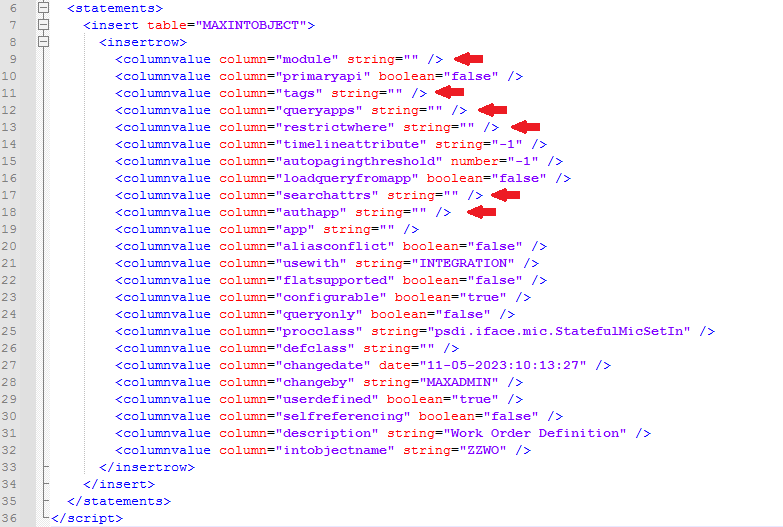
The output file will look like below:

Note:This tool has one problem. It generates Null value as an Empty string. Thus, it could cause errors in certain logic that requires the value to be Null such as when using mbo.isNull(“FieldName”). I found it worked most of the time for me, but it did cause me some headaches in a few instances. To fix it, we can delete these lines from the generated DBC script or add another UPDATE SQL statement to correct it. I now only this tool for simple configurations. For a more complex configuration data, I use Oracle SQL Developer or SQL Server Management Studio to generate the INSERT statement instead

The main tables that contain configuration for some common objects are
listed below:

  • Escalation: ESCALATION, ESCREFPOINT
  • Cron Task: CRONTASKDEF , CRONTASKINSTANCE
  • Workflow: WFPROCESS, WFNODE, WFASSIGNMENT
  • Saved Query: QUERY
  • Start Center Template: SCTEMPLATE

Note: for Start Center and Result sets to be displayed correctly, there are other dependent objects that need to be migrated such as Object Structure, security permission etc.

How to bulk upload images via the Integration Framework?

In the previous post, I provided an example of how we can customise Object Structure to enable import/export of binary data via MIF. It is achieved with Java customisation. From Maximo version 7.6, the automation scripting framework has been greatly extended to support integration. With this update, we can enable import/export of binary data with a simple automation script. Below is an example of how we can configure Maximo 7.6 to bulk upload images to Item Master application:

Step 1: Add a new Object Structure

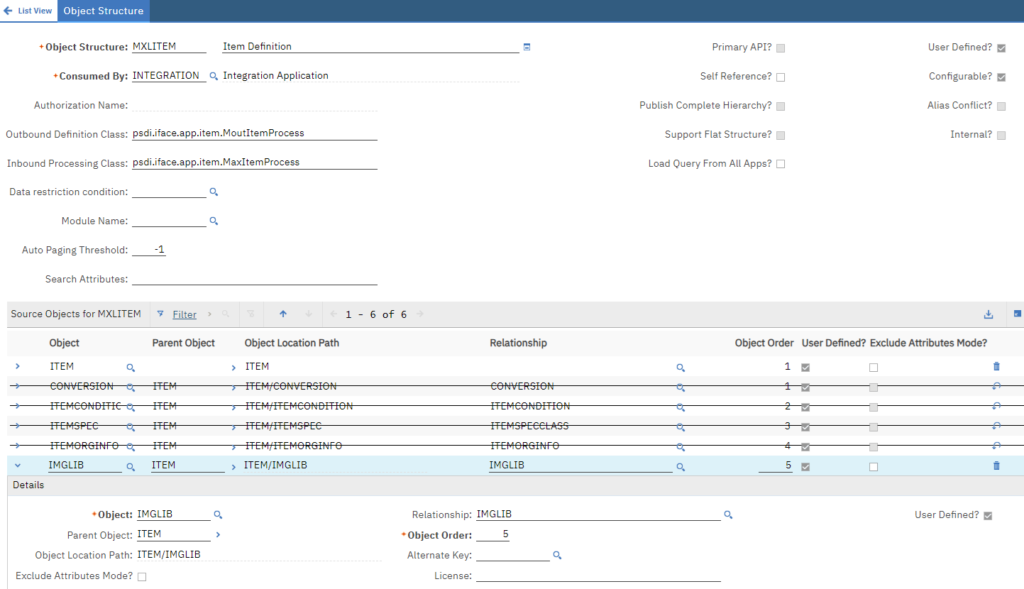
  • In the Object Structures application, Open and duplicate the MXITEM object structure to create a new one. Name it MXLITEM
  • Under “Source Objects for MXITEM”, delete all child objects, and add a new child object IMGLIB as shown below

Step 2: Add an Integration Automation Script

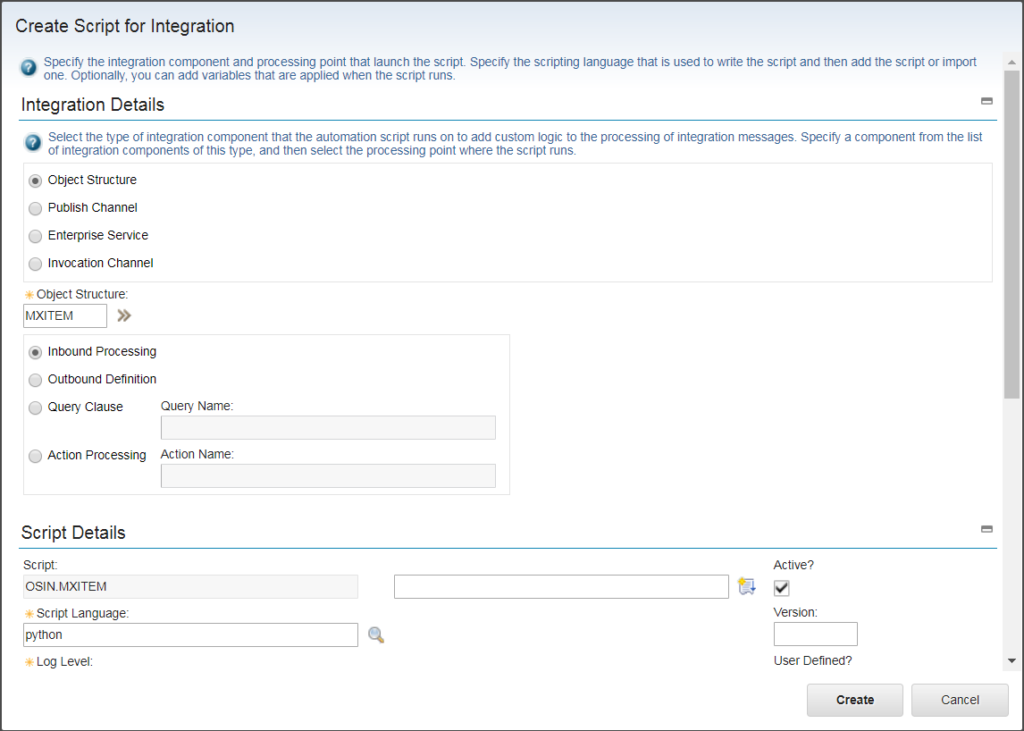
  • In the Automation Script application, choose Action > Create > Script for Integration
  • In the pop-up, enter the following  details:
    • Select “Object Structure”, choose “MXLITEM” for Object Structure
    • Select “Inbound Processing
    • Language: Python
    • Copy/paste the piece of code below to the  Source Code area.

Step 3: Upload images to Item Master

Download the Excel VBA tool in this GitHub repo. Use it bulk upload images to Item Master:

  • Upload the Settings page with the URL and the username/password to connect to Maximo
  • Put all the image files in the same folder as the Excel file
  • Update the Data sheet with the list of Item Number and the name of the image file.
  • Click on “Upload Images”

Notes & Updates

Note 1: be careful with photos taken from newer cameras, the files usually have high resolution and thus can be quite big. I’ve seen an eager team of engineers upload images for all assets and inventory items in a power plant, and overnight, the database grew from 1GB to 20 GB. Thus make sure you resize the images before uploading.

One quick and simple method in Windows is to select multiple files, then right-click, and choose Send To > Mail Recipient. Windows will give you a pop-up to resize the files, choose the smallest size (640×480). Windows will resize the files, then attach them to Outlook, in Outlook, select all the files, and copy/paste them to a different folder. These files will be much smaller than the original, full-resolution files.

Update Aug/2023: I have posted a new article on how to automatically rescale the image to a smaller size

Import/Export Maximo ImageLib Data via Integration Framework

In Maximo, we can upload images as attachments (DOCLINKS) which are stored as files on the server or as “profile” images which are stored as binary data inside the IMAGELIB table. Profile image is quite useful to give the user a quick view of what an inventory item or an asset/location looks like.

While Maximo allows us to upload DOCLINKS attachments via the Maximo Integration Framework (MIF), uploading images to the IMAGELIB table via MIF is not supported out-of-the-box. Therefore, to upload images, we can only do it manually one by one via the Maximo UI.

For bulk loading, if we have access to the DB server, we can write a stored procedure to read the files and import binary data directly to the database. There are two scenarios I had in the past in which this
approach doesn’t work

  • When we built mobile apps and wanted to upload data to IMAGELIB. In that case, my teammate extended a REST handler class to achieve this requirement.
  • When we needed to bulk upload images, the client did not give us access to the database

To address this requirement, we can extend the process classes of object structure (OS) to encode/decode binary data into Base64 string to deliver the data via XML or JSON format. Since this processing is done on object structure, it will support both application Import/Export and sending/receiving binary data via the integration framework’s MEAWEB API or JSON API.

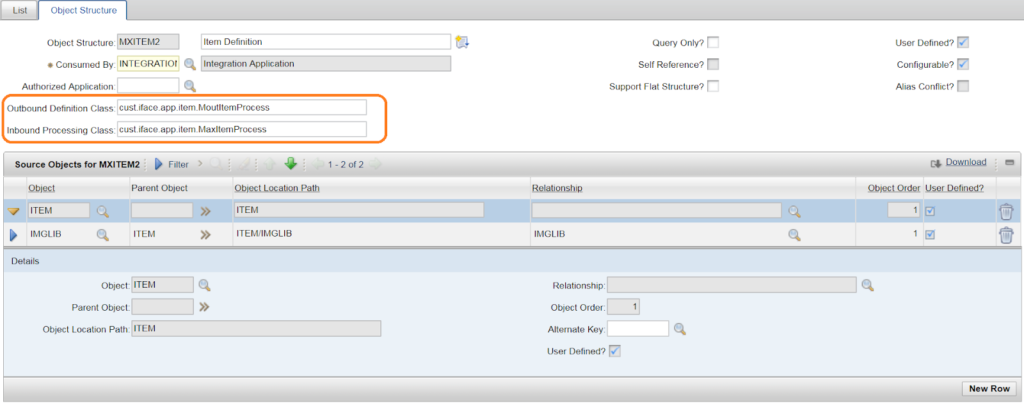
To encode binary data to Base64 text string before exporting OS data, we can extend MicSetOut.class and associate it to the OS by specifying the class’s path in the “Outbound Definition Class” field. Below is the sample Java code which exports Item master data with Image:

To decode base64 string back to binary data before storing it to IMAGELIB table, we can extend the MicSetIn.class and associate it to the OS by specifying the class’s path in the “Inbound Processing Class” field. Below is the sample Java code:

Once we have the customized classes in place, it is possible to Export/Import ImageLib data using XML format or via web services. It is also quite easy to write a simple Excel/VBA program to bulk upload images via MIF without the need to have direct access to the DB server. But these are different topics and perhaps, I’ll provide examples in other future posts.