In previous posts, we have practised how to create a JSP page, register it as a component, and register a control. We also discussed how to pass properties from the control to its components and use it with conditional UI.
In this post, I will provide an example to build a chart control to display meter data of an asset.

Step 1 – Let’s start by creating our basic control:
- Create a “customchart.jsp” file with the following lines and place it inside the folder “maximo/ applications/ maximo/ maximouiweb/ webmodule/ webclient/ components”
- Register the JSP file as a component by creating a “customchart-component-registry.xml” file and place it inside folder “maximo/ applications/ maximo/ properties/ registry-extensions”
- Register a control using the component we just created by creating a “customchart-control-registry.xml” file in the same registry-extensions folder
- Build EAR file, Deploy, and Start Maximo server. (Note: for a development environment, if you place these files directly to the EAR package in Websphere’s installedApps folder, you only need to restart Maximo server to register the new control and component. After that, any change to JSP
file doesn’t need a restart) - Export Asset application and edit the application design XML file to add the new control above the Assetnum multipart textbox control:
- Open the Asset application and we should see our new control with the placeholder text as in the following image:

Step 2 – Replace our placeholder text with a dummy line chart
- Modify “customchart.jsp” to display a line chart with dummy data, and use the property to resize our control instead of using hard-coded value:
- Examine the code, you will notice that we use a few variables such as “component”, “dojo” without declaring them. It is because there are commonly used variables and libraries which have been declared or imported in the “componentheader.jsp” file we included when defining our component. You can examine this file to find out about other variables that you can use. One such is the “s” variable, which is an MXSession instance, which I will use later to query data from the Maximo database.
- Edit our Asset application XML file to specify the size of our custom control by adding the width and height property: <customchart id=”cust_chart_1″ dataattribute=”assetnum” width=”250″ height=”150″ />.
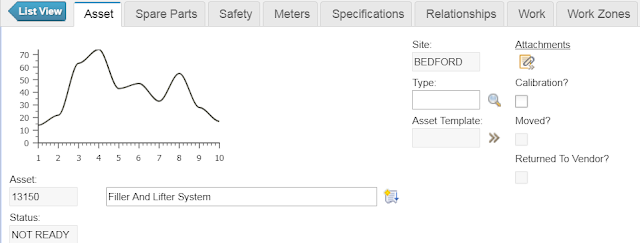
- Open the Asset application, and it should show a chart with dummy data as follows:

Step 3 – Update “customchart.jsp” display actual meter data:
- Using the MXSession instance variable “s” to retrieve meter data from the database: MboSetRemote readingsSet = s.getMboSet(“MEASUREMENT”);
- For the sake of simplicity, I hardcoded the query to display data of the “O-PRESSUR” meter from Asset “11450”. This is standard Maximo Mbo Java code. If you are already familiar with this, you will have no problem handling more complex requirements to display correct information here. (If you are not familiar with Maximo Mbo Java, you can learn the basics from Bruno’s blog)
- After retrieving the MboSet, we get the meter data and put it into an array in JSON format to pass it to Javascript which is processed at the client side by the browser to feed into our DOJO chart.
- Below is the full code of the customchart.jsp file:
- Re-arrange the layout a bit using application designer, we should be able to show the pressure chart of the pump on the main asset screen:

So there it is. I hope this series provides you with basic information to start playing with Maximo custom control and enables you to make Maximo more useful to your organisation or clients.


Hi, I made very simple component in maximo.
Displaying the ID of the current record in it. Everything works, but when you move to a new record with an arrow, the component does not refresh. How to force refresh? In link below I put code of my example component:
https://pastebin.com/9PTtSZyF
Thanks in advance for help!
Your component should be bound to some attribute. Have a look here.
http://www.maximoaddons.com/blog/creating-custom-progress-bar-control-for-ibm-maximo-using-the-twitter-bootstrap-framework.html
Hi, thank's for reply. I made component based on this tutorial too but it also doesn't refresh 🙁
For me it took lots of retries. May be try just creating that progress bar then you might be able to move forward from there
Hello, what if you had a requirement to input data in your custom control, say have a couple of input='text' and have a button to process that data server side. How would you go about that?
Hello Tokkellos, I haven't got chance to figured it out. All of the real implementation I did were to display data, not to post data back to application server for processing. For this requirement, probably I'll re-use the existing core components (e.g. textbox) to create a new custom control, just to re-arrange the layout of the inputs as per requirement. For behavior of the input, re-using existing code seems to be the best bet.
This is a neat idea.
A related RFE here:
https://ibm-ai-apps.ideas.ibm.com/ideas/CONFIG-I-5
You can read [the full answer on the IBM Maximo forum][1]. My takeaways from the answer are:
1. The control registry must define the datasrc and dataattribute properties and pass @{dataattribute} to the component.
2. The component registry must define the dataattribute and defaultrender properties.
3. The component JSP needs to inject the value of the "dataattribute" using <%=boundComponent.getString()%>.
Links:
[1]: https://community.ibm.com/community/user/iot/communities/community-home/digestviewer/viewthread?GroupId=727&MessageKey=f3a25416-2aa7-4080-9f3e-28efff554343&CommunityKey=3d7261ae-48f7-481d-b675-a40eb407e0fd&ReturnUrl=%2fcommunity%2fuser%2fiot%2fcommunities%2fcommunity-home%2fdigestviewer%3fcommunitykey%3d3d7261ae-48f7-481d-b675-a40eb407e0fd%26tab%3ddigestviewer
Pingback: Federated MBO / JSON Resource – Filling the gap between Maximo and IoT